> ## Documentation Index
> Fetch the complete documentation index at: https://docs.wandb.ai/llms.txt
> Use this file to discover all available pages before exploring further.
# ログ軸をカスタマイズする
> デフォルトの W&B step カウンターではなく、define_metric() を使用して、ログしたメトリクスにカスタム x軸 を設定します。
メトリクスを W\&B にログするときに、カスタム x軸 を設定できます。デフォルトでは、W\&B はメトリクスを *steps* としてログします。各 step は `wandb.Run.log()` API call 1 回に対応します。
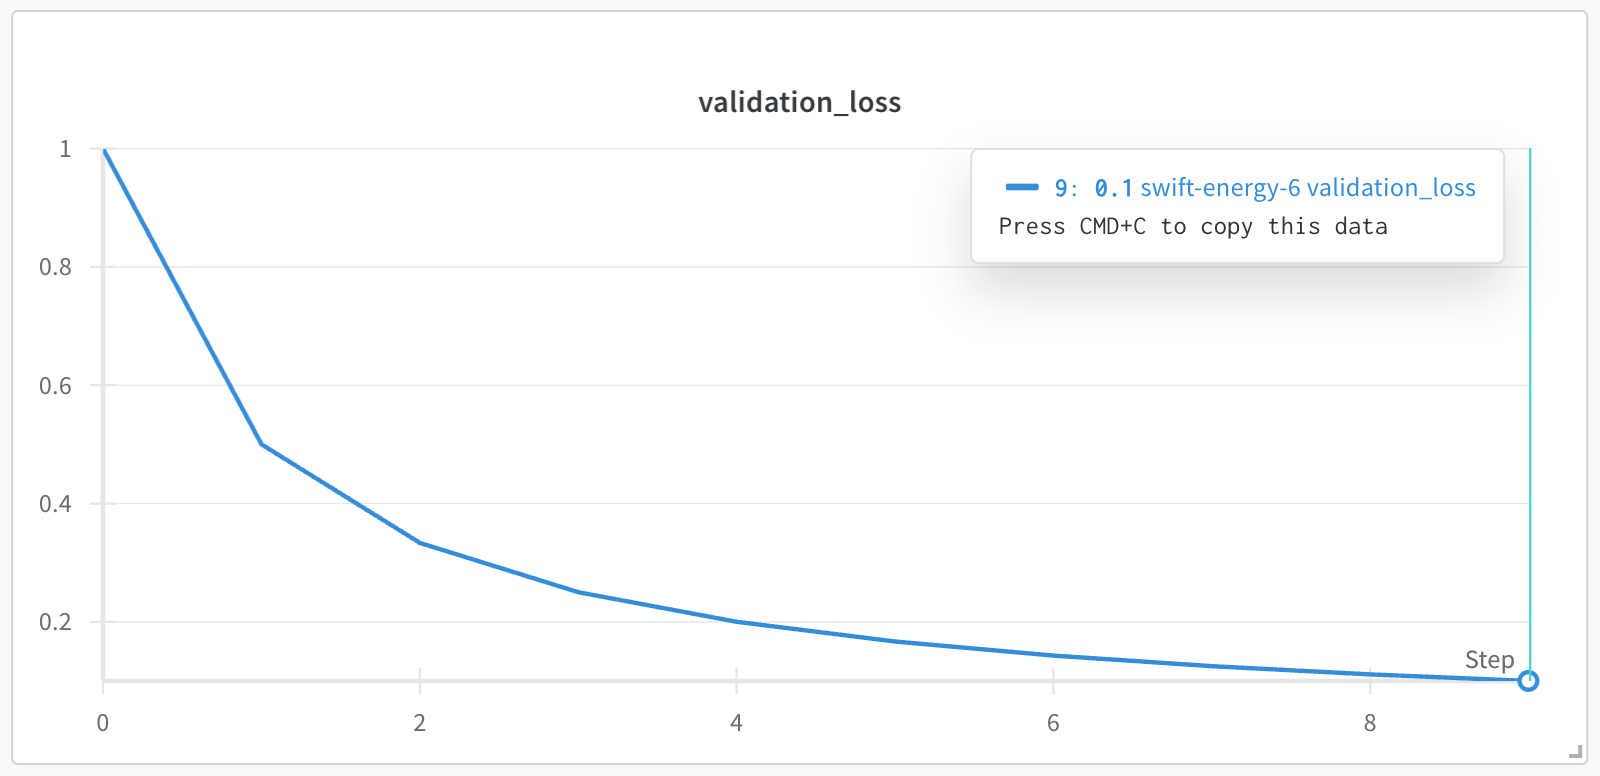
たとえば、次のスクリプトには 10 回繰り返す `for` ループがあります。各反復で、スクリプトは `validation_loss` というメトリクスをログし、step 番号を 1 ずつ増やします。
```python theme={null}
import wandb
with wandb.init() as run:
# range関数は0から9までの数列を生成する
for i in range(10):
log_dict = {
"validation_loss": 1/(i+1)
}
run.log(log_dict)
```
プロジェクトのWorkspaceでは、`validation_loss` メトリクスが x軸 `step` に対してプロットされます。`step` は `wandb.Run.log()` が呼び出されるたびに 1 ずつ増加します。前のコード例では、x軸に step 番号 0、1、2、...、9 が表示されます。
 状況によっては、対数 x軸など、別の x軸に対してメトリクスをログしたほうが適切な場合があります。[`define_metric()`](/ja/models/ref/python/experiments/run/#define_metric) method を使用すると、ログした任意のメトリクスをカスタム x軸として使用できます。
`name` パラメーターには y軸に表示するメトリクスを指定します。`step_metric` パラメーターには、x軸として使用するメトリクスを指定します。カスタムメトリクスをログする場合は、辞書内で x軸と y軸の両方の値をキーと値のペアとして指定してください。
次のコードスニペットをコピー&ペーストして、カスタム x軸メトリクスを設定します。`<>` 内の値はご自身の値に置き換えてください。
```python theme={null}
import wandb
custom_step = "" # カスタムx軸の名前
metric_name = "" # y軸メトリクスの名前
with wandb.init() as run:
# stepメトリクス(x軸)とそれに対してログするメトリクス(y軸)を指定する
run.define_metric(step_metric = custom_step, name = metric_name)
for i in range(10):
log_dict = {
custom_step : int, # x軸の値
metric_name : int, # y軸の値
}
run.log(log_dict)
```
例として、次のコードスニペットでは、`x_axis_squared` というカスタム x軸 を作成します。カスタム x軸 の値は、for ループのインデックス `i` の二乗 (`i**2`) です。y軸 は、Python 組み込みの `random` モジュールを使用した検証損失 (`"validation_loss"`) のモック値で構成されます:
```python theme={null}
import wandb
import random
with wandb.init() as run:
run.define_metric(step_metric = "x_axis_squared", name = "validation_loss")
for i in range(10):
log_dict = {
"x_axis_squared": i**2,
"validation_loss": random.random(),
}
run.log(log_dict)
```
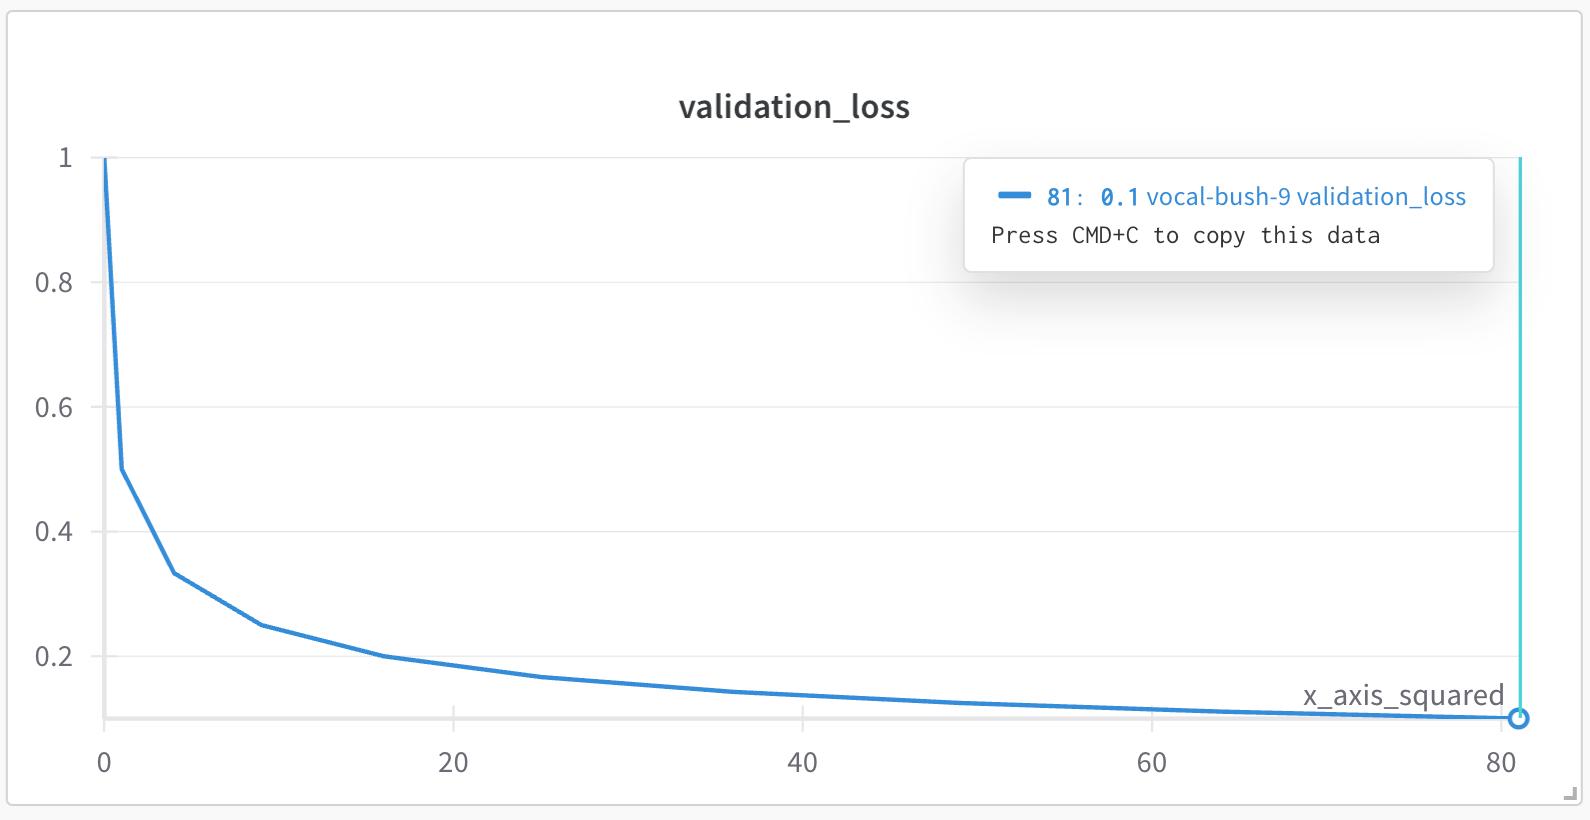
次の画像は、W\&B App UI に表示される結果のプロットを示しています。`validation_loss` メトリクスはカスタム x軸 `x_axis_squared` に対してプロットされており、これは for ループのインデックス `i` を二乗した値です。x軸 の値は `0, 1, 4, 9, 16, 25, 36, 49, 64, 81` で、それぞれ `0, 1, 2, ..., 9` の二乗に対応しています。
状況によっては、対数 x軸など、別の x軸に対してメトリクスをログしたほうが適切な場合があります。[`define_metric()`](/ja/models/ref/python/experiments/run/#define_metric) method を使用すると、ログした任意のメトリクスをカスタム x軸として使用できます。
`name` パラメーターには y軸に表示するメトリクスを指定します。`step_metric` パラメーターには、x軸として使用するメトリクスを指定します。カスタムメトリクスをログする場合は、辞書内で x軸と y軸の両方の値をキーと値のペアとして指定してください。
次のコードスニペットをコピー&ペーストして、カスタム x軸メトリクスを設定します。`<>` 内の値はご自身の値に置き換えてください。
```python theme={null}
import wandb
custom_step = "" # カスタムx軸の名前
metric_name = "" # y軸メトリクスの名前
with wandb.init() as run:
# stepメトリクス(x軸)とそれに対してログするメトリクス(y軸)を指定する
run.define_metric(step_metric = custom_step, name = metric_name)
for i in range(10):
log_dict = {
custom_step : int, # x軸の値
metric_name : int, # y軸の値
}
run.log(log_dict)
```
例として、次のコードスニペットでは、`x_axis_squared` というカスタム x軸 を作成します。カスタム x軸 の値は、for ループのインデックス `i` の二乗 (`i**2`) です。y軸 は、Python 組み込みの `random` モジュールを使用した検証損失 (`"validation_loss"`) のモック値で構成されます:
```python theme={null}
import wandb
import random
with wandb.init() as run:
run.define_metric(step_metric = "x_axis_squared", name = "validation_loss")
for i in range(10):
log_dict = {
"x_axis_squared": i**2,
"validation_loss": random.random(),
}
run.log(log_dict)
```
次の画像は、W\&B App UI に表示される結果のプロットを示しています。`validation_loss` メトリクスはカスタム x軸 `x_axis_squared` に対してプロットされており、これは for ループのインデックス `i` を二乗した値です。x軸 の値は `0, 1, 4, 9, 16, 25, 36, 49, 64, 81` で、それぞれ `0, 1, 2, ..., 9` の二乗に対応しています。
 文字列プレフィックス付きの `globs` を使用すると、複数のメトリクスに対してカスタム x軸 を設定できます。たとえば、次のコードスニペットでは、プレフィックス `train/*` を持つログされたメトリクスを x軸 `train/step` にプロットしています.
```python theme={null}
import wandb
with wandb.init() as run:
# 他のすべての train/ メトリクスにこの step を使用するよう設定する
run.define_metric("train/*", step_metric="train/step")
for i in range(10):
log_dict = {
"train/step": 2**i, # W&B 内部 step に対して指数的に増加
"train/loss": 1 / (i + 1), # x軸は train/step
"train/accuracy": 1 - (1 / (1 + i)), # x軸は train/step
"val/loss": 1 / (1 + i), # x軸は wandb 内部 step
}
run.log(log_dict)
```
文字列プレフィックス付きの `globs` を使用すると、複数のメトリクスに対してカスタム x軸 を設定できます。たとえば、次のコードスニペットでは、プレフィックス `train/*` を持つログされたメトリクスを x軸 `train/step` にプロットしています.
```python theme={null}
import wandb
with wandb.init() as run:
# 他のすべての train/ メトリクスにこの step を使用するよう設定する
run.define_metric("train/*", step_metric="train/step")
for i in range(10):
log_dict = {
"train/step": 2**i, # W&B 内部 step に対して指数的に増加
"train/loss": 1 / (i + 1), # x軸は train/step
"train/accuracy": 1 - (1 / (1 + i)), # x軸は train/step
"val/loss": 1 / (1 + i), # x軸は wandb 内部 step
}
run.log(log_dict)
```