Try in Colab
Sweeps: 概要
Weights & Biases を使ったハイパーパラメータ探索 run はとても簡単です。以下のシンプルな3ステップで行います:- スイープの定義: 検索するパラメータ、検索戦略、最適化メトリクスなどを指定する辞書またはYAMLファイルを作成します。
-
スイープの初期化: 1行のコードでスイープを初期化し、sweep 設定の辞書を渡します:
sweep_id = wandb.sweep(sweep_config) -
スイープエージェントの実行: こちらも1行のコードで完了し、
wandb.agent()を使ってsweep_idを渡し、モデルアーキテクチャーを定義してトレーニングする関数と共に実行します:wandb.agent(sweep_id, function=train)
始める前に
W&B をインストールし、W&B Python SDK をノートブックにインポートします:!pip installを使用してインストールします:
- W&B をインポートします:
- W&B にログインし、プロンプトが表示されたら APIキー を提供します:
ステップ 1️: スイープを定義する
W&B スイープは、ハイパーパラメータ値を試行するための戦略と、それを評価するコードを組み合わせたものです。 スイープを開始する前に、スイープ戦略を_スイープ設定_で定義する必要があります。Jupyter ノートブックでスイープを開始する場合、スイープ設定はネストされた辞書でなければなりません。コマンドラインでスイープを行う場合は、YAMLファイルでスイープ設定を指定する必要があります。
検索メソッドの選択
最初に、設定辞書内でハイパーパラメータ検索メソッドを指定します。選べるハイパーパラメータ検索戦略は、グリッド、ランダム、ベイズ探索です。 このチュートリアルでは、ランダム検索を使用します。ノートブック内で辞書を作成し、method キーに対して random を指定します。
検索するハイパーパラメータの指定
スイープ設定で検索メソッドが指定されたので、検索したいハイパーパラメータを指定します。 これを行うには、parameter キーに1つ以上のハイパーパラメータ名を指定し、value キーに1つ以上のハイパーパラメータ値を指定します。
特定のハイパーパラメータに対して検索する値は、調査しているハイパーパラメータの種類に依存します。
例えば、機械学習オプティマイザーを選択した場合、Adam オプティマイザーや確率的勾配降下法など、1つ以上の有限のオプティマイザー名を指定する必要があります。
epochs が1に設定されています。
random 検索の場合、
特定の run で選ばれるパラメータのvaluesは均等に確率が分布しています。
あるいは、
特定のdistributionを指定し、
例えばnormal 分布の平均muと標準偏差sigmaをパラメータとして指定することもできます。
sweep_configは、試してみたいparametersを具体的に示したネストされた辞書で、
それらを試すためのmethodを指定します。
次に、スイープ設定がどのように見えるかを確認しましょう:
可能性のある無限の選択肢を持つハイパーパラメータの場合
選択した少数の
valuesを試してみるのが通常意味があります。例えば、先のスイープ設定では、layer_sizeおよびdropoutパラメータキーに対して限定された値のリストが指定されています。ステップ 2️: スイープの初期化
検索戦略を定義したら、それを実装するための準備をします。 W&Bは、クラウドまたはローカルで複数のマシンにわたってスイープを管理する Sweep Controller を使用します。このチュートリアルでは、W&Bにより管理されるスイープコントローラを使用します。 スイープコントローラーはスイープを管理しますが、実際にスイープを実行するコンポーネントは、_sweep agent_として知られています。デフォルトでは、スイープコントローラのコンポーネントはW&Bのサーバー上で開始され、スイープエージェントはローカルマシン上で作成されます。
wandb.sweepメソッドを使用してスイープコントローラをアクティブにできます。先ほど定義したスイープ設定辞書をsweep_configフィールドに渡します:
wandb.sweep関数は、後のステップでスイープをアクティブ化するために使用するsweep_idを返します。
コマンドラインでは、この関数は次のように置き換えられます
ステップ 3: 機械学習コードを定義する
スイープを実行する前に、 試してみたいハイパーパラメータ値を使用するトレーニング手順を定義します。W&B Sweepsをトレーニングコードに統合するための鍵は、各トレーニング実験のために、あなたのトレーニングロジックがスイープ設定で定義されたハイパーパラメータ値にアクセスできるようにすることです。 次のコード例では、ヘルパー関数build_dataset、build_network、build_optimizer、およびtrain_epochが、スイープハイパーパラメータ設定辞書にアクセスします。
次の機械学習トレーニングコードをノートブック内で実行します。これらの関数は、PyTorchでの基本的な全結合ニューラルネットワークを定義しています。
train関数内では、次のW&B Python SDKメソッドが見られます:
wandb.init(): 新しい W&B run を初期化します。各 run は、トレーニング関数の1回の実行です。wandb.config: 試してみたいハイパーパラメータを含むスイープ設定を渡します。wandb.log(): 各エポックのトレーニングlossをログに記録します。
build_dataset、build_network、build_optimizer、およびtrain_epoch。
これらの関数は基本的なPyTorchパイプラインの標準的な部分であり、
W&Bの使用によってその実装に影響しません。
ステップ 4: スイープエージェントのアクティベート
スイープ設定が定義され、ハイパーパラメータを対話的に利用できるトレーニングスクリプトが準備できたので、スイープエージェントをアクティベートする準備ができました。スイープエージェントは、スイープ設定で定義されたハイパーパラメータ値のセットを使用して実験を実行する責任を負っています。sweep_idを持つスイープの一部として、スイープが実行する関数(この例ではtrain関数を使用)、(オプションで)スイープコントローラーに何個の設定を要求するかを指定してください。
同じ
sweep_idを持つスイープエージェントを異なる計算リソース上で起動することができます。スイープコントローラーがあなたの定義したスイープ設定に基づいて協働することを保証します。train)を5回実行するスイープエージェントをアクティベートします:
スイープ設定で
random 検索メソッドが指定されていたため、スイープコントローラーはランダムに生成されたハイパーパラメータ値を提供します。スイープ結果の可視化
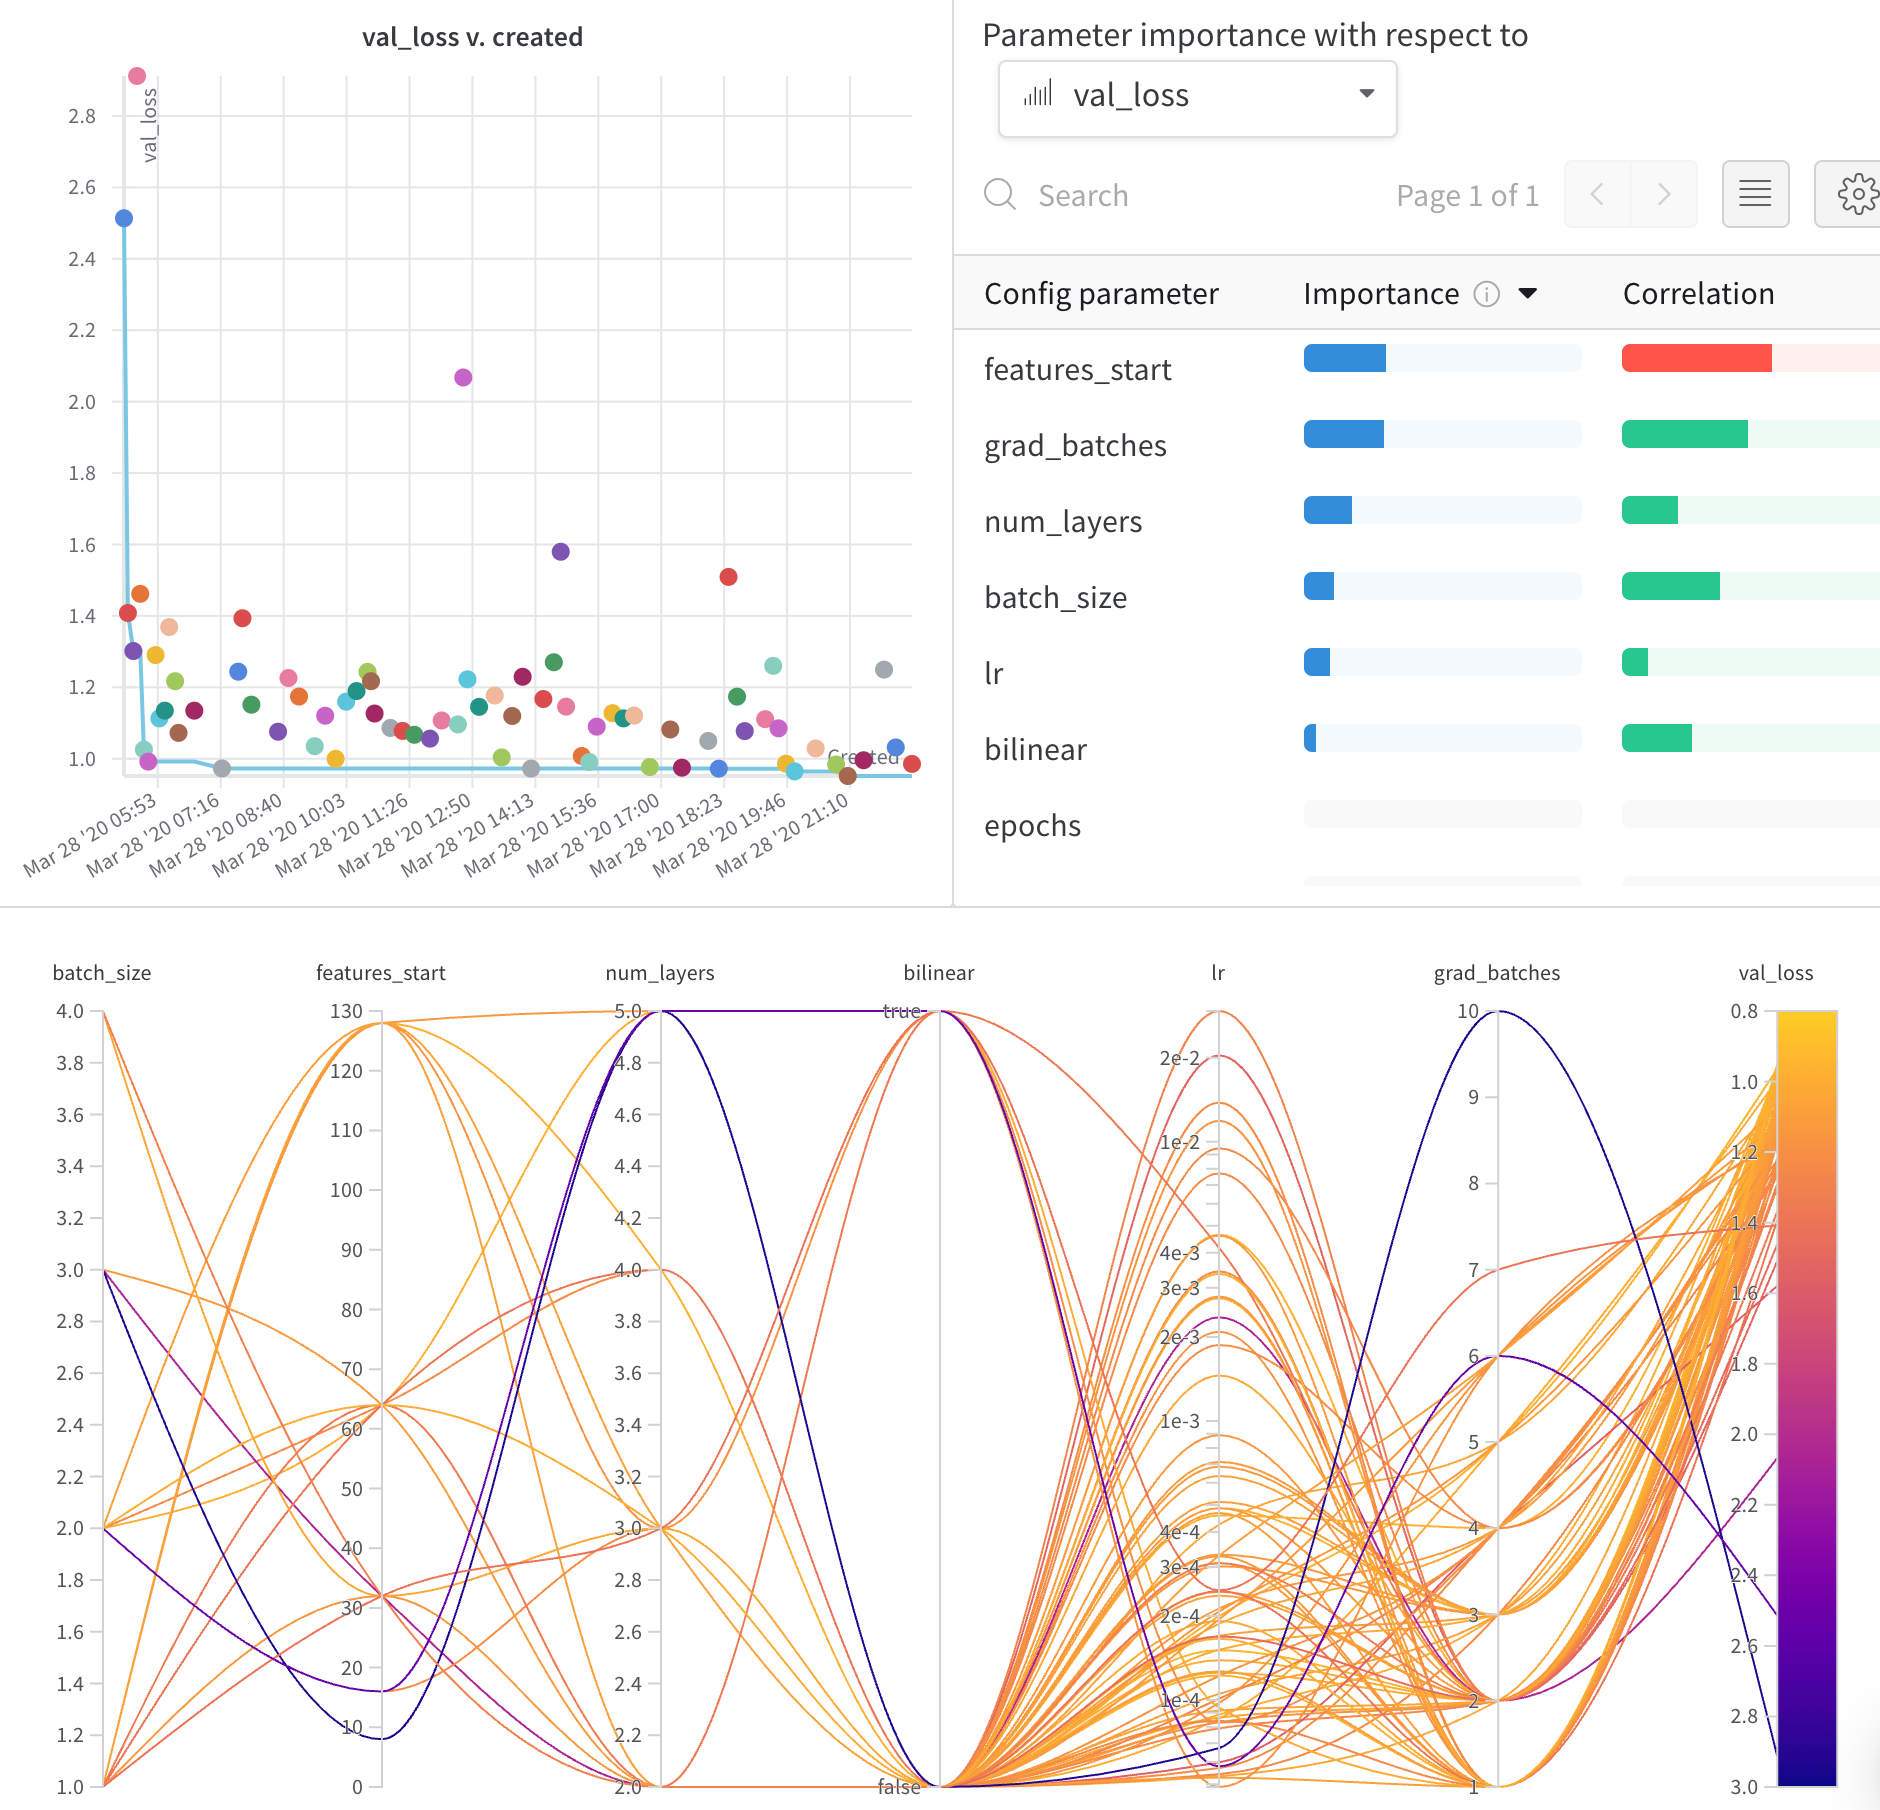
Parallel Coordinates プロット
このプロットは、ハイパーパラメータ値をモデルメトリクスにマッピングします。最も良いモデルパフォーマンスをもたらしたハイパーパラメータの組み合わせを特定するのに役立ちます。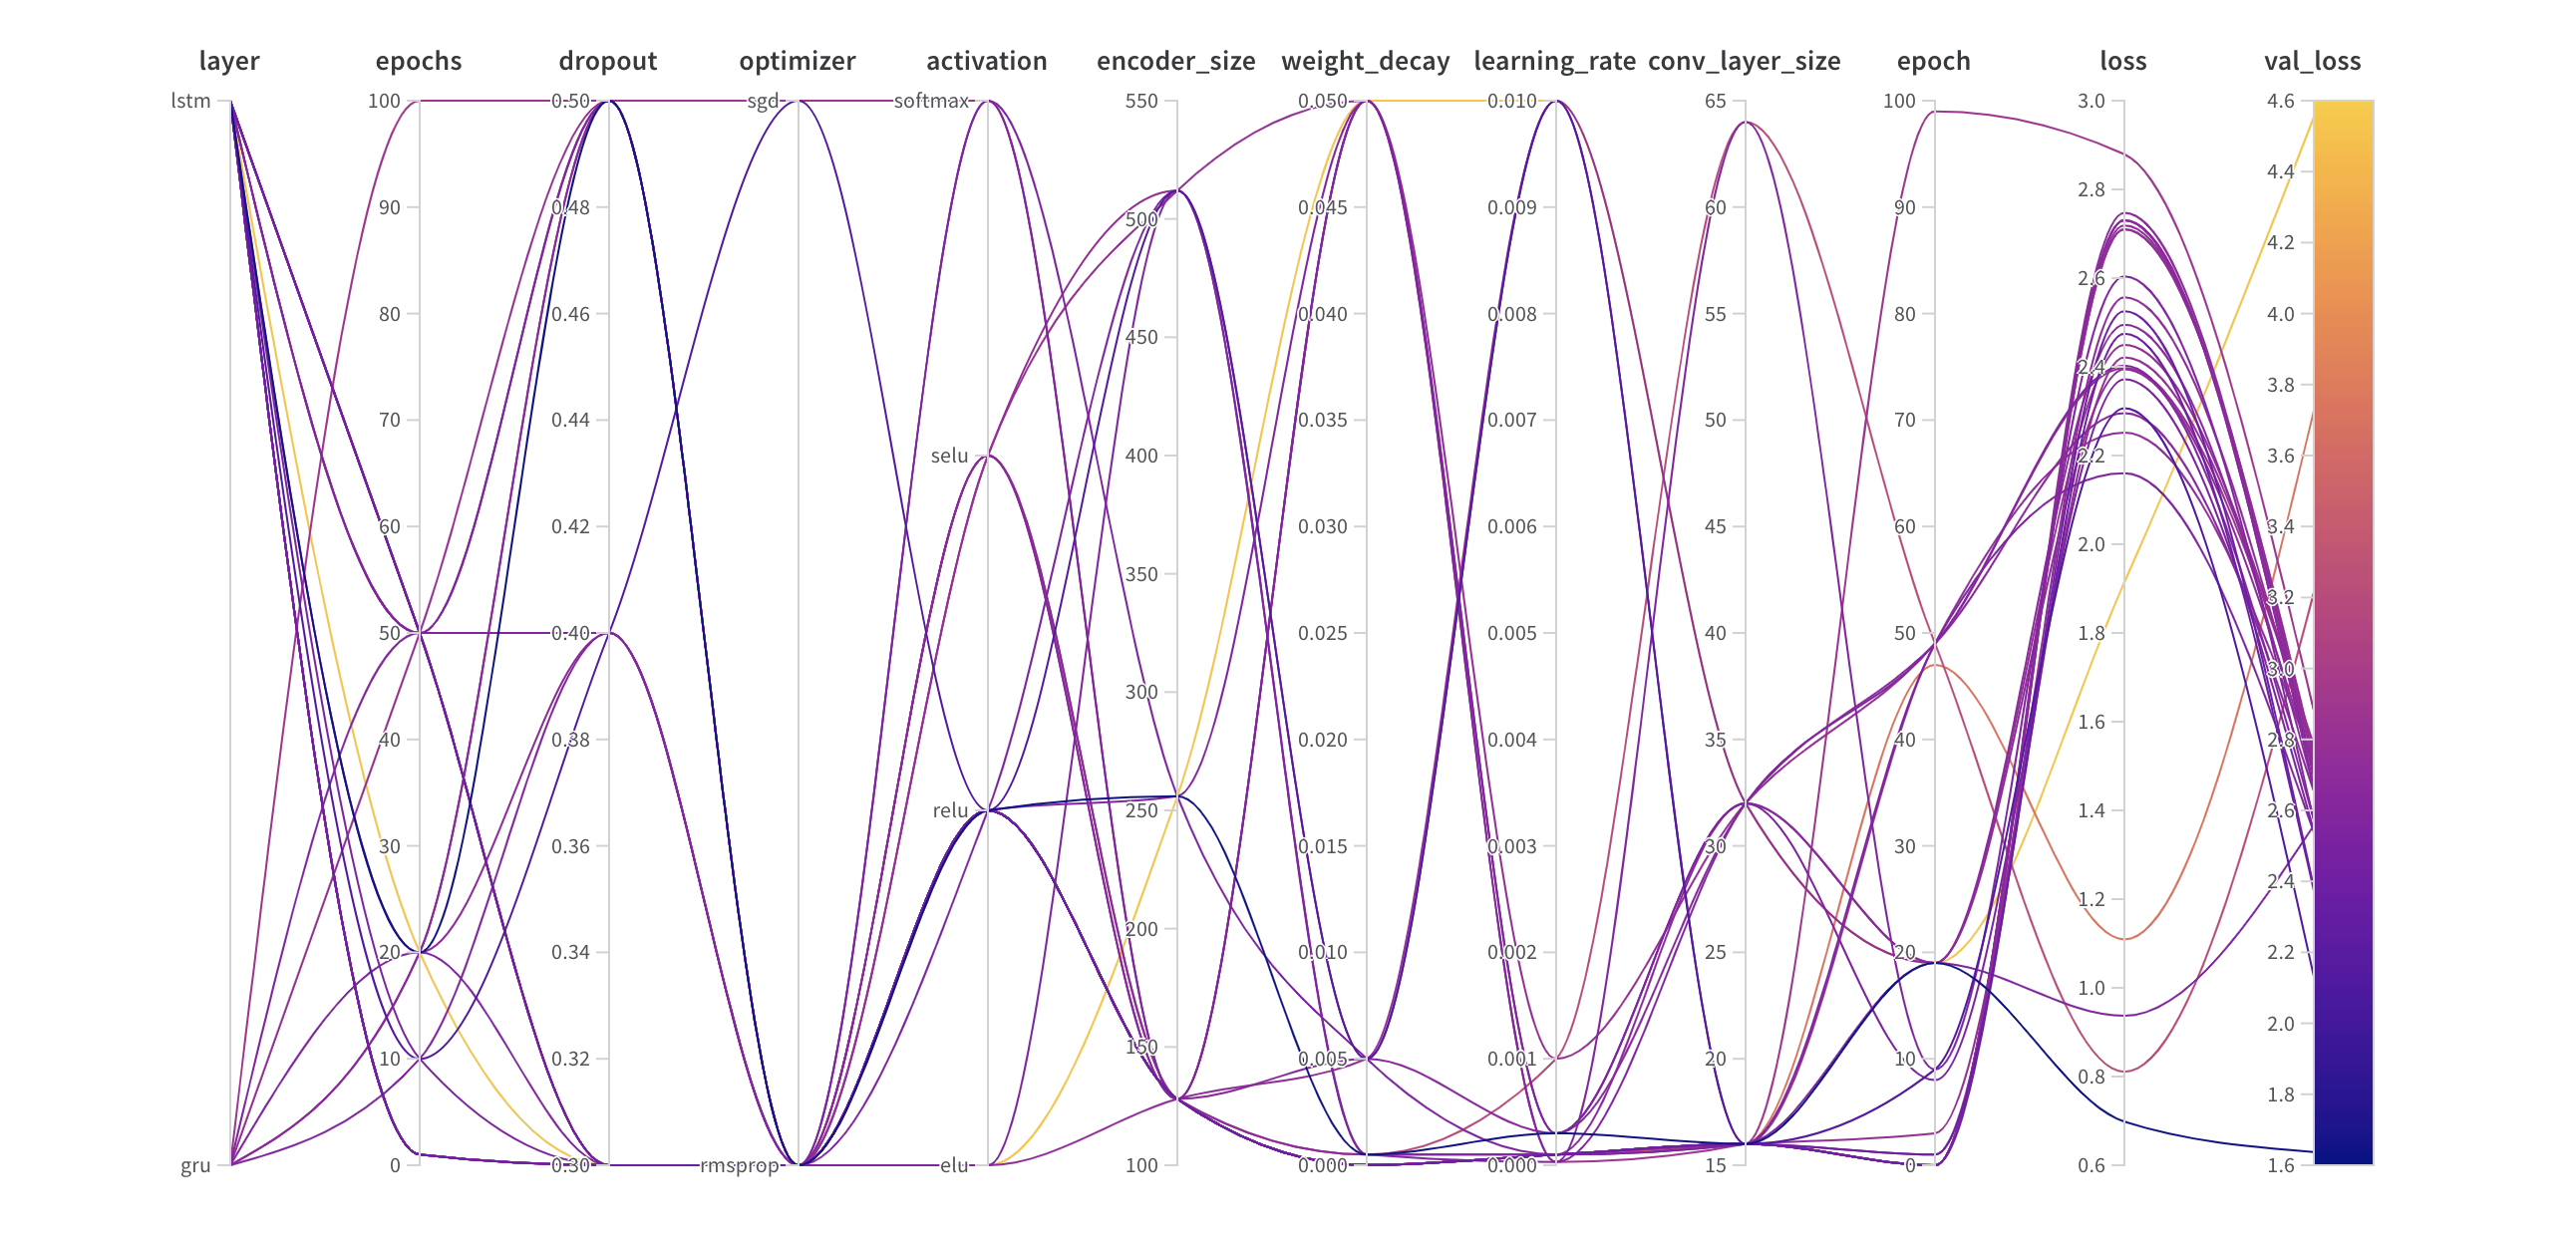
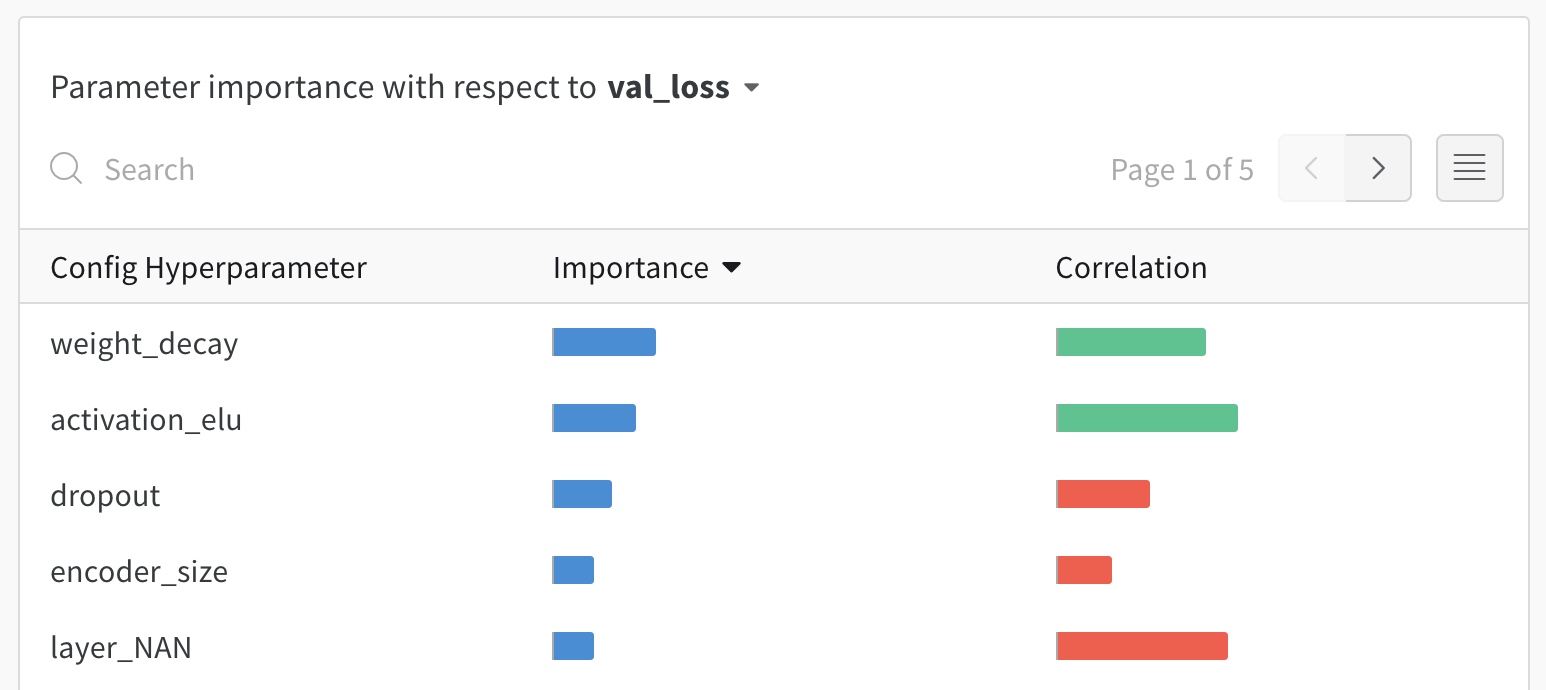
ハイパーパラメータの重要度プロット
ハイパーパラメータの重要度プロットは、あなたのメトリクスの最良の予測因子だったハイパーパラメータを表面化します。 特徴重要度(ランダムフォレストモデルによる)と相関関係(暗黙の線形モデル)を報告します。