### 方法 2: Microsoft Presidio を使用してマスクする
次の方法では、[Microsoft Presidio](https://microsoft.github.io/presidio/) を使用して PII データを完全に除去します。Presidio は PII をマスクし、PII のタイプを表すプレースホルダーに置き換えます。たとえば、Presidio は `"My name is Alex"` 内の `Alex` を `
### 方法 3: Faker と Presidio を使用して置換で匿名化する
テキストをマスクする代わりに、MS Presidio を使用して、名前や電話番号などの PII を [Faker](https://faker.readthedocs.io/en/master/) Python ライブラリで生成したダミーデータに置き換えることで匿名化できます。たとえば、次のようなデータがあるとします。
`"My name is Raphael and I like to fish. My phone number is 212-555-5555"`
Presidio と Faker でデータを処理すると、次のようになる場合があります。
`"My name is Katherine Dixon and I like to fish. My phone number is 667.431.7379"`
Presidio と Faker を一緒に使用するには、custom operator への参照を指定する必要があります。これらの operator は、PII をダミーデータに置き換える Faker の function を Presidio が使用するように指定するものです。
```python lines theme={null}
from faker import Faker
from presidio_anonymizer import AnonymizerEngine
from presidio_anonymizer.entities import OperatorConfig
fake = Faker()
# faker関数を作成する(値を受け取る必要があることに注意)
def fake_name(x):
return fake.name()
def fake_number(x):
return fake.phone_number()
# PERSONおよびPHONE_NUMBERエンティティ用のカスタムオペレーターを作成する
operators = {
"PERSON": OperatorConfig("custom", {"lambda": fake_name}),
"PHONE_NUMBER": OperatorConfig("custom", {"lambda": fake_number}),
}
text_to_anonymize = (
"My name is Raphael and I like to fish. My phone number is 212-555-5555"
)
# アナライザーの出力
analyzer_results = analyzer.analyze(
text=text_to_anonymize, entities=["PHONE_NUMBER", "PERSON"], language="en"
)
anonymizer = AnonymizerEngine()
# 上記のオペレーターをアノニマイザーに渡すことを忘れずに
anonymized_results = anonymizer.anonymize(
text=text_to_anonymize, analyzer_results=analyzer_results, operators=operators
)
print(f"Raw text:\n\t{text_to_anonymize}")
print(f"Anonymized text:\n\t{anonymized_results.text}")
```
コードを 1 つのクラスに統合し、Entities のリストに先ほど特定した追加項目を含めるには、次を実行します。
```python lines theme={null}
from typing import ClassVar
from faker import Faker
from presidio_anonymizer import AnonymizerEngine
from presidio_anonymizer.entities import OperatorConfig
# Fakerを拡張してフェイクデータを生成するカスタムクラス
class MyFaker(Faker):
# Faker関数を作成する(値を受け取る必要があることに注意)
def fake_address(self):
return fake.address()
def fake_ssn(self):
return fake.ssn()
def fake_name(self):
return fake.name()
def fake_number(self):
return fake.phone_number()
def fake_email(self):
return fake.email()
# エンティティ用のカスタムオペレーターを作成する
operators: ClassVar[dict[str, OperatorConfig]] = {
"PERSON": OperatorConfig("custom", {"lambda": fake_name}),
"PHONE_NUMBER": OperatorConfig("custom", {"lambda": fake_number}),
"EMAIL_ADDRESS": OperatorConfig("custom", {"lambda": fake_email}),
"LOCATION": OperatorConfig("custom", {"lambda": fake_address}),
"US_SSN": OperatorConfig("custom", {"lambda": fake_ssn}),
}
def redact_and_anonymize_with_faker(self, text):
anonymizer = AnonymizerEngine()
analyzer_results = analyzer.analyze(
text=text,
entities=["PHONE_NUMBER", "PERSON", "LOCATION", "EMAIL_ADDRESS", "US_SSN"],
language="en",
)
anonymized_results = anonymizer.anonymize(
text=text, analyzer_results=analyzer_results, operators=self.operators
)
return anonymized_results.text
```
関数をテストするには、サンプルテキストを使って以下を実行します。
```python lines theme={null}
faker = MyFaker()
text_to_anonymize = (
"My name is Raphael and I like to fish. My phone number is 212-555-5555"
)
anonymized_text = faker.redact_and_anonymize_with_faker(text_to_anonymize)
print(f"Raw text:\n\t{text_to_anonymize}")
print(f"Anonymized text:\n\t{anonymized_text}")
```
### Method 4: `autopatch_settings` を使用する
`autopatch_settings` を使用すると、サポートされる1つ以上のLLMインテグレーションについて、初期化時にPII処理を直接設定できます。W\&Bでは、特定のインテグレーションのすべてのCallにわたってPII処理を一元化したい場合、この方法を推奨しています。この方法の利点は次のとおりです。
1. PII処理ロジックを初期化時に一元化して適用できるため、各所に分散したカスタムロジックの必要性を減らせます。
2. PII処理のワークフローは、特定のインテグレーションごとにカスタマイズしたり、完全に無効化したりできます。
`autopatch_settings` を使用してPII処理を設定するには、サポートされるLLMインテグレーションのいずれかについて、`op_settings` で `postprocess_inputs` または `postprocess_output` を定義します。
```python lines theme={null}
def postprocess(inputs: dict) -> dict:
if "SENSITIVE_KEY" in inputs:
inputs["SENSITIVE_KEY"] = "REDACTED"
return inputs
client = weave.init(
...,
autopatch_settings={
"openai": {
"op_settings": {
"postprocess_inputs": postprocess,
"postprocess_output": ...,
}
},
"anthropic": {
"op_settings": {
"postprocess_inputs": ...,
"postprocess_output": ...,
}
}
},
)
```
## Weave Call にメソッドを適用する
各マスキング方法を個別に確認したので、次の例では、それらを Weave Models に統合し、結果を Weave トレース で確認する方法を示します。
まず、[Weave Model](https://docs.wandb.ai/weave/guides/core-types/models) を作成します。Weave Model は、設定、モデルの重み、モデルの動作を定義するコードなどの情報を組み合わせたものです。
このモデルには、Anthropic API を呼び出す predict 関数が含まれています。Anthropic の Claude Sonnet は、[Traces](https://docs.wandb.ai/weave/quickstart) を使用して LLM Call をトレースしながら、感情分析を実行します。Claude Sonnet はテキストブロックを受け取り、*positive*、*negative*、*neutral* のいずれかの感情分類を出力します。また、このモデルには、PII データが LLM に送信される前にマスクまたは匿名化されるようにするための後処理関数も含まれています。
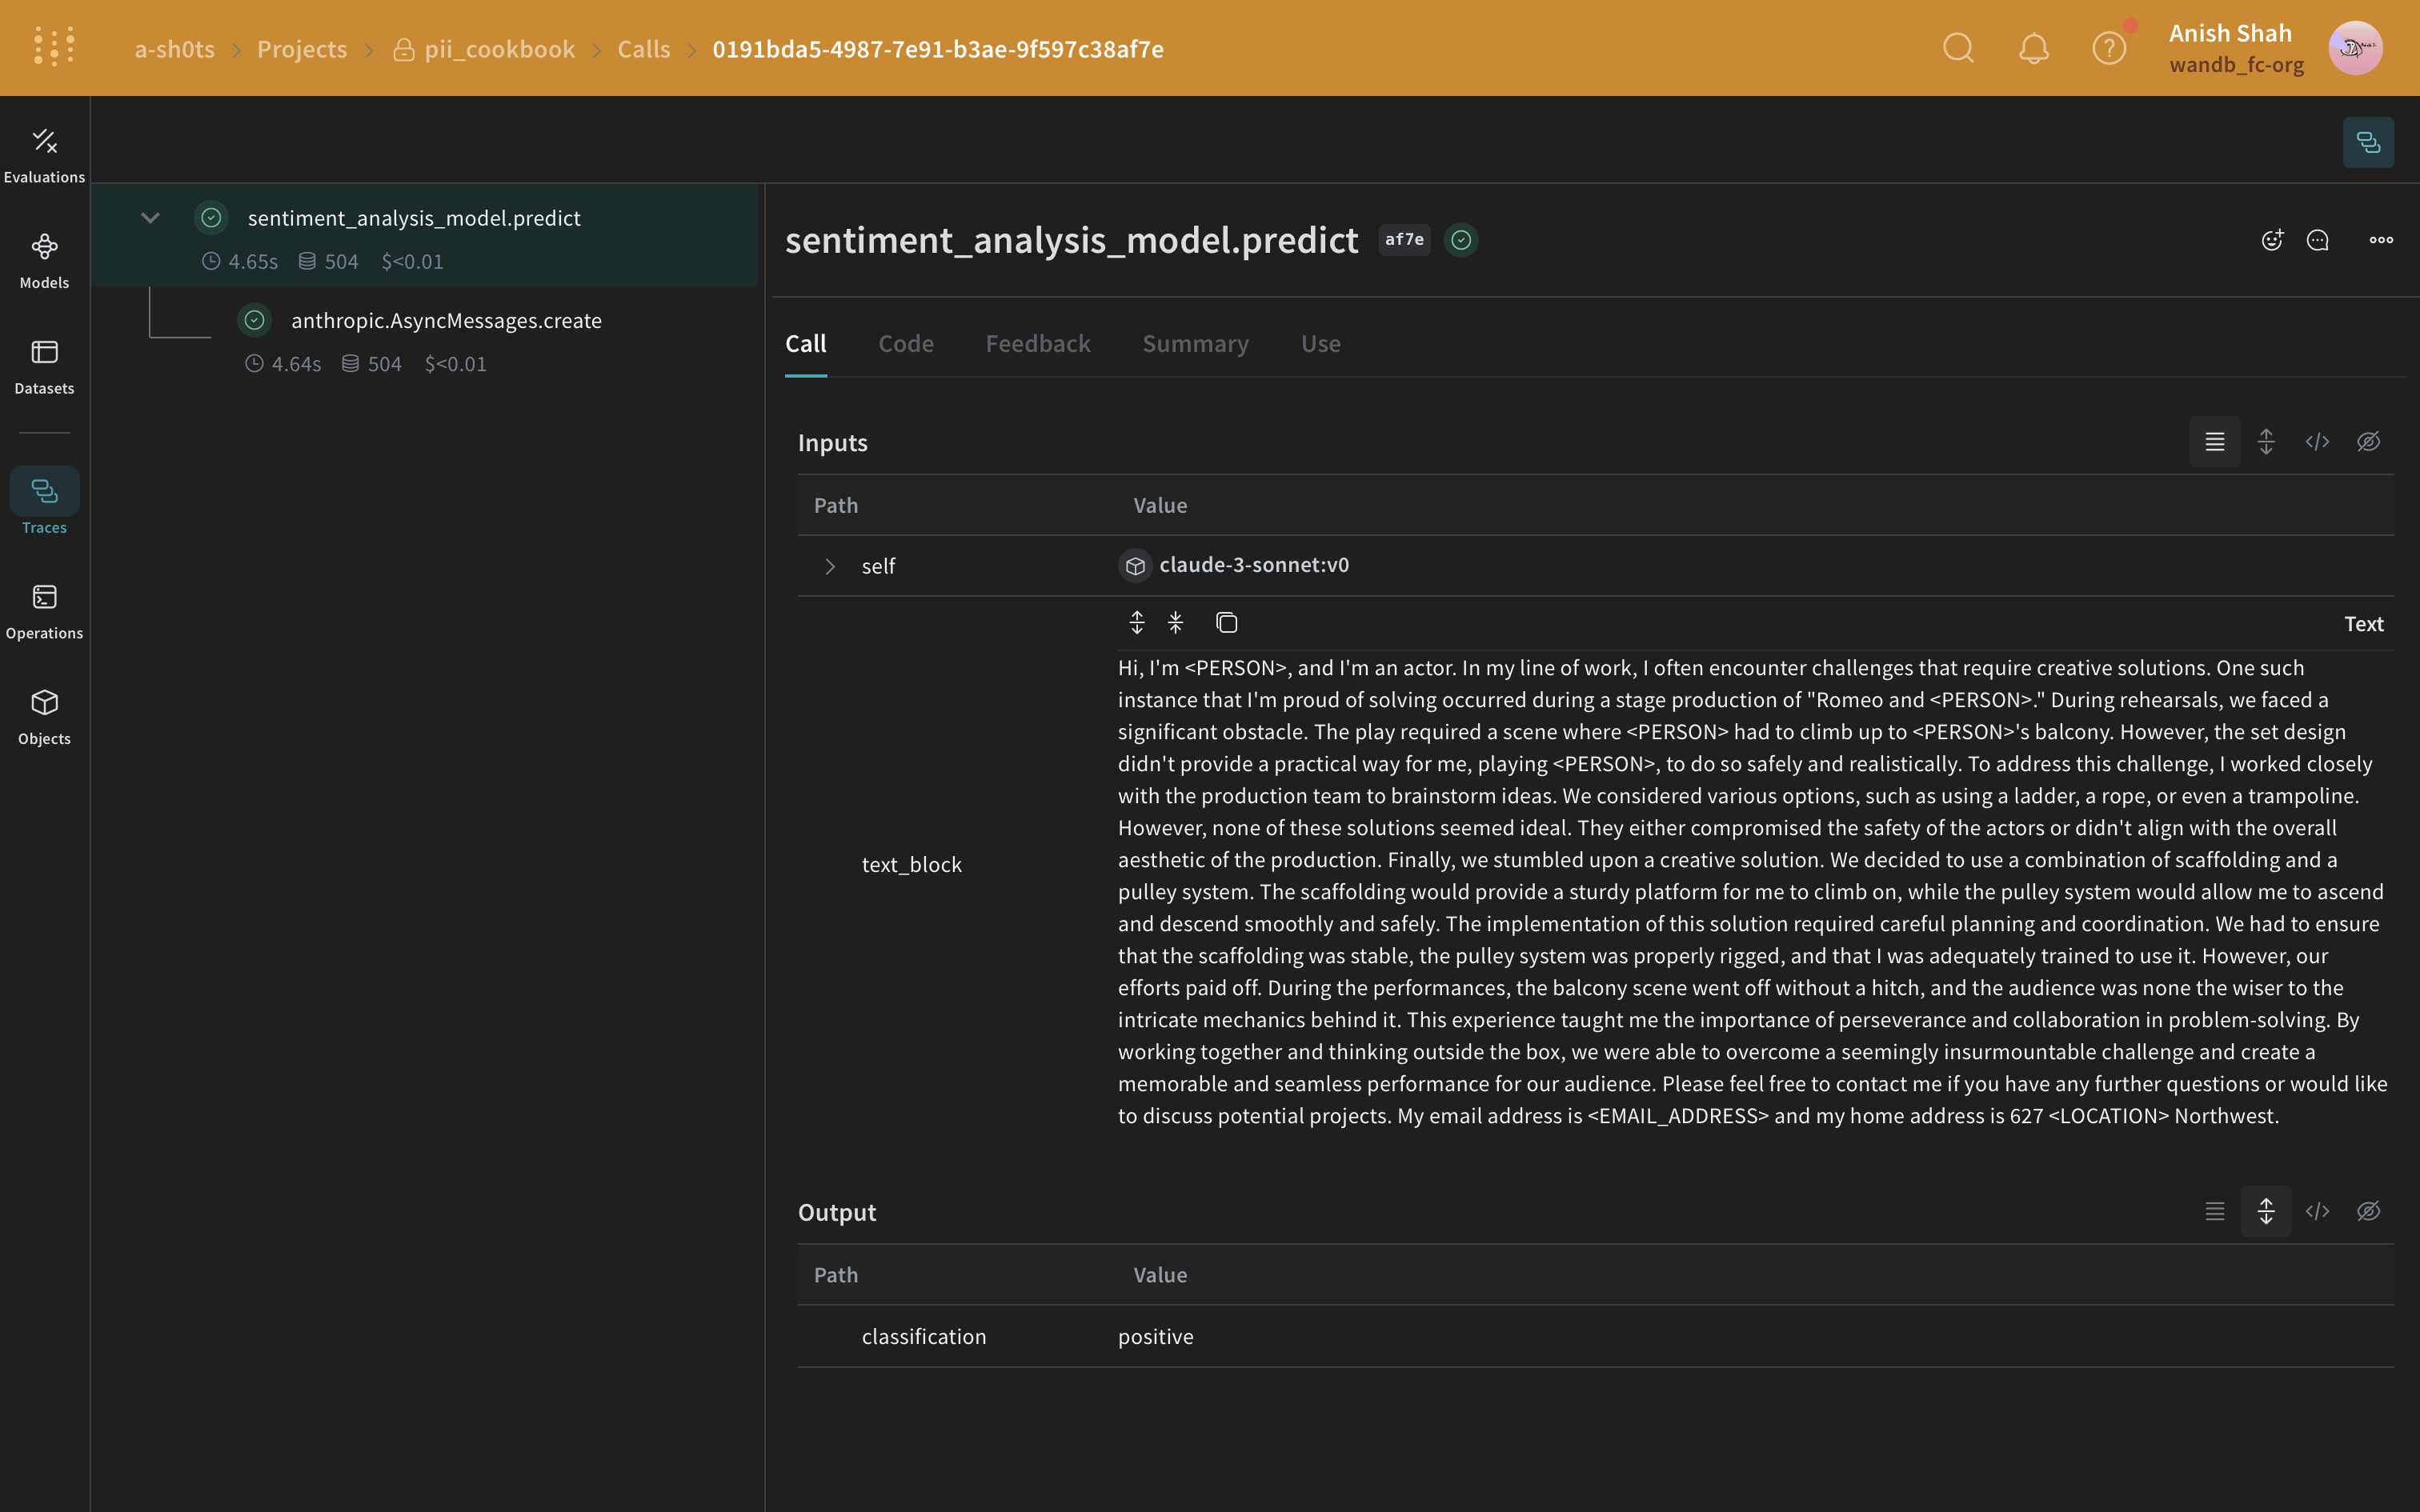
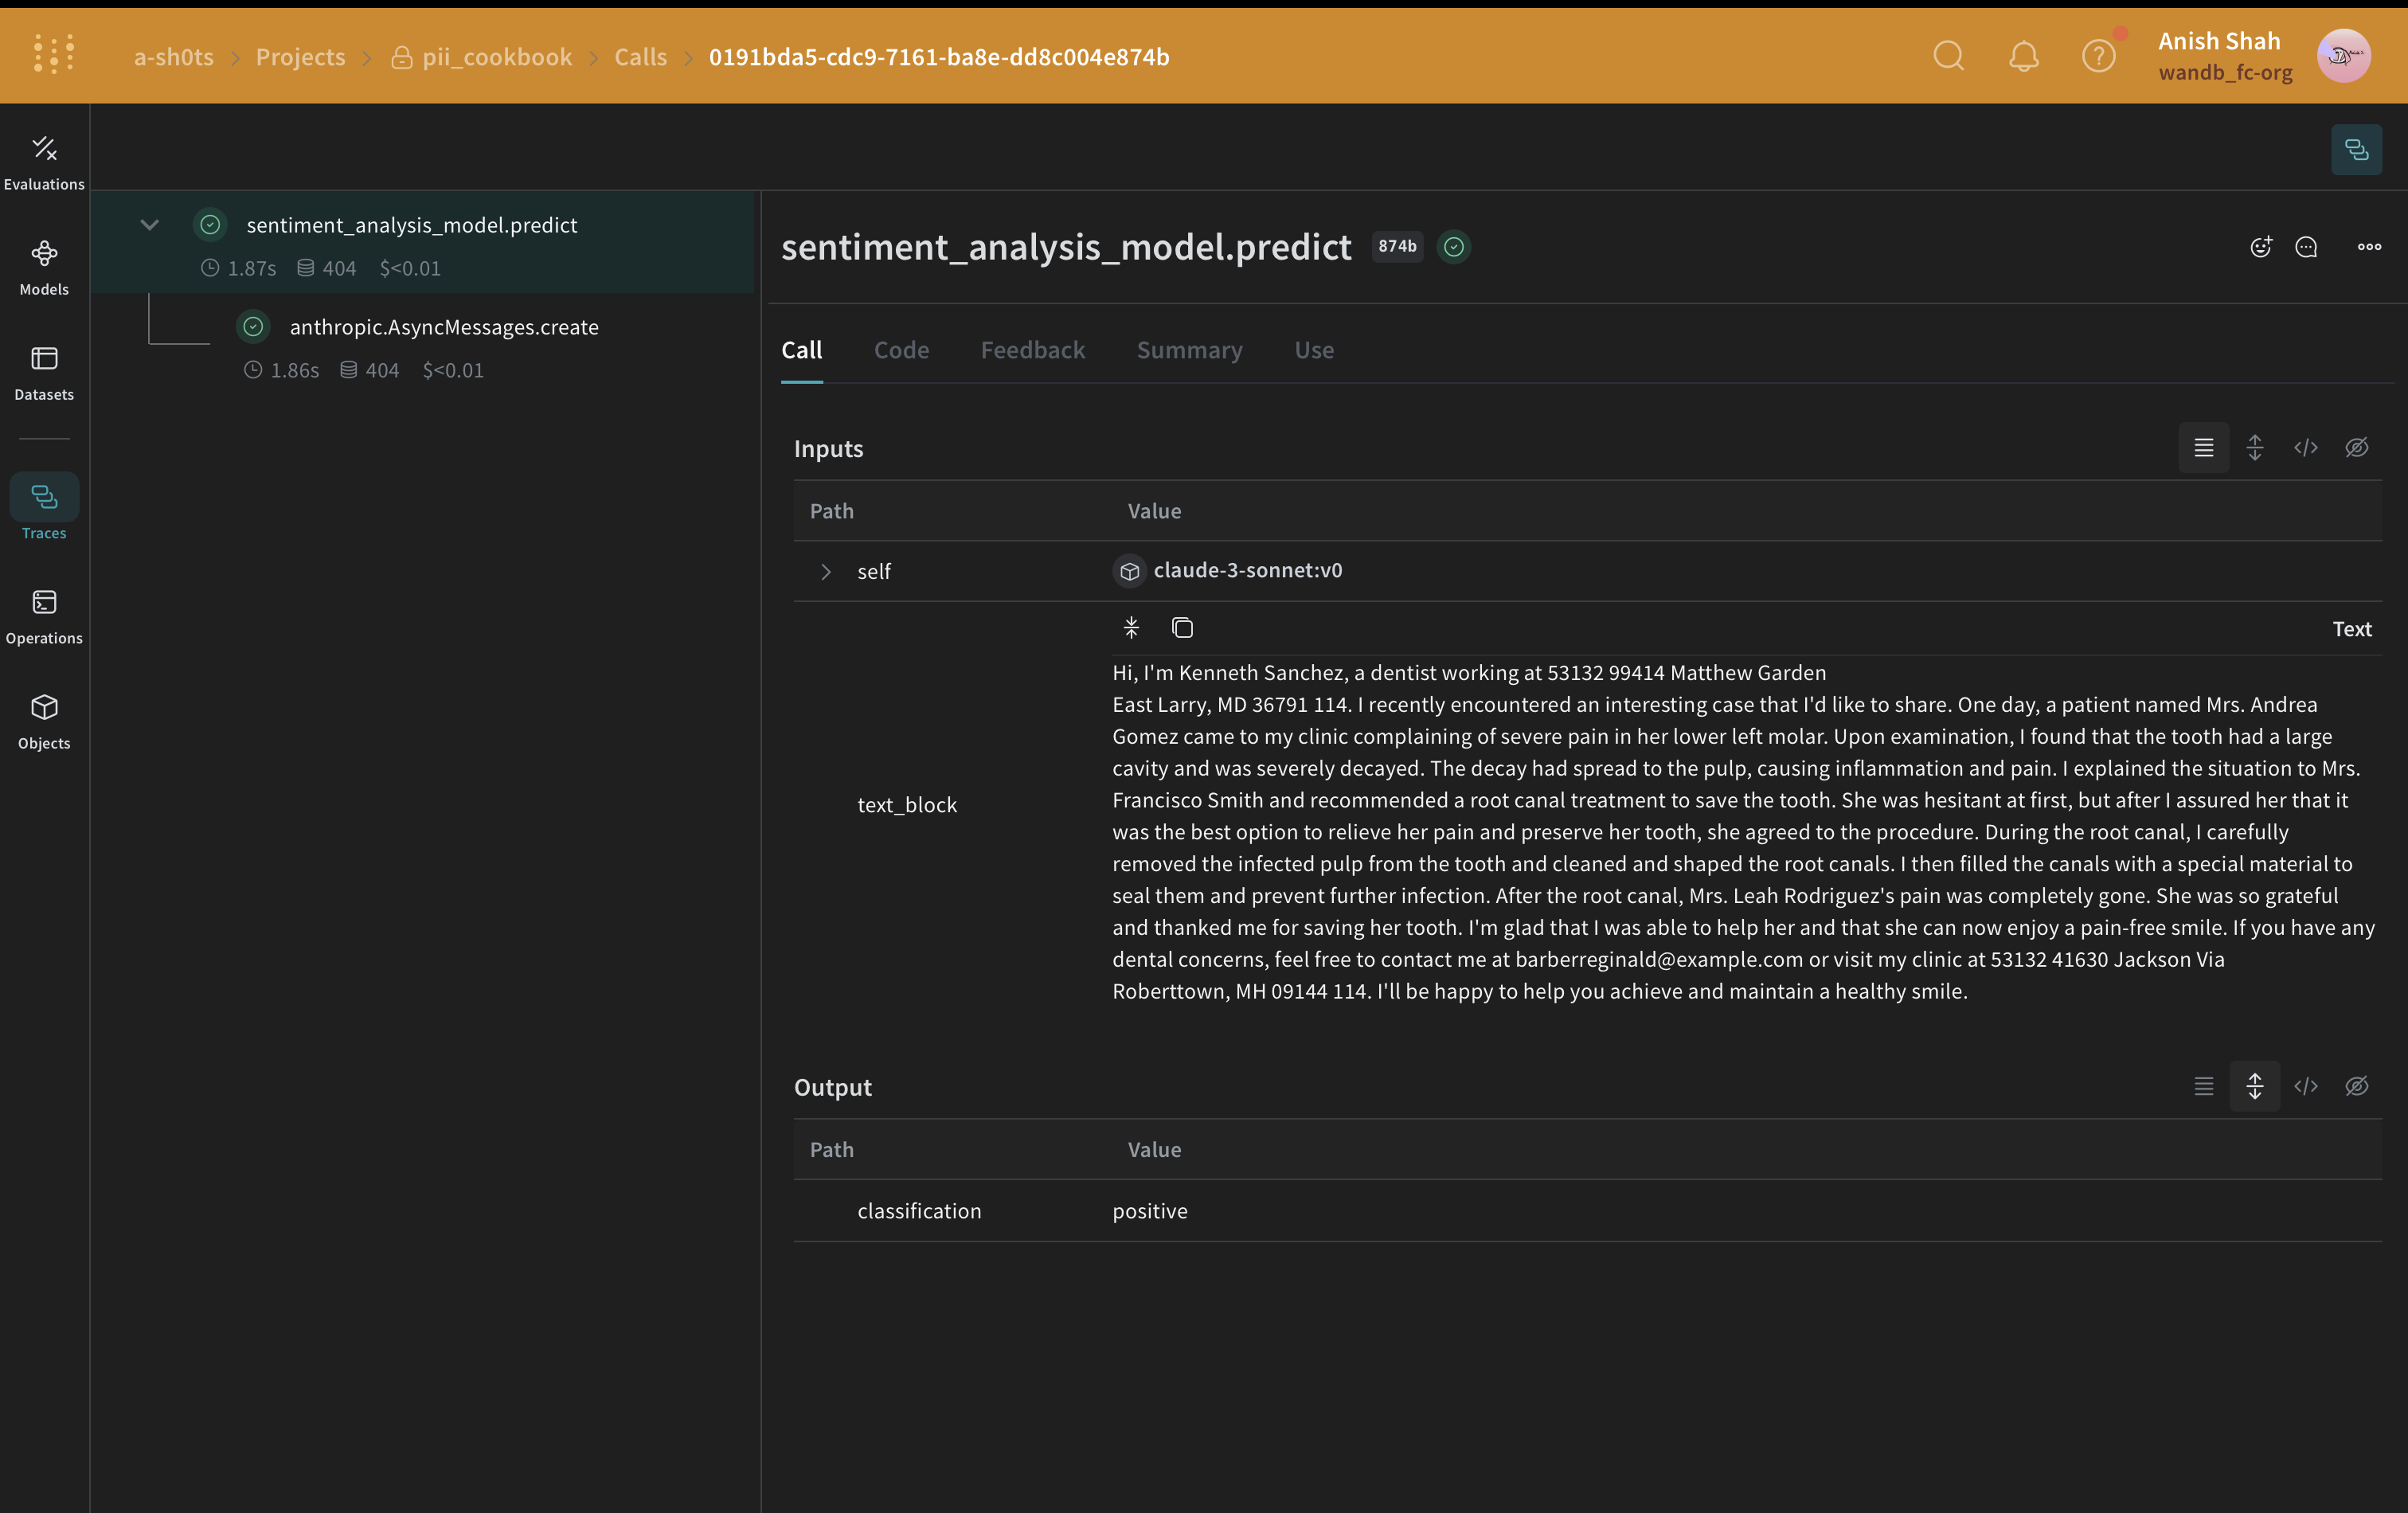
このコードを実行すると、Weave プロジェクトページへのリンクと、実行した特定のトレース (LLM Call) へのリンクが表示されます。これらのリンクを使用して、入力が LLM に到達する前に、後処理関数によって想定どおりにマスクまたは匿名化されていることを確認してください。
### Regex による方法
まずは、Regex を使用して元のテキスト内の PII データを特定し、マスクできます。
```python lines theme={null}
import json
from typing import Any
import anthropic
import weave
# モデル予測 Weave Op に正規表現によるマスキングを適用する入力後処理関数を定義する
def postprocess_inputs_regex(inputs: dict[str, Any]) -> dict:
inputs["text_block"] = redact_with_regex(inputs["text_block"])
return inputs
# Weave モデル / 予測関数
class SentimentAnalysisRegexPiiModel(weave.Model):
model_name: str
system_prompt: str
temperature: int
@weave.op(
postprocess_inputs=postprocess_inputs_regex,
)
async def predict(self, text_block: str) -> dict:
client = anthropic.AsyncAnthropic()
response = await client.messages.create(
max_tokens=1024,
model=self.model_name,
system=self.system_prompt,
messages=[
{"role": "user", "content": [{"type": "text", "text": text_block}]}
],
)
result = response.content[0].text
if result is None:
raise ValueError("No response from model")
parsed = json.loads(result)
return parsed
```
```python lines theme={null}
# システムプロンプトを使ってLLMモデルを作成する
model = SentimentAnalysisRegexPiiModel(
name="claude-3-sonnet",
model_name="claude-3-5-sonnet-20240620",
system_prompt='You are a Sentiment Analysis classifier. You will be classifying text based on their sentiment. Your input will be a block of text. You will answer with one the following rating option["positive", "negative", "neutral"]. Your answer should be one word in json format: {classification}. Ensure that it is valid JSON.',
temperature=0,
)
print("Model: ", model)
# テキストブロックごとに、まず匿名化してから予測する
for entry in pii_data:
await model.predict(entry["text"])
```
### Presidio を使用したマスキング方法
次に、Presidio を使用して元のテキスト内の PII データを特定し、マスクします。
 ```python lines theme={null}
from typing import Any
import weave
# モデル予測 Weave Op に Presidio マスキングを適用する入力後処理関数を定義する
def postprocess_inputs_presidio(inputs: dict[str, Any]) -> dict:
inputs["text_block"] = redact_with_presidio(inputs["text_block"])
return inputs
# Weave モデル / 予測関数
class SentimentAnalysisPresidioPiiModel(weave.Model):
model_name: str
system_prompt: str
temperature: int
@weave.op(
postprocess_inputs=postprocess_inputs_presidio,
)
async def predict(self, text_block: str) -> dict:
client = anthropic.AsyncAnthropic()
response = await client.messages.create(
max_tokens=1024,
model=self.model_name,
system=self.system_prompt,
messages=[
{"role": "user", "content": [{"type": "text", "text": text_block}]}
],
)
result = response.content[0].text
if result is None:
raise ValueError("No response from model")
parsed = json.loads(result)
return parsed
```
```python lines theme={null}
# システムプロンプトを使用してLLMモデルを作成する
model = SentimentAnalysisPresidioPiiModel(
name="claude-3-sonnet",
model_name="claude-3-5-sonnet-20240620",
system_prompt='You are a Sentiment Analysis classifier. You will be classifying text based on their sentiment. Your input will be a block of text. You will answer with one the following rating option["positive", "negative", "neutral"]. Your answer should be one word in json format: {classification}. Ensure that it is valid JSON.',
temperature=0,
)
print("Model: ", model)
# テキストブロックごとに匿名化してから予測を実行する
for entry in pii_data:
await model.predict(entry["text"])
```
```python lines theme={null}
from typing import Any
import weave
# モデル予測 Weave Op に Presidio マスキングを適用する入力後処理関数を定義する
def postprocess_inputs_presidio(inputs: dict[str, Any]) -> dict:
inputs["text_block"] = redact_with_presidio(inputs["text_block"])
return inputs
# Weave モデル / 予測関数
class SentimentAnalysisPresidioPiiModel(weave.Model):
model_name: str
system_prompt: str
temperature: int
@weave.op(
postprocess_inputs=postprocess_inputs_presidio,
)
async def predict(self, text_block: str) -> dict:
client = anthropic.AsyncAnthropic()
response = await client.messages.create(
max_tokens=1024,
model=self.model_name,
system=self.system_prompt,
messages=[
{"role": "user", "content": [{"type": "text", "text": text_block}]}
],
)
result = response.content[0].text
if result is None:
raise ValueError("No response from model")
parsed = json.loads(result)
return parsed
```
```python lines theme={null}
# システムプロンプトを使用してLLMモデルを作成する
model = SentimentAnalysisPresidioPiiModel(
name="claude-3-sonnet",
model_name="claude-3-5-sonnet-20240620",
system_prompt='You are a Sentiment Analysis classifier. You will be classifying text based on their sentiment. Your input will be a block of text. You will answer with one the following rating option["positive", "negative", "neutral"]. Your answer should be one word in json format: {classification}. Ensure that it is valid JSON.',
temperature=0,
)
print("Model: ", model)
# テキストブロックごとに匿名化してから予測を実行する
for entry in pii_data:
await model.predict(entry["text"])
```
### Faker と Presidio の置換方法
この例では、Faker を使用して匿名化した置換用の PII データを生成し、Presidio を使用して元のテキスト内の PII データを検出して置換します。
 ```python lines theme={null}
from typing import Any
import weave
# Faker による匿名化と Presidio によるマスキングをモデル予測 Weave Op に適用する入力後処理関数を定義する
faker = MyFaker()
def postprocess_inputs_faker(inputs: dict[str, Any]) -> dict:
inputs["text_block"] = faker.redact_and_anonymize_with_faker(inputs["text_block"])
return inputs
# Weave モデル / predict 関数
class SentimentAnalysisFakerPiiModel(weave.Model):
model_name: str
system_prompt: str
temperature: int
@weave.op(
postprocess_inputs=postprocess_inputs_faker,
)
async def predict(self, text_block: str) -> dict:
client = anthropic.AsyncAnthropic()
response = await client.messages.create(
max_tokens=1024,
model=self.model_name,
system=self.system_prompt,
messages=[
{"role": "user", "content": [{"type": "text", "text": text_block}]}
],
)
result = response.content[0].text
if result is None:
raise ValueError("No response from model")
parsed = json.loads(result)
return parsed
```
```python lines theme={null}
# システムプロンプトを使用してLLMモデルを作成する
model = SentimentAnalysisFakerPiiModel(
name="claude-3-sonnet",
model_name="claude-3-5-sonnet-20240620",
system_prompt='You are a Sentiment Analysis classifier. You will be classifying text based on their sentiment. Your input will be a block of text. You will answer with one the following rating option["positive", "negative", "neutral"]. Your answer should be one word in json format: {classification}. Ensure that it is valid JSON.',
temperature=0,
)
print("Model: ", model)
# テキストブロックごとに、まず匿名化してから予測する
for entry in pii_data:
await model.predict(entry["text"])
```
```python lines theme={null}
from typing import Any
import weave
# Faker による匿名化と Presidio によるマスキングをモデル予測 Weave Op に適用する入力後処理関数を定義する
faker = MyFaker()
def postprocess_inputs_faker(inputs: dict[str, Any]) -> dict:
inputs["text_block"] = faker.redact_and_anonymize_with_faker(inputs["text_block"])
return inputs
# Weave モデル / predict 関数
class SentimentAnalysisFakerPiiModel(weave.Model):
model_name: str
system_prompt: str
temperature: int
@weave.op(
postprocess_inputs=postprocess_inputs_faker,
)
async def predict(self, text_block: str) -> dict:
client = anthropic.AsyncAnthropic()
response = await client.messages.create(
max_tokens=1024,
model=self.model_name,
system=self.system_prompt,
messages=[
{"role": "user", "content": [{"type": "text", "text": text_block}]}
],
)
result = response.content[0].text
if result is None:
raise ValueError("No response from model")
parsed = json.loads(result)
return parsed
```
```python lines theme={null}
# システムプロンプトを使用してLLMモデルを作成する
model = SentimentAnalysisFakerPiiModel(
name="claude-3-sonnet",
model_name="claude-3-5-sonnet-20240620",
system_prompt='You are a Sentiment Analysis classifier. You will be classifying text based on their sentiment. Your input will be a block of text. You will answer with one the following rating option["positive", "negative", "neutral"]. Your answer should be one word in json format: {classification}. Ensure that it is valid JSON.',
temperature=0,
)
print("Model: ", model)
# テキストブロックごとに、まず匿名化してから予測する
for entry in pii_data:
await model.predict(entry["text"])
```
### `autopatch_settings` メソッド
次の例では、初期化時に `anthropic` の `postprocess_inputs` を `postprocess_inputs_regex()` 関数に設定しています。`postprocess_inputs_regex` 関数は、[方法 1: 正規表現を使用したフィルター](#method-1-filter-using-regular-expressions) で定義した `redact_with_regex` メソッドを適用します。その結果、すべての `anthropic` モデルへの入力に `redact_with_regex` が適用されます。
```python lines theme={null}
from typing import Any
import weave
client = weave.init(
...,
autopatch_settings={
"anthropic": {
"op_settings": {
"postprocess_inputs": postprocess_inputs_regex,
}
}
},
)
# モデル予測 Weave Op に正規表現によるマスキングを適用する入力後処理関数を定義する
def postprocess_inputs_regex(inputs: dict[str, Any]) -> dict:
inputs["text_block"] = redact_with_regex(inputs["text_block"])
return inputs
# Weave モデル / 予測関数
class SentimentAnalysisRegexPiiModel(weave.Model):
model_name: str
system_prompt: str
temperature: int
async def predict(self, text_block: str) -> dict:
client = anthropic.AsyncAnthropic()
response = await client.messages.create(
max_tokens=1024,
model=self.model_name,
system=self.system_prompt,
messages=[
{"role": "user", "content": [{"type": "text", "text": text_block}]}
],
)
result = response.content[0].text
if result is None:
raise ValueError("No response from model")
parsed = json.loads(result)
return parsed
```
```python lines theme={null}
# system promptを使ってLLMモデルを作成する
model = SentimentAnalysisRegexPiiModel(
name="claude-3-sonnet",
model_name="claude-3-5-sonnet-20240620",
system_prompt='You are a Sentiment Analysis classifier. You will be classifying text based on their sentiment. Your input will be a block of text. You will answer with one the following rating option["positive", "negative", "neutral"]. Your answer should be one word in json format: {classification}. Ensure that it is valid JSON.',
temperature=0,
)
print("Model: ", model)
# テキストブロックごとに、まず匿名化してから予測する
for entry in pii_data:
await model.predict(entry["text"])
```
### オプション: データを暗号化する
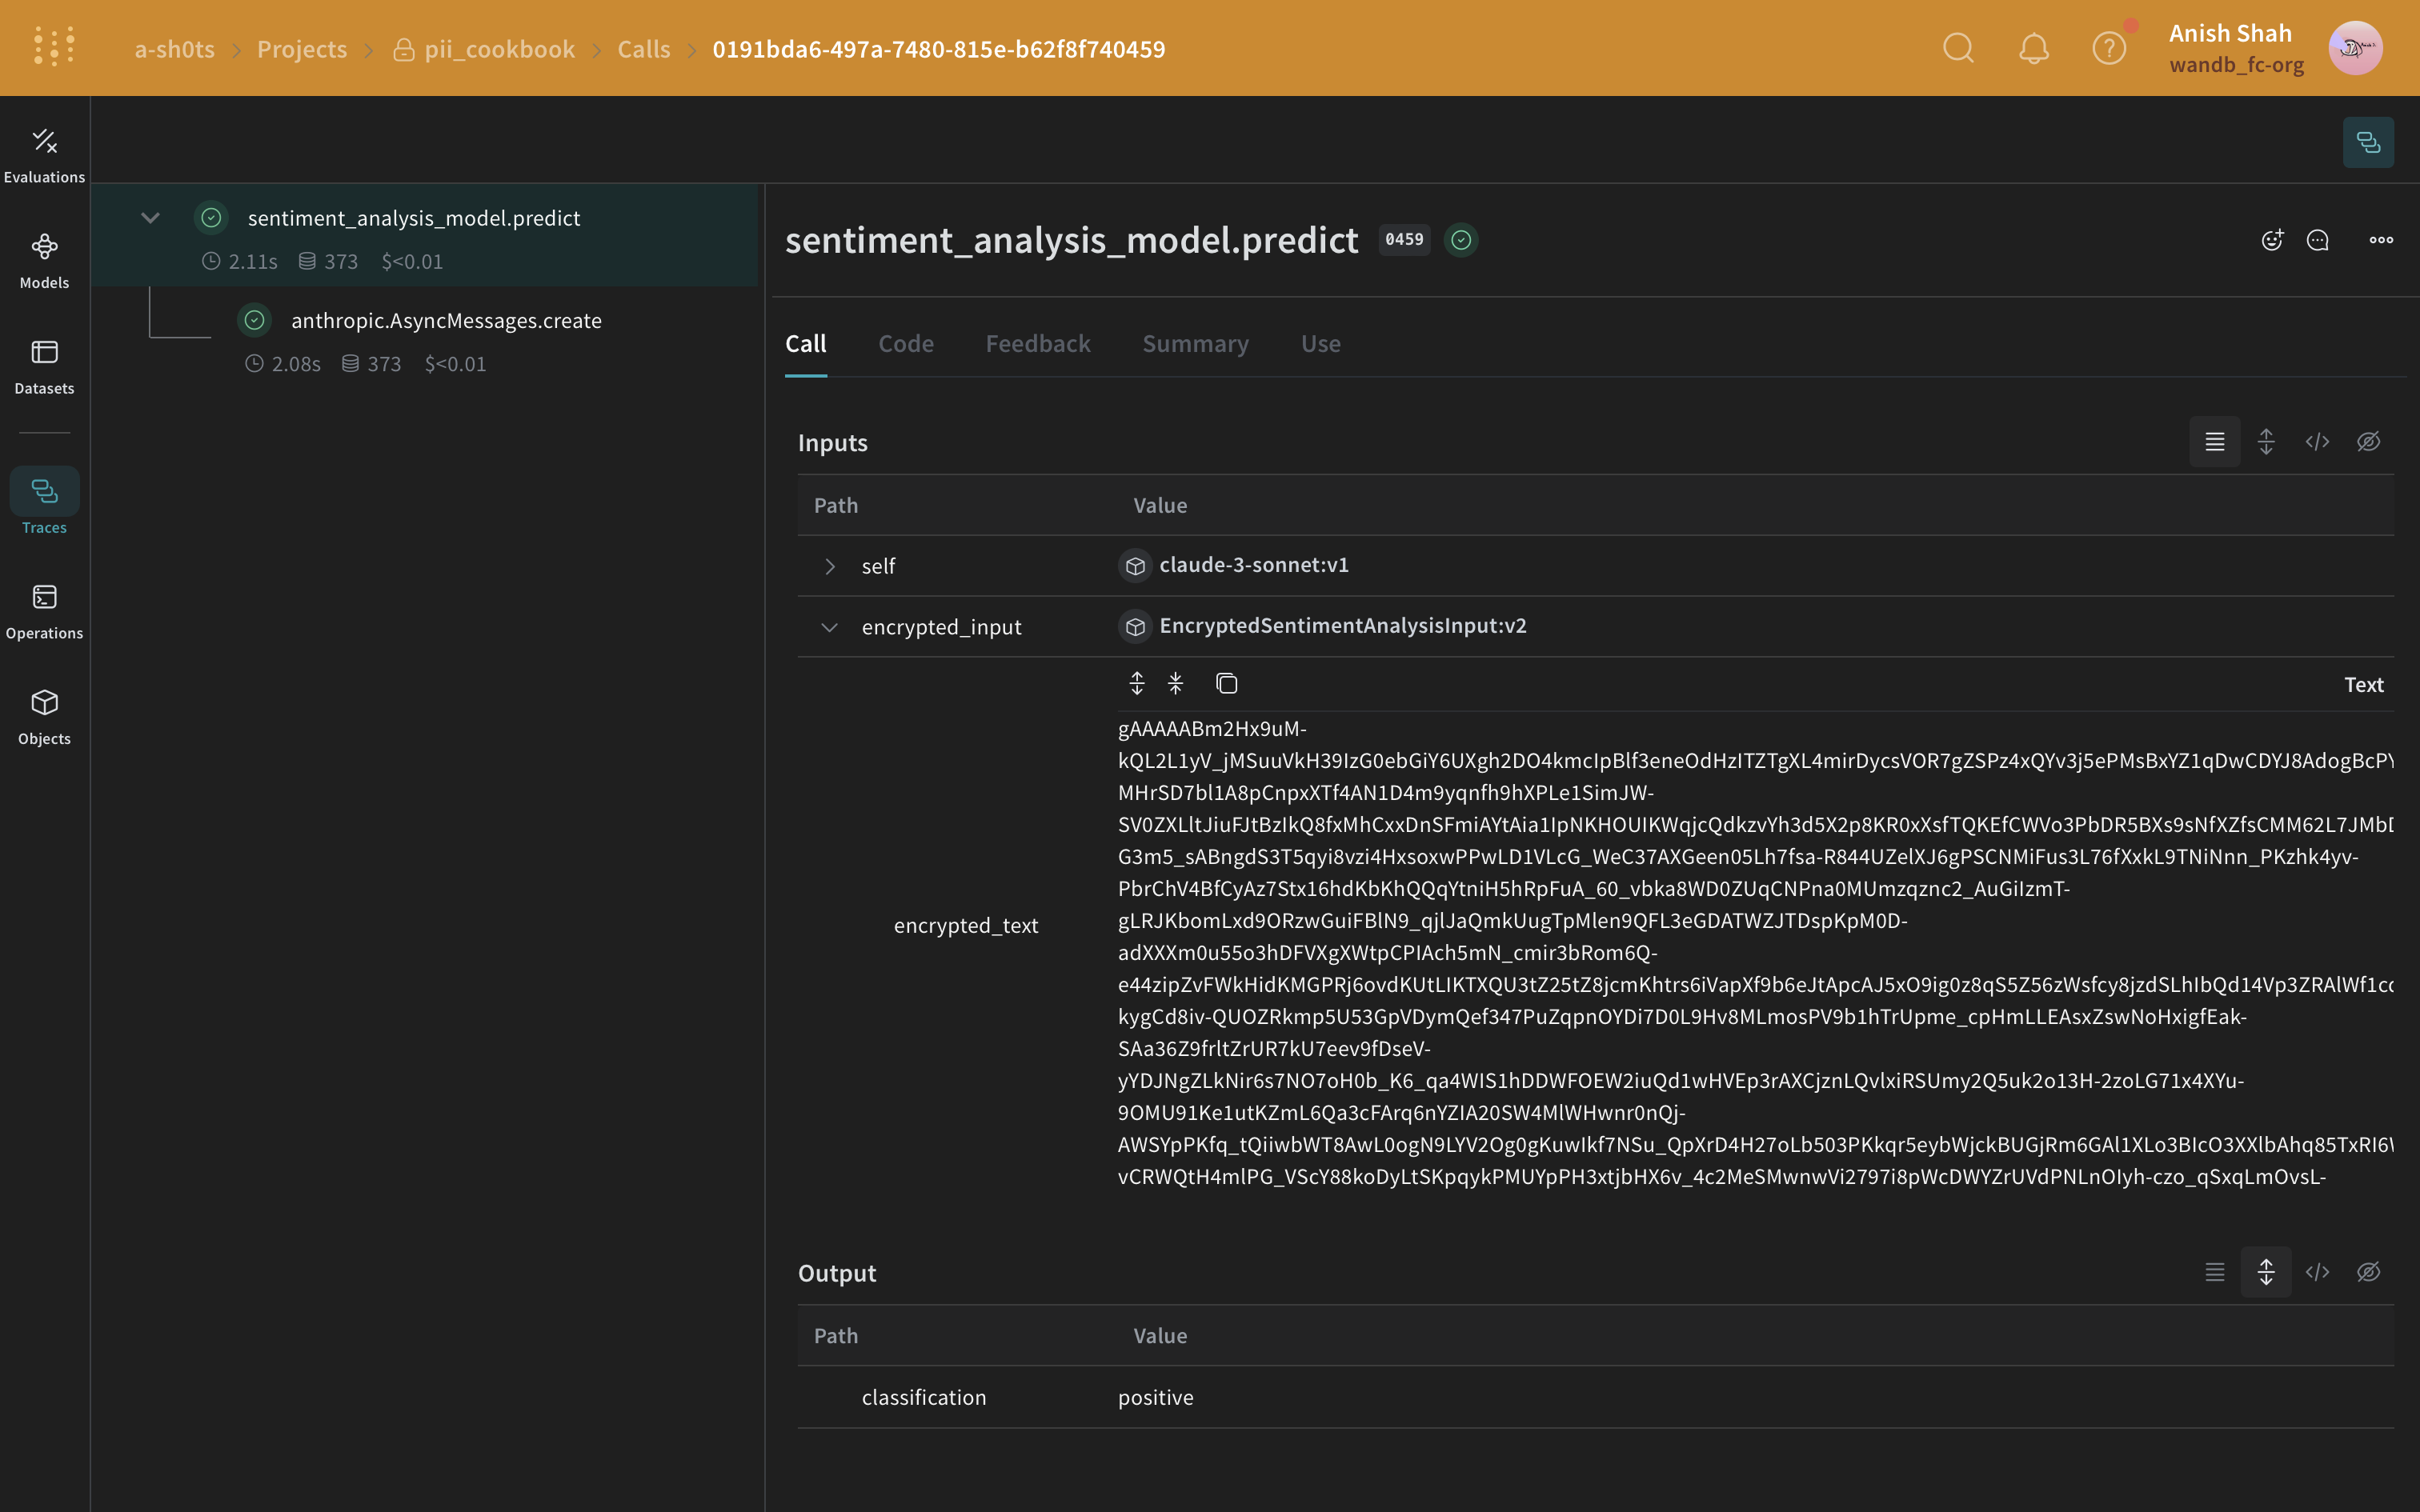 PII の匿名化に加えて、cryptography ライブラリの [Fernet](https://cryptography.io/en/latest/fernet/) 対称暗号化を使ってデータを暗号化すると、セキュリティをさらに強化できます。この方法では、匿名化したデータが傍受された場合でも、暗号化キーがなければ内容を読み取れません。次の例では、入力テキストをログする前に暗号化し、モデルの `predict` メソッド内で復号する方法を示します。
```python lines theme={null}
import os
from cryptography.fernet import Fernet
from pydantic import BaseModel, ValidationInfo, model_validator
def get_fernet_key():
# 環境変数にキーが存在するか確認する
key = os.environ.get('FERNET_KEY')
if key is None:
# キーが存在しない場合、新しいキーを生成する
key = Fernet.generate_key()
# キーを環境変数に保存する
os.environ['FERNET_KEY'] = key.decode()
else:
# キーが存在する場合、バイト型であることを確認する
key = key.encode()
return key
cipher_suite = Fernet(get_fernet_key())
class EncryptedSentimentAnalysisInput(BaseModel):
encrypted_text: str = None
@model_validator(mode="before")
def encrypt_fields(cls, values):
if "text" in values and values["text"] is not None:
values["encrypted_text"] = cipher_suite.encrypt(values["text"].encode()).decode()
del values["text"]
return values
@property
def text(self):
if self.encrypted_text:
return cipher_suite.decrypt(self.encrypted_text.encode()).decode()
return None
@text.setter
def text(self, value):
self.encrypted_text = cipher_suite.encrypt(str(value).encode()).decode()
@classmethod
def encrypt(cls, text: str):
return cls(text=text)
def decrypt(self):
return self.text
# 新しい EncryptedSentimentAnalysisInput を使用するよう sentiment_analysis_model を変更
class sentiment_analysis_model(weave.Model):
model_name: str
system_prompt: str
temperature: int
@weave.op()
async def predict(self, encrypted_input: EncryptedSentimentAnalysisInput) -> dict:
client = AsyncAnthropic()
decrypted_text = encrypted_input.decrypt() # カスタムクラスを使用してテキストを復号する
response = await client.messages.create(
max_tokens=1024,
model=self.model_name,
system=self.system_prompt,
messages=[
{ "role": "user",
"content":[
{
"type": "text",
"text": decrypted_text
}
]
}
]
)
result = response.content[0].text
if result is None:
raise ValueError("No response from model")
parsed = json.loads(result)
return parsed
model = sentiment_analysis_model(
name="claude-3-sonnet",
model_name="claude-3-5-sonnet-20240620",
system_prompt="You are a Sentiment Analysis classifier. You will be classifying text based on their sentiment. Your input will be a block of text. You will answer with one the following rating option[\"positive\", \"negative\", \"neutral\"]. Your answer should one word in json format dict where the key is classification.",
temperature=0
)
for entry in pii_data:
encrypted_input = EncryptedSentimentAnalysisInput.encrypt(entry["text"])
await model.predict(encrypted_input)
```
PII の匿名化に加えて、cryptography ライブラリの [Fernet](https://cryptography.io/en/latest/fernet/) 対称暗号化を使ってデータを暗号化すると、セキュリティをさらに強化できます。この方法では、匿名化したデータが傍受された場合でも、暗号化キーがなければ内容を読み取れません。次の例では、入力テキストをログする前に暗号化し、モデルの `predict` メソッド内で復号する方法を示します。
```python lines theme={null}
import os
from cryptography.fernet import Fernet
from pydantic import BaseModel, ValidationInfo, model_validator
def get_fernet_key():
# 環境変数にキーが存在するか確認する
key = os.environ.get('FERNET_KEY')
if key is None:
# キーが存在しない場合、新しいキーを生成する
key = Fernet.generate_key()
# キーを環境変数に保存する
os.environ['FERNET_KEY'] = key.decode()
else:
# キーが存在する場合、バイト型であることを確認する
key = key.encode()
return key
cipher_suite = Fernet(get_fernet_key())
class EncryptedSentimentAnalysisInput(BaseModel):
encrypted_text: str = None
@model_validator(mode="before")
def encrypt_fields(cls, values):
if "text" in values and values["text"] is not None:
values["encrypted_text"] = cipher_suite.encrypt(values["text"].encode()).decode()
del values["text"]
return values
@property
def text(self):
if self.encrypted_text:
return cipher_suite.decrypt(self.encrypted_text.encode()).decode()
return None
@text.setter
def text(self, value):
self.encrypted_text = cipher_suite.encrypt(str(value).encode()).decode()
@classmethod
def encrypt(cls, text: str):
return cls(text=text)
def decrypt(self):
return self.text
# 新しい EncryptedSentimentAnalysisInput を使用するよう sentiment_analysis_model を変更
class sentiment_analysis_model(weave.Model):
model_name: str
system_prompt: str
temperature: int
@weave.op()
async def predict(self, encrypted_input: EncryptedSentimentAnalysisInput) -> dict:
client = AsyncAnthropic()
decrypted_text = encrypted_input.decrypt() # カスタムクラスを使用してテキストを復号する
response = await client.messages.create(
max_tokens=1024,
model=self.model_name,
system=self.system_prompt,
messages=[
{ "role": "user",
"content":[
{
"type": "text",
"text": decrypted_text
}
]
}
]
)
result = response.content[0].text
if result is None:
raise ValueError("No response from model")
parsed = json.loads(result)
return parsed
model = sentiment_analysis_model(
name="claude-3-sonnet",
model_name="claude-3-5-sonnet-20240620",
system_prompt="You are a Sentiment Analysis classifier. You will be classifying text based on their sentiment. Your input will be a block of text. You will answer with one the following rating option[\"positive\", \"negative\", \"neutral\"]. Your answer should one word in json format dict where the key is classification.",
temperature=0
)
for entry in pii_data:
encrypted_input = EncryptedSentimentAnalysisInput.encrypt(entry["text"])
await model.predict(encrypted_input)
```