> ## Documentation Index
> Fetch the complete documentation index at: https://docs.wandb.ai/llms.txt
> Use this file to discover all available pages before exploring further.
# CrewAI
> CrewAI を Weave と統合し、マルチエージェントアプリケーションを監視・トレースする
 このガイドでは、[Crews](https://docs.crewai.com/guides/crews/first-crew) と [Flows](https://docs.crewai.com/guides/flows/first-flow) の両方を含む [CrewAI](https://docs.crewai.com/introduction) のマルチエージェントアプリケーションを、Weave を使用して監視およびトレースする方法を紹介します。
CrewAI は、自律型 AI エージェントを構築するための Python フレームワークです。LangChain や他のエージェントフレームワークには依存しておらず、高レベルの [Crews](https://docs.crewai.com/guides/crews/first-crew) と低レベルの [Flows](https://docs.crewai.com/guides/flows/first-flow) という 2 つの抽象化をサポートします。
CrewAI アプリケーションは複数のエージェントが連携して動作することが多いため、それらがどのように協調し、やり取りしているかを理解することが不可欠です。Weave は、CrewAI アプリケーションのトレースを自動的に取得し、エージェントのパフォーマンスや相互作用を監視・分析できるようにします。
以下のセクションでは、Crew のトレース、ツール使用状況のトラッキング、Flow のトレース、およびガードレール関数を Weave op としてラップする方法を順に説明します。
このガイドでは、[Crews](https://docs.crewai.com/guides/crews/first-crew) と [Flows](https://docs.crewai.com/guides/flows/first-flow) の両方を含む [CrewAI](https://docs.crewai.com/introduction) のマルチエージェントアプリケーションを、Weave を使用して監視およびトレースする方法を紹介します。
CrewAI は、自律型 AI エージェントを構築するための Python フレームワークです。LangChain や他のエージェントフレームワークには依存しておらず、高レベルの [Crews](https://docs.crewai.com/guides/crews/first-crew) と低レベルの [Flows](https://docs.crewai.com/guides/flows/first-flow) という 2 つの抽象化をサポートします。
CrewAI アプリケーションは複数のエージェントが連携して動作することが多いため、それらがどのように協調し、やり取りしているかを理解することが不可欠です。Weave は、CrewAI アプリケーションのトレースを自動的に取得し、エージェントのパフォーマンスや相互作用を監視・分析できるようにします。
以下のセクションでは、Crew のトレース、ツール使用状況のトラッキング、Flow のトレース、およびガードレール関数を Weave op としてラップする方法を順に説明します。
## Crew を使い始める
この例を実行するには、CrewAI と Weave をインストールしてください。CrewAI のインストールの詳細については、[CrewAI installation guide](https://docs.crewai.com/installation) をご覧ください。
```bash theme={null}
pip install crewai weave
```
次の例では、CrewAI Crew を作成し、Weave を使用して実行をトレースします。トレースを有効にするには、スクリプトの先頭で `weave.init()` を呼び出します。`weave.init()` の引数には、Weave がトレースをログするプロジェクト名を指定します。
```python lines {5} theme={null}
import weave
from crewai import Agent, Task, Crew, LLM, Process
# プロジェクト名で Weave を初期化する
weave.init(project_name="crewai_demo")
# 決定論的な出力を保証するため、temperature を 0 に設定して LLM を作成する
llm = LLM(model="gpt-4o-mini", temperature=0)
# エージェントを作成する
researcher = Agent(
role='Research Analyst',
goal='Find and analyze the best investment opportunities',
backstory='Expert in financial analysis and market research',
llm=llm,
verbose=True,
allow_delegation=False,
)
writer = Agent(
role='Report Writer',
goal='Write clear and concise investment reports',
backstory='Experienced in creating detailed financial reports',
llm=llm,
verbose=True,
allow_delegation=False,
)
# タスクを作成する
research_task = Task(
description='Deep research on the {topic}',
expected_output='Comprehensive market data including key players, market size, and growth trends.',
agent=researcher
)
writing_task = Task(
description='Write a detailed report based on the research',
expected_output='The report should be easy to read and understand. Use bullet points where applicable.',
agent=writer
)
# Crew を作成する
crew = Crew(
agents=[researcher, writer],
tasks=[research_task, writing_task],
verbose=True,
process=Process.sequential,
)
# Crew を実行する
result = crew.kickoff(inputs={"topic": "AI in material science"})
print(result)
```
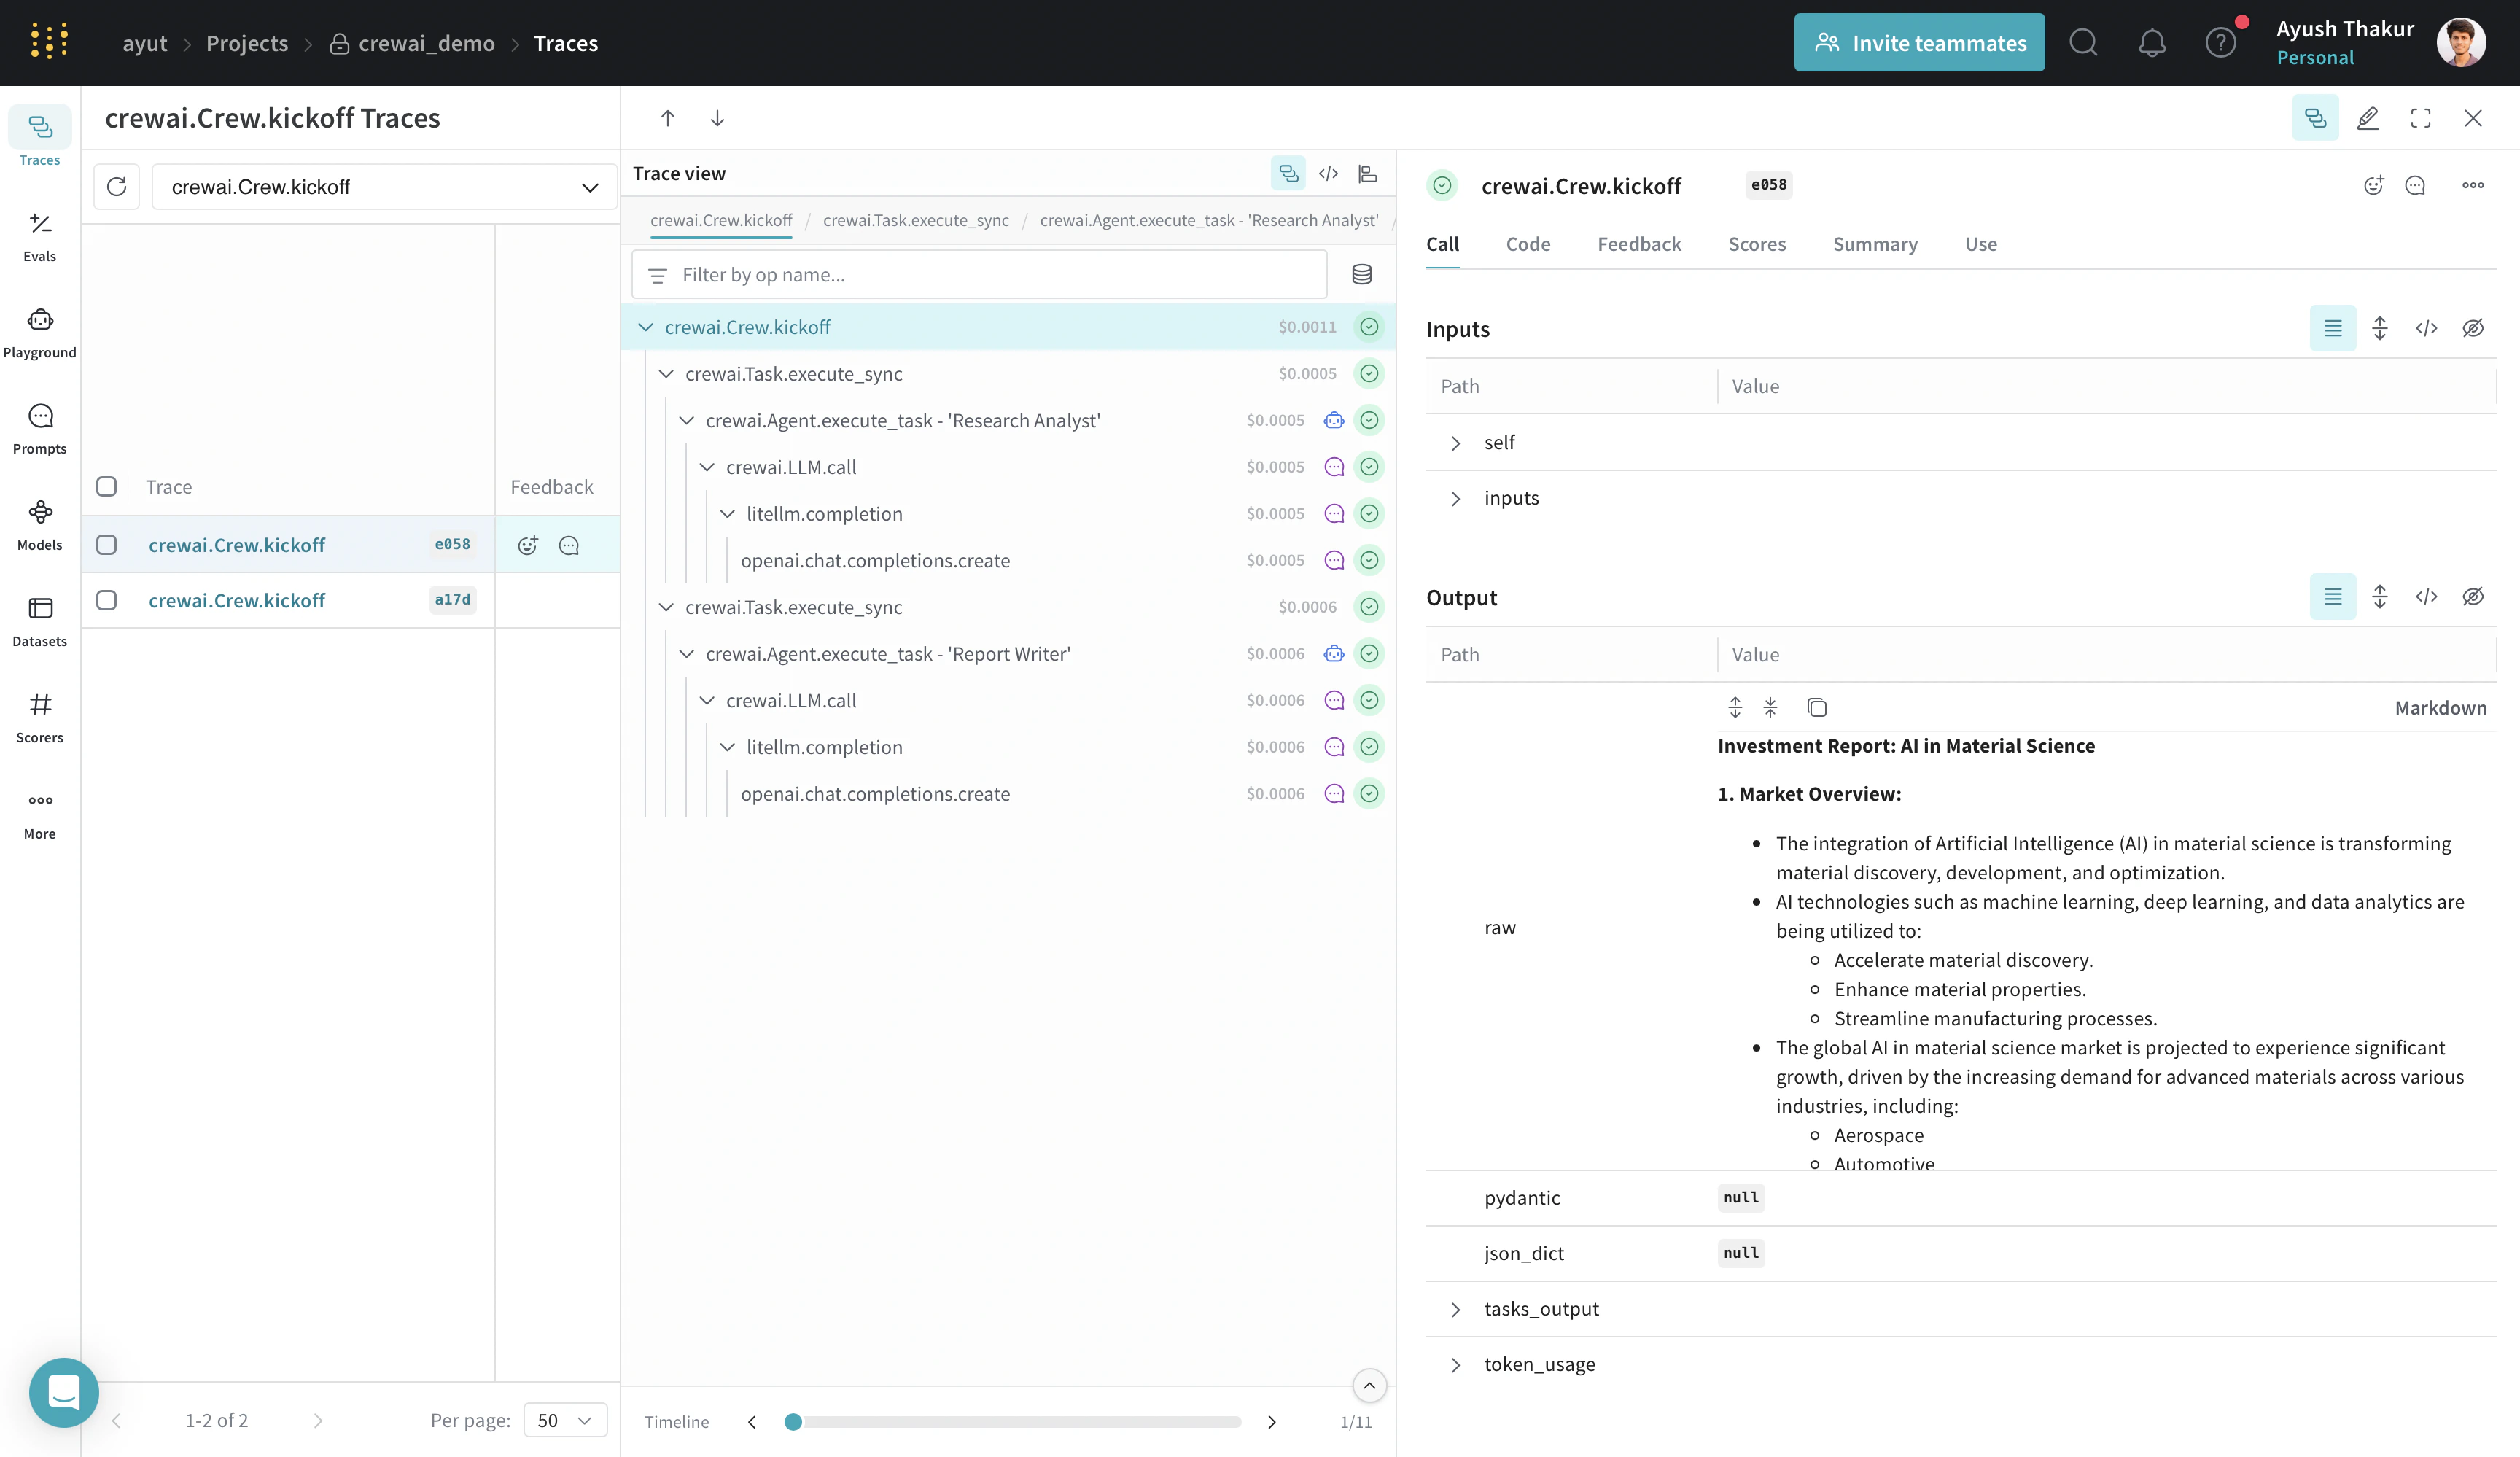
Weave は、CrewAI ライブラリを介して行われるすべての calls をトラッキングし、ログします。これには、エージェント のやり取り、タスクの実行、LLM calls が含まれます。トレースは Weave の Web インターフェースで確認できます。
[ ](https://wandb.ai/ayut/crewai_demo/weave/traces?filter=%7B%22opVersionRefs%22%3A%5B%22weave%3A%2F%2F%2Fayut%2Fcrewai_demo%2Fop%2Fcrewai.Crew.kickoff%3A*%22%5D%7D\&peekPath=%2Fayut%2Fcrewai_demo%2Fcalls%2F0195c7ac-bd52-7390-95a7-309370e9e058%3FhideTraceTree%3D0\&cols=%7B%22wb_run_id%22%3Afalse%2C%22attributes.weave.client_version%22%3Afalse%2C%22attributes.weave.os_name%22%3Afalse%2C%22attributes.weave.os_release%22%3Afalse%2C%22attributes.weave.os_version%22%3Afalse%2C%22attributes.weave.source%22%3Afalse%2C%22attributes.weave.sys_version%22%3Afalse%7D)
CrewAI には、kickoff プロセスをより細かく制御するための複数の method (`kickoff()`, `kickoff_for_each()`, `kickoff_async()`, `kickoff_for_each_async()`) があります。このインテグレーションは、これらすべての method からのトレースのログをサポートしています。
](https://wandb.ai/ayut/crewai_demo/weave/traces?filter=%7B%22opVersionRefs%22%3A%5B%22weave%3A%2F%2F%2Fayut%2Fcrewai_demo%2Fop%2Fcrewai.Crew.kickoff%3A*%22%5D%7D\&peekPath=%2Fayut%2Fcrewai_demo%2Fcalls%2F0195c7ac-bd52-7390-95a7-309370e9e058%3FhideTraceTree%3D0\&cols=%7B%22wb_run_id%22%3Afalse%2C%22attributes.weave.client_version%22%3Afalse%2C%22attributes.weave.os_name%22%3Afalse%2C%22attributes.weave.os_release%22%3Afalse%2C%22attributes.weave.os_version%22%3Afalse%2C%22attributes.weave.source%22%3Afalse%2C%22attributes.weave.sys_version%22%3Afalse%7D)
CrewAI には、kickoff プロセスをより細かく制御するための複数の method (`kickoff()`, `kickoff_for_each()`, `kickoff_async()`, `kickoff_for_each_async()`) があります。このインテグレーションは、これらすべての method からのトレースのログをサポートしています。
## ツールをトラッキングする
CrewAI のツールは、Web 検索やデータ分析から、共同作業や同僚へのタスク委任まで、さまざまな機能をエージェントに提供します。インテグレーションでは、それらもトレースできます。
インターネットを検索して最も関連性の高い結果を返せるツールを使えるようにすることで、前の例で生成されたレポートの品質を向上させます。
まず、追加の依存関係をインストールします。
```bash theme={null}
pip install 'crewai[tools]'
```
この例では、`SerperDevTool` を使用して、'Research Analyst' エージェントがインターネット上の関連情報を検索できるようにしています。このツールと API の要件の詳細については、[SerperDevTool documentation](https://docs.crewai.com/tools/serperdevtool)をご覧ください。
```python lines {12} theme={null}
# .... 既存のインポート ....
from crewai_tools import SerperDevTool
# エージェントにツールを提供します。
researcher = Agent(
role='Research Analyst',
goal='Find and analyze the best investment opportunities',
backstory='Expert in financial analysis and market research',
llm=llm,
verbose=True,
allow_delegation=False,
tools=[SerperDevTool()],
)
# .... 既存のコード ....
```
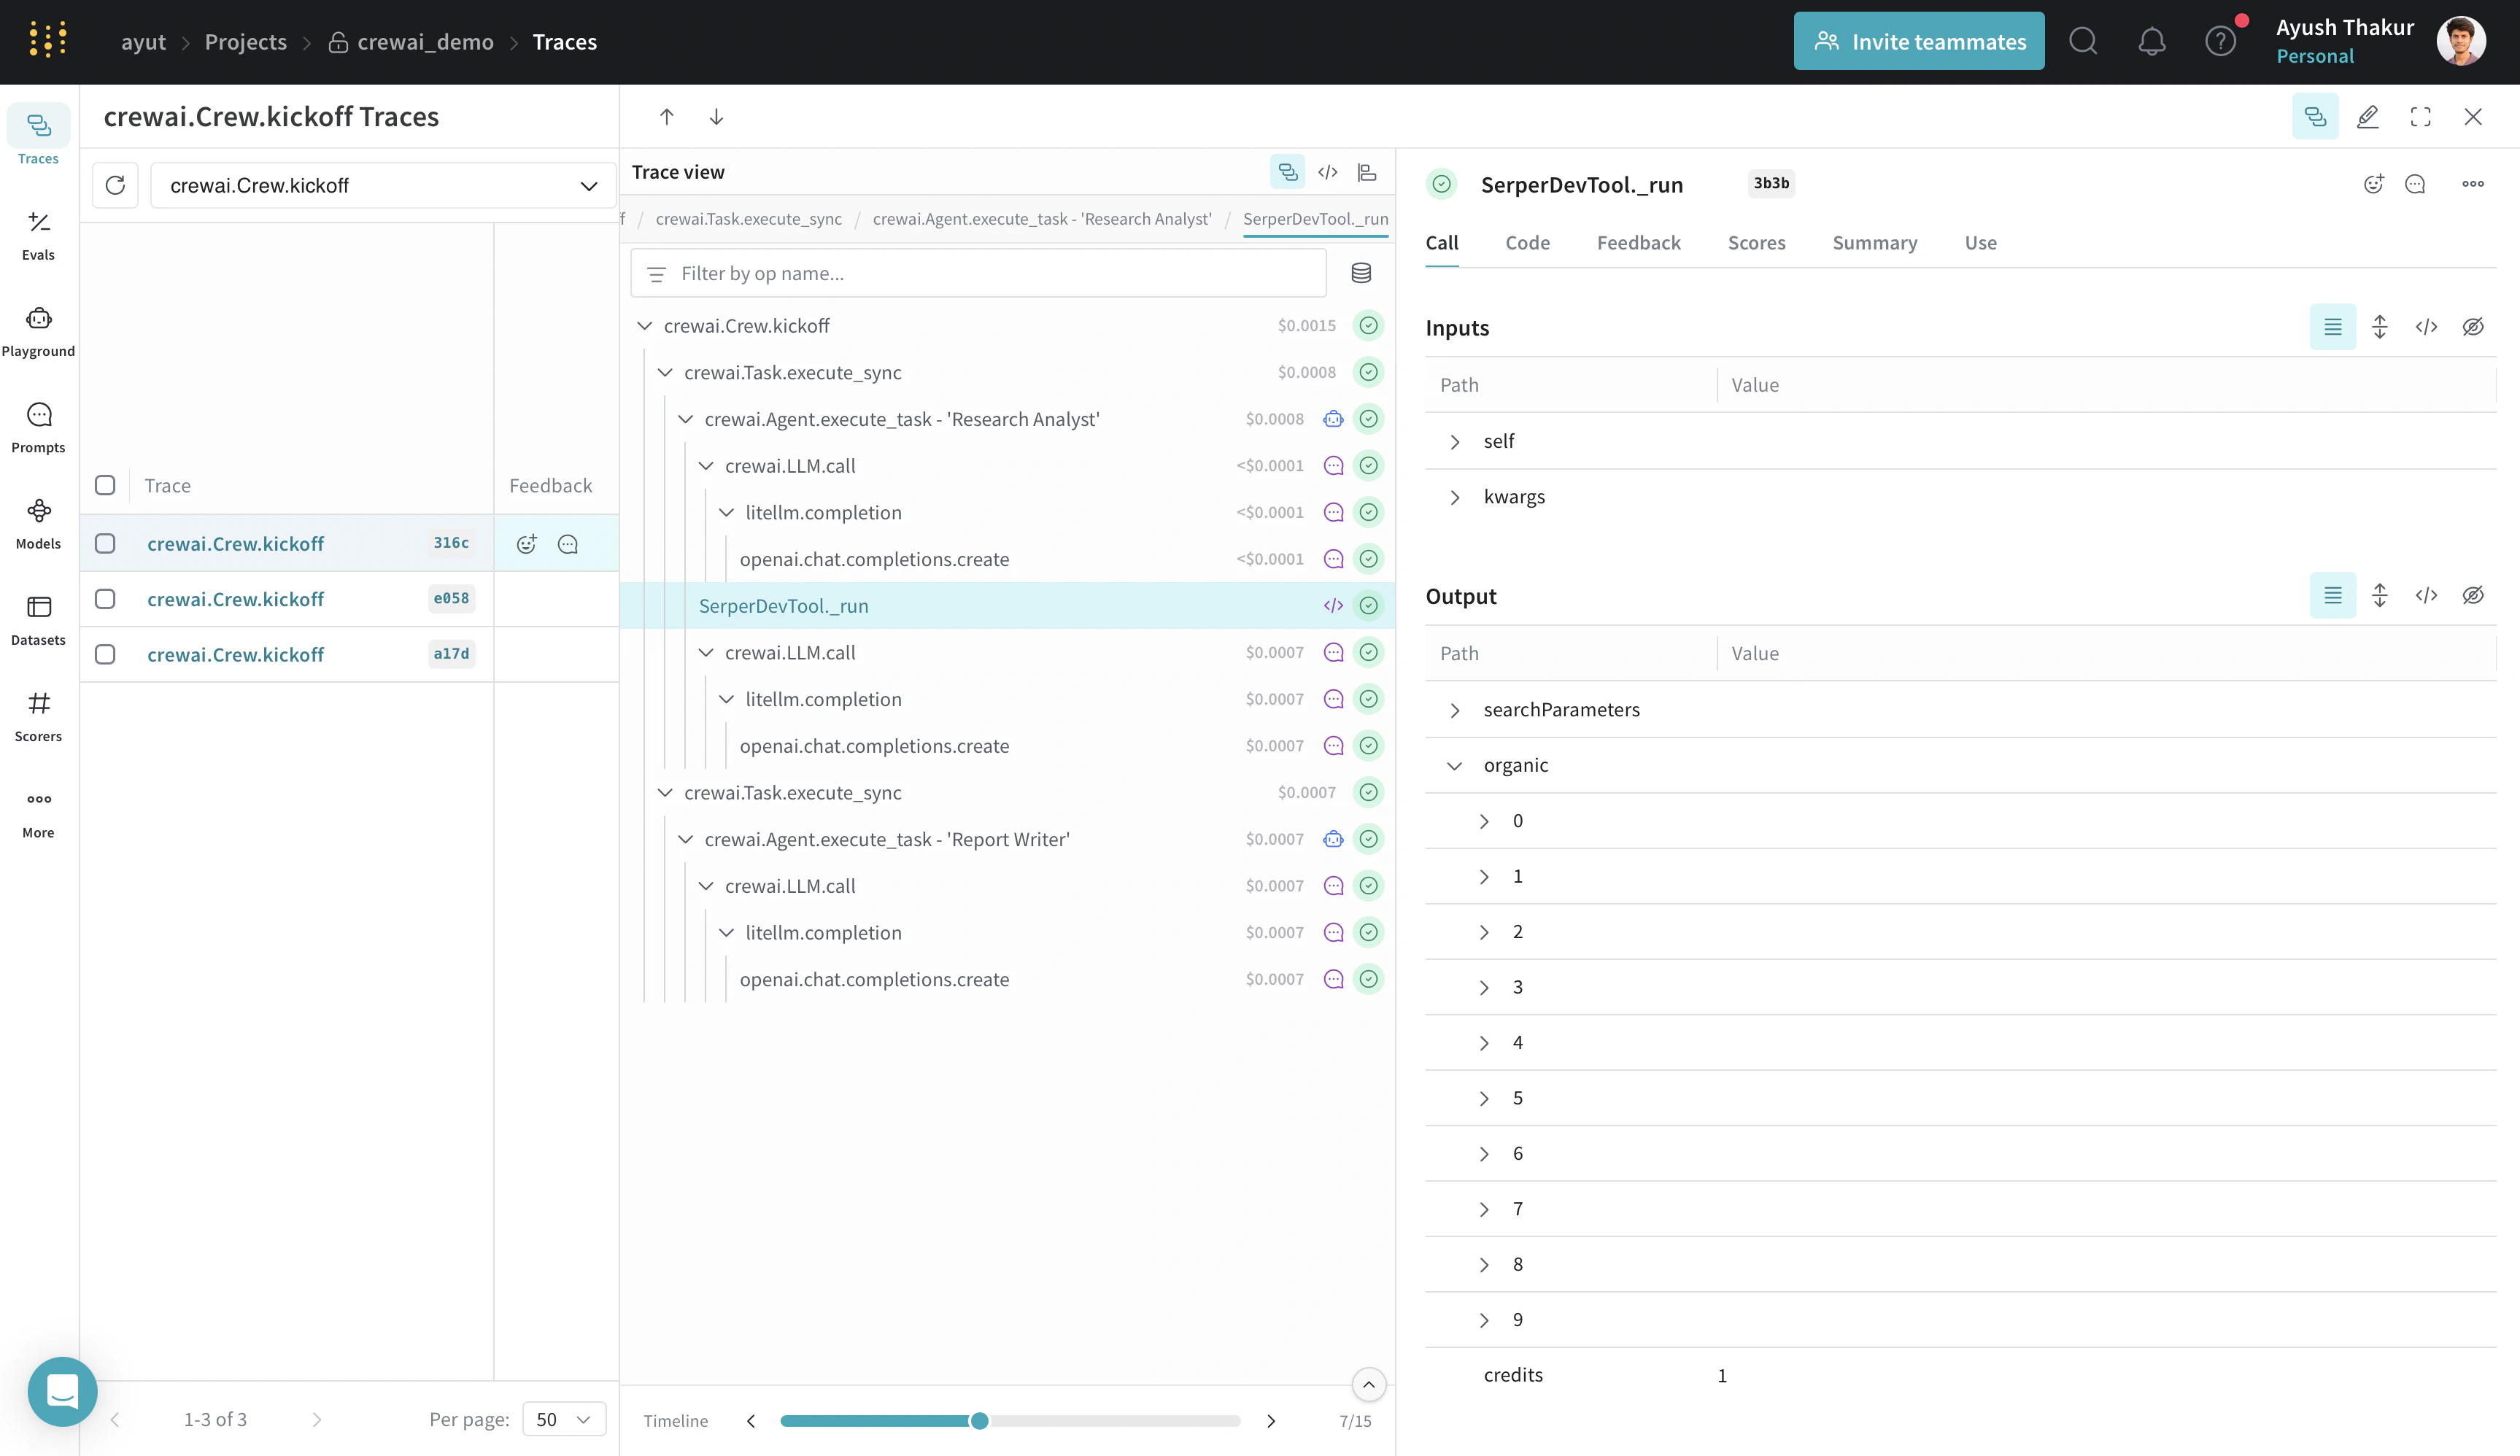
インターネットにアクセスできるエージェントでこの Crew を実行すると、より関連性の高い結果が得られます。Weave は、以下の画像のようにツールの使用を自動的にトレースします。
[ ](https://wandb.ai/ayut/crewai_demo/weave/traces?filter=%7B%22opVersionRefs%22%3A%5B%22weave%3A%2F%2F%2Fayut%2Fcrewai_demo%2Fop%2Fcrewai.Crew.kickoff%3A*%22%5D%7D\&peekPath=%2Fayut%2Fcrewai_demo%2Fcalls%2F0195c7c7-0213-7f42-b130-caa93a79316c%3FdescendentCallId%3D0195c7c7-0a16-7f11-8cfd-9dedf1d03b3b\&cols=%7B%22wb_run_id%22%3Afalse%2C%22attributes.weave.client_version%22%3Afalse%2C%22attributes.weave.os_name%22%3Afalse%2C%22attributes.weave.os_release%22%3Afalse%2C%22attributes.weave.os_version%22%3Afalse%2C%22attributes.weave.source%22%3Afalse%2C%22attributes.weave.sys_version%22%3Afalse%7D)
このインテグレーションは、[`crewAI-tools`](https://github.com/crewAIInc/crewAI-tools)リポジトリで利用可能なすべてのツールに自動的にパッチを適用します。
](https://wandb.ai/ayut/crewai_demo/weave/traces?filter=%7B%22opVersionRefs%22%3A%5B%22weave%3A%2F%2F%2Fayut%2Fcrewai_demo%2Fop%2Fcrewai.Crew.kickoff%3A*%22%5D%7D\&peekPath=%2Fayut%2Fcrewai_demo%2Fcalls%2F0195c7c7-0213-7f42-b130-caa93a79316c%3FdescendentCallId%3D0195c7c7-0a16-7f11-8cfd-9dedf1d03b3b\&cols=%7B%22wb_run_id%22%3Afalse%2C%22attributes.weave.client_version%22%3Afalse%2C%22attributes.weave.os_name%22%3Afalse%2C%22attributes.weave.os_release%22%3Afalse%2C%22attributes.weave.os_version%22%3Afalse%2C%22attributes.weave.source%22%3Afalse%2C%22attributes.weave.sys_version%22%3Afalse%7D)
このインテグレーションは、[`crewAI-tools`](https://github.com/crewAIInc/crewAI-tools)リポジトリで利用可能なすべてのツールに自動的にパッチを適用します。
## Flow 入門
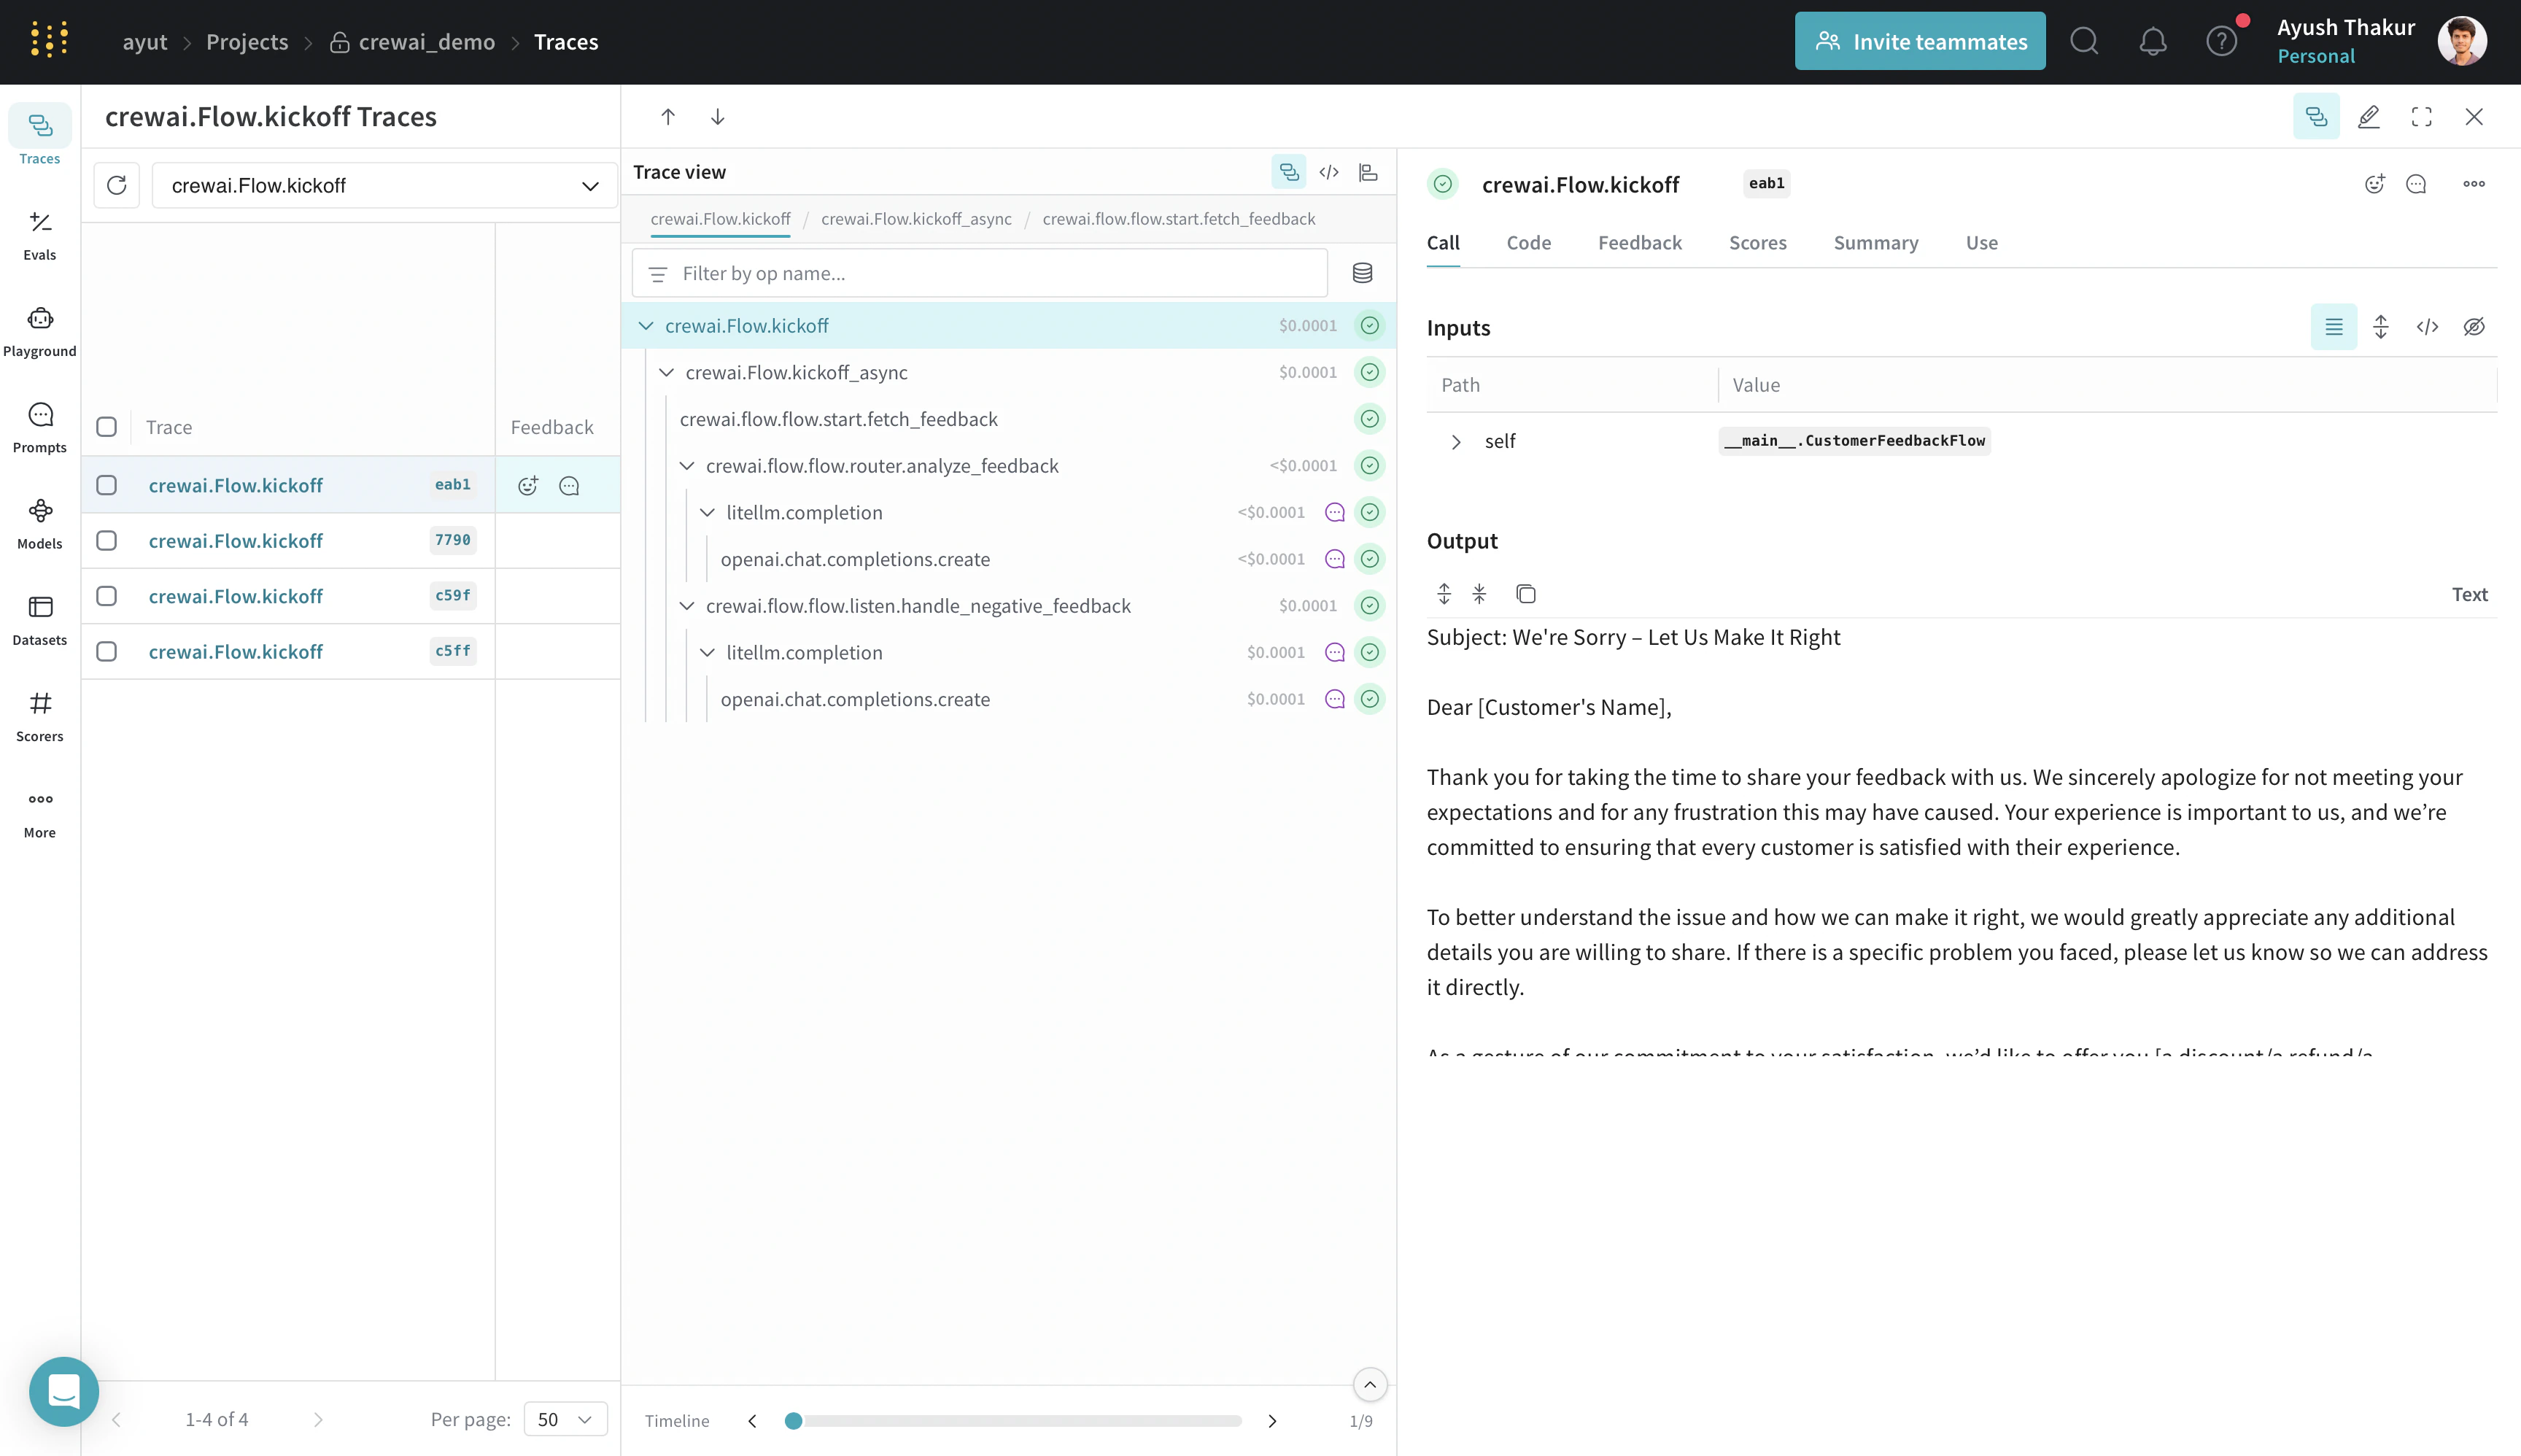
次の例では、CrewAI Flow を定義し、Weave でトレースします。Crews の場合と同様に、Flow を定義する前に `weave.init()` を呼び出してください。これにより、Weave は `Flow.kickoff` のエントリポイントと、`@start`、`@listen`、`@router`、`@or_`、`@and_` の各デコレータを自動的に取得します。
```python lines {3} theme={null}
import weave
# プロジェクト名でWeaveを初期化する
weave.init("crewai_demo")
from crewai.flow.flow import Flow, listen, router, start
from litellm import completion
class CustomerFeedbackFlow(Flow):
model = "gpt-4o-mini"
@start()
def fetch_feedback(self):
print("Fetching customer feedback")
# 実際のシナリオでは、これをAPIコールに置き換えることができます。
# この例では、カスタマーフィードバックをシミュレートします。
feedback = (
"I had a terrible experience with the product. "
"It broke after one use and customer service was unhelpful."
)
self.state["feedback"] = feedback
return feedback
@router(fetch_feedback)
def analyze_feedback(self, feedback):
# 言語モデルを使用してセンチメントを分析する
prompt = (
f"Analyze the sentiment of this customer feedback and "
"return only 'positive' or 'negative':\n\n"
f"Feedback: {feedback}"
)
response = completion(
model=self.model,
messages=[{"role": "user", "content": prompt}],
)
sentiment = response["choices"][0]["message"]["content"].strip().lower()
# レスポンスが曖昧な場合はnegativeをデフォルトとする
if sentiment not in ["positive", "negative"]:
sentiment = "negative"
return sentiment
@listen("positive")
def handle_positive_feedback(self):
# ポジティブなフィードバックに対するお礼メッセージを生成する
prompt = "Generate a thank you message for a customer who provided positive feedback."
response = completion(
model=self.model,
messages=[{"role": "user", "content": prompt}],
)
thank_you_message = response["choices"][0]["message"]["content"].strip()
self.state["response"] = thank_you_message
return thank_you_message
@listen("negative")
def handle_negative_feedback(self):
# ネガティブなフィードバックに対してサービス改善を約束するお詫びメッセージを生成する
prompt = (
"Generate an apology message to a customer who provided negative feedback and offer assistance or a solution."
)
response = completion(
model=self.model,
messages=[{"role": "user", "content": prompt}],
)
apology_message = response["choices"][0]["message"]["content"].strip()
self.state["response"] = apology_message
return apology_message
# Flowをインスタンス化してキックオフする
flow = CustomerFeedbackFlow()
result = flow.kickoff()
print(result)
```
[ ](https://wandb.ai/ayut/crewai_demo/weave/traces?filter=%7B%22opVersionRefs%22%3A%5B%22weave%3A%2F%2F%2Fayut%2Fcrewai_demo%2Fop%2Fcrewai.Flow.kickoff%3A*%22%5D%7D\&peekPath=%2Fayut%2Fcrewai_demo%2Fcalls%2F0195c7e3-7a63-7283-bef4-9e0eb2f0eab1\&cols=%7B%22wb_run_id%22%3Afalse%2C%22attributes.weave.client_version%22%3Afalse%2C%22attributes.weave.os_name%22%3Afalse%2C%22attributes.weave.os_release%22%3Afalse%2C%22attributes.weave.os_version%22%3Afalse%2C%22attributes.weave.source%22%3Afalse%2C%22attributes.weave.sys_version%22%3Afalse%7D)
このインテグレーションでは、`Flow.kickoff` のエントリポイントと、使用可能なすべてのデコレータ (`@start`、`@listen`、`@router`、`@or_`、`@and_`) に自動的にパッチが適用されます。
](https://wandb.ai/ayut/crewai_demo/weave/traces?filter=%7B%22opVersionRefs%22%3A%5B%22weave%3A%2F%2F%2Fayut%2Fcrewai_demo%2Fop%2Fcrewai.Flow.kickoff%3A*%22%5D%7D\&peekPath=%2Fayut%2Fcrewai_demo%2Fcalls%2F0195c7e3-7a63-7283-bef4-9e0eb2f0eab1\&cols=%7B%22wb_run_id%22%3Afalse%2C%22attributes.weave.client_version%22%3Afalse%2C%22attributes.weave.os_name%22%3Afalse%2C%22attributes.weave.os_release%22%3Afalse%2C%22attributes.weave.os_version%22%3Afalse%2C%22attributes.weave.source%22%3Afalse%2C%22attributes.weave.sys_version%22%3Afalse%7D)
このインテグレーションでは、`Flow.kickoff` のエントリポイントと、使用可能なすべてのデコレータ (`@start`、`@listen`、`@router`、`@or_`、`@and_`) に自動的にパッチが適用されます。
## Crew guardrail: 独自の ops をトラッキングする
タスクガードレールを使うと、CrewAI がタスクの出力を次のタスクに渡す前に検証や変換を行えます。エージェント の実行内容をその場で検証するには、Python 関数を使用できます。
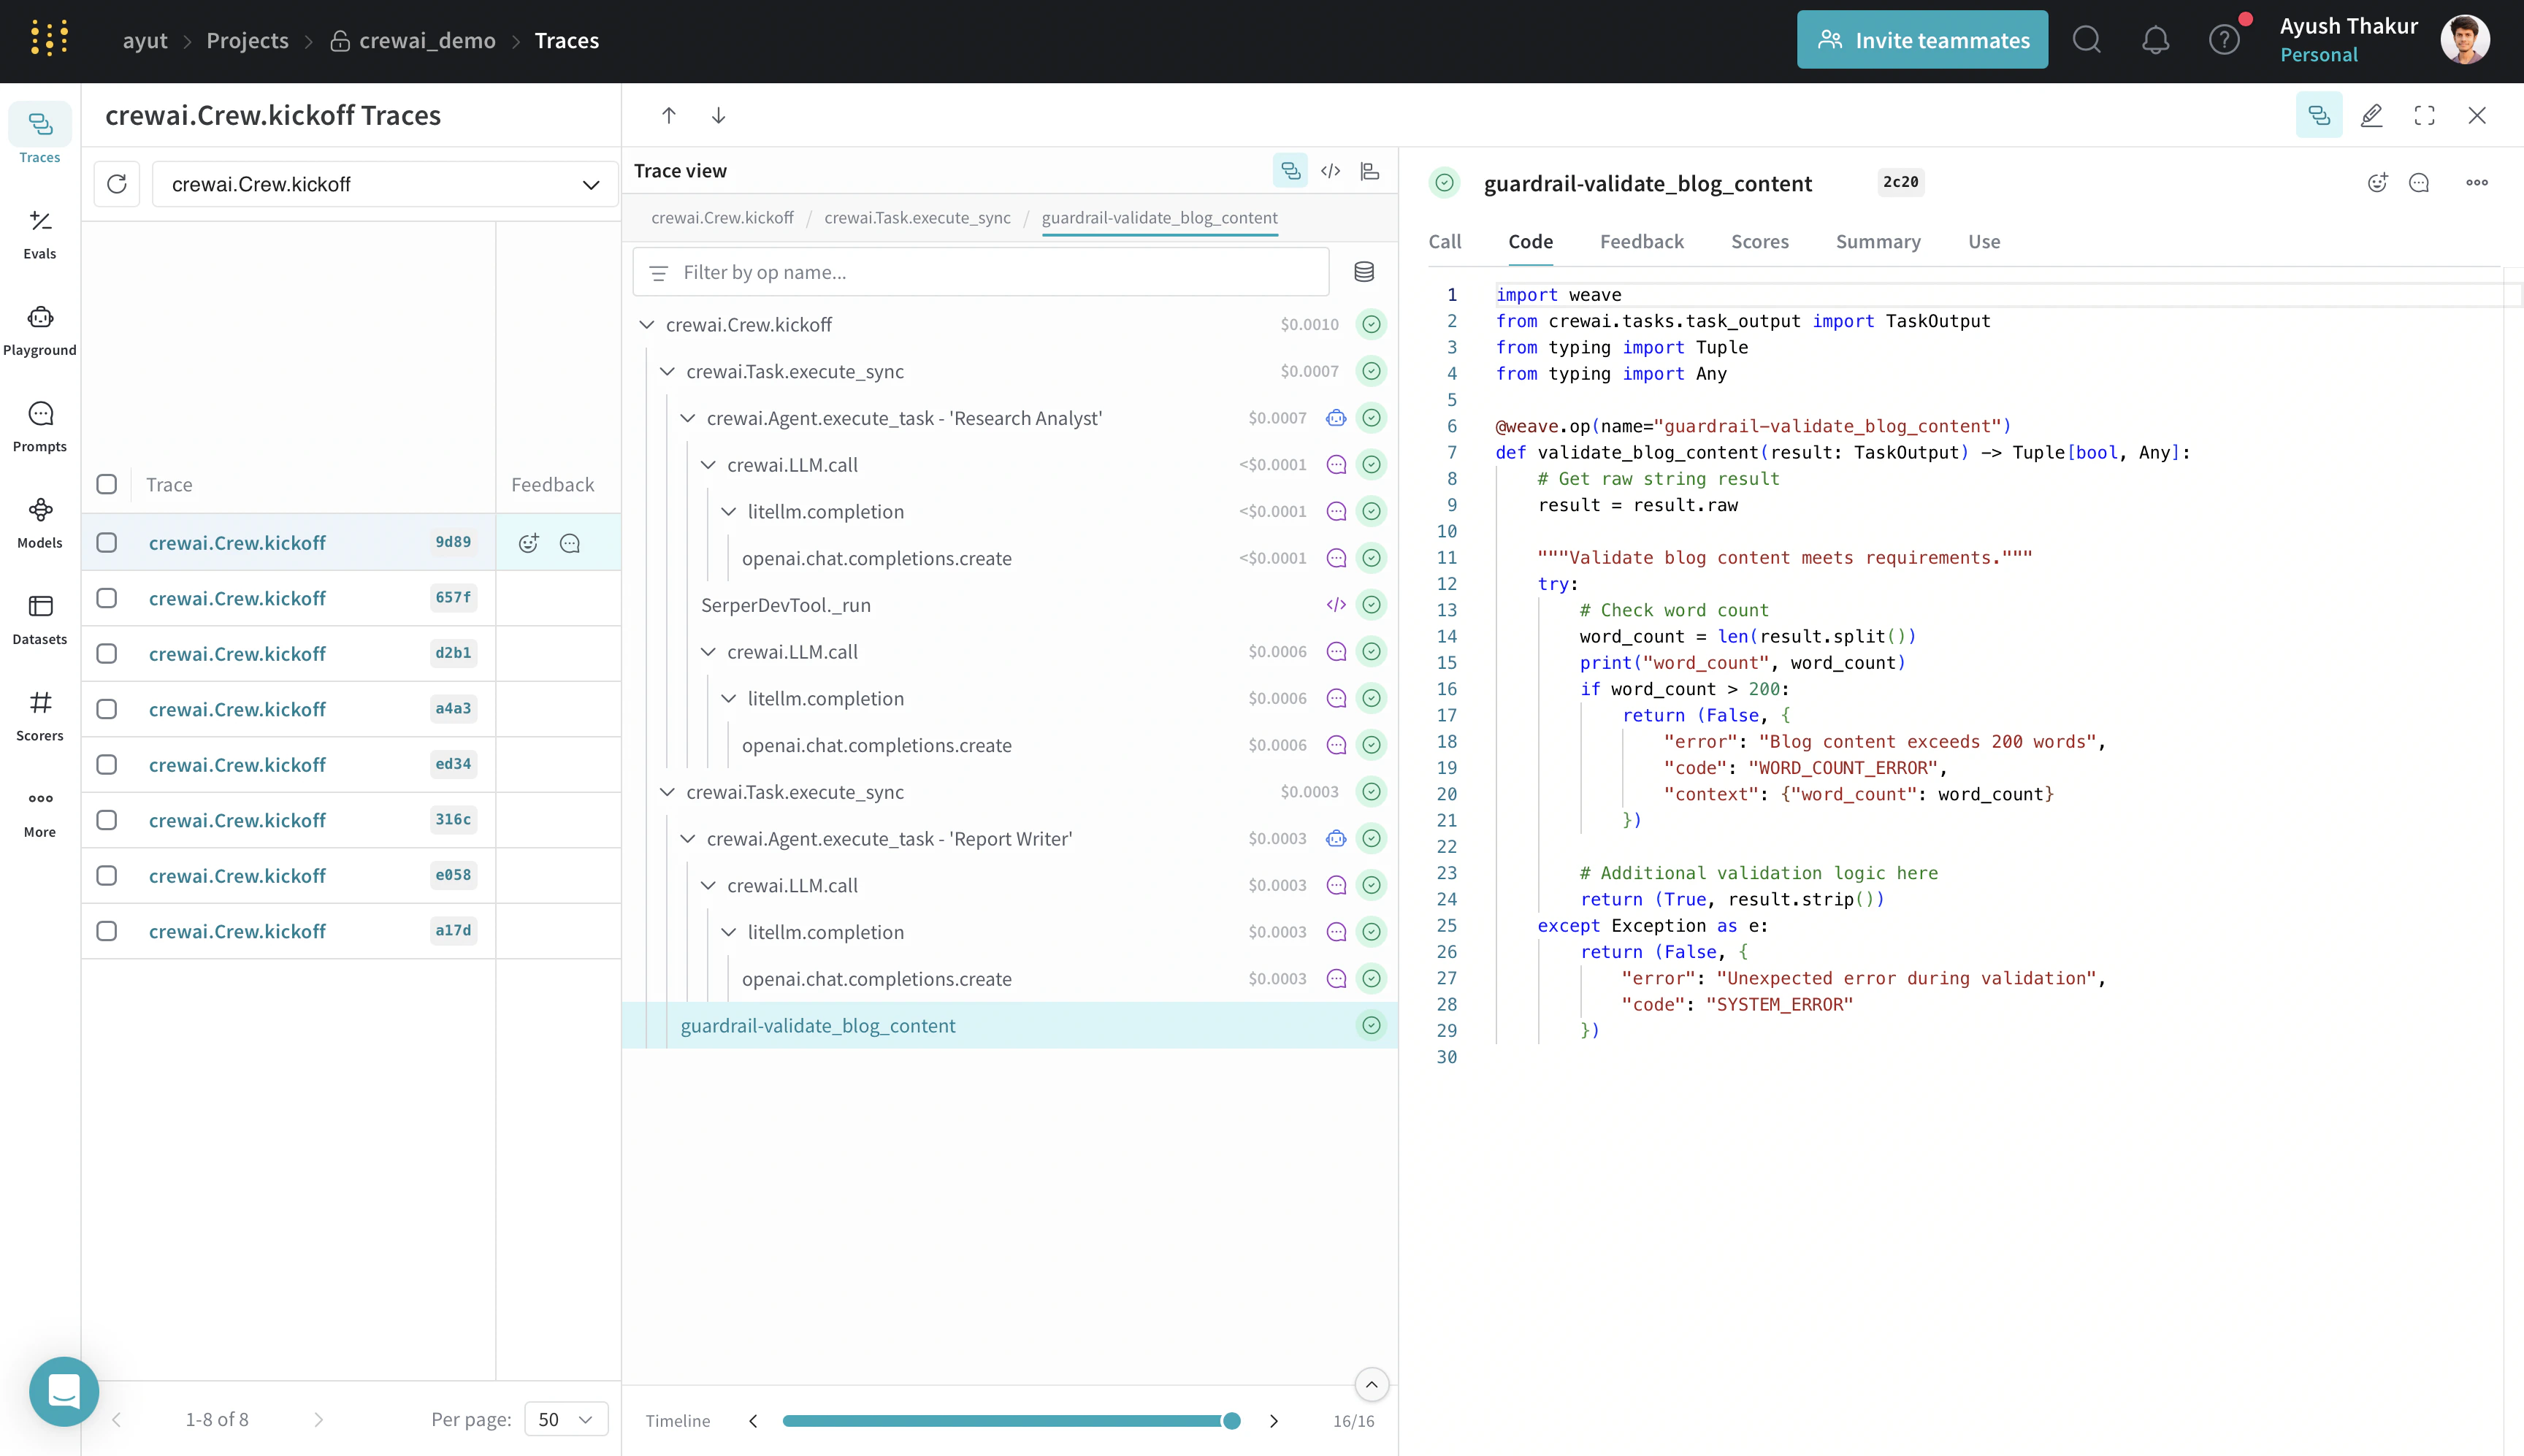
ガードレール関数を `@weave.op` でラップすると、inputs、outputs、アプリケーションロジックが取得され、エージェント を通じてデータがどのように検証されるかをデバッグできるようになります。さらに、実験を進める中で git にコミットされていないアドホックな詳細も記録できるよう、コードのバージョン管理も自動的に開始されます。
次の例では、リサーチアナリストとライターの Crew を拡張し、生成されたレポートの長さを検証するガードレールを追加します。
```python lines {4,36} theme={null}
# .... 既存のインポートと weave の初期化 ....
# ガードレール関数を `@weave.op()` でデコレートする
@weave.op(name="guardrail-validate_blog_content")
def validate_blog_content(result: TaskOutput) -> Tuple[bool, Any]:
# 生の string 結果を取得する
result = result.raw
"""Validate blog content meets requirements."""
try:
# 単語数を確認する
word_count = len(result.split())
if word_count > 200:
return (False, {
"error": "Blog content exceeds 200 words",
"code": "WORD_COUNT_ERROR",
"context": {"word_count": word_count}
})
# 追加の検証ロジックをここに記述
return (True, result.strip())
except Exception as e:
return (False, {
"error": "Unexpected error during validation",
"code": "SYSTEM_ERROR"
})
# .... 既存のエージェントとリサーチアナリストのタスク ....
writing_task = Task(
description='Write a detailed report based on the research under 200 words',
expected_output='The report should be easy to read and understand. Use bullet points where applicable.',
agent=writer,
guardrail=validate_blog_content,
)
# .... crew を実行する既存のコード ....
```
ガードレール関数を `@weave.op` でデコレートすると、この関数の入力と出力に加え、実行時間、関数が LLM を使用している場合のトークン情報、コード version などをトラッキングできます。
[ ](https://wandb.ai/ayut/crewai_demo/weave/traces?filter=%7B%22opVersionRefs%22%3A%5B%22weave%3A%2F%2F%2Fayut%2Fcrewai_demo%2Fop%2Fcrewai.Crew.kickoff%3A*%22%5D%7D\&peekPath=%2Fayut%2Fcrewai_demo%2Fcalls%2F0195c838-38cb-71a2-8a15-651ecddf9d89%3FdescendentCallId%3D0195c838-8632-7173-846d-f230e7272c20\&cols=%7B%22wb_run_id%22%3Afalse%2C%22attributes.weave.client_version%22%3Afalse%2C%22attributes.weave.os_name%22%3Afalse%2C%22attributes.weave.os_release%22%3Afalse%2C%22attributes.weave.os_version%22%3Afalse%2C%22attributes.weave.source%22%3Afalse%2C%22attributes.weave.sys_version%22%3Afalse%7D)
## まとめ
これで、エージェント間のやり取り、ツールの使用、Flow の実行、ガードレールの検証を取得する、Weave でトレースされた CrewAI アプリケーションが用意できました。このインテグレーションの改善案を提案したり問題を報告したりするには、[GitHub で issue を作成してください](https://github.com/wandb/weave/issues/new/choose)。
CrewAI でマルチエージェントシステムを構築する方法の詳細については、CrewAI の[サンプル](https://github.com/crewAIInc/crewAI-examples)と[ドキュメント](https://docs.crewai.com/introduction)をご覧ください。