> ## Documentation Index
> Fetch the complete documentation index at: https://docs.wandb.ai/llms.txt
> Use this file to discover all available pages before exploring further.
# コードをトレースする
> 実行中のコードを計装し、その実行を W&B Weave に詳細なトレースとして表示します。
このガイドでは、アプリケーションを計装して、その実行を W\&B Weave に詳細なトレースとして表示する方法を説明します。トレースでは、入力、出力、各操作の構造を Call として取り込むことで、LLM を活用したコードのデバッグ、評価、監視を行えます。
実行中のコードを Weave で詳細なトレースとして表示するには、Call を作成します。以下のセクションでは、そのための主な 3 つの方法を、手動での作業が少ないものから多いものの順に説明します。
* LLM ライブラリ呼び出しの自動トラッキング
* `weave.op` を使用したカスタム関数のトラッキング
* API を直接使用する手動の Call トラッキング
トレース対象をどの程度細かく制御したいかに応じて、適切な方法を選択してください。
## LLM ライブラリの Call の自動トラッキング
Weave は、`openai`、`anthropic`、`cohere`、`mistral`、`LangChain` など、多くの一般的なライブラリやフレームワークと自動的に統合します。LLM またはフレームワークのライブラリをインポートし、Weave プロジェクトを初期化してください。すると Weave は、追加のコード変更なしで、LLM またはプラットフォームに対するすべての Call を自動的に Weave プロジェクトにトレースします。サポートされるライブラリ インテグレーションの完全な一覧については、[インテグレーション概要](/ja/weave/guides/integrations/) を参照してください。
```python lines theme={null}
import weave
from openai import OpenAI
client = OpenAI()
# Weave トレースを初期化
weave.init('intro-example')
response = client.chat.completions.create(
model="gpt-4",
messages=[
{
"role": "user",
"content": "How are you?"
}
],
temperature=0.8,
max_tokens=64,
top_p=1,
)
```
```typescript twoslash lines theme={null}
// @noErrors
import OpenAI from 'openai'
import * as weave from 'weave'
const client = new OpenAI()
// Weave トレースを初期化
await weave.init('intro-example')
const response = await client.chat.completions.create({
model: 'gpt-4',
messages: [
{
role: 'user',
content: 'How are you?',
},
],
temperature: 0.8,
max_tokens: 64,
top_p: 1,
});
```
JavaScript および TypeScript プロジェクト向けの完全なセットアップ ガイドについては、[TypeScript SDK: サードパーティ インテグレーション ガイド](/ja/weave/guides/integrations/js) を参照してください。
自動的な動作をより細かく制御したい場合は、[LLM Call の自動トラッキングを設定する](/ja/weave/guides/integrations/autopatching) を参照してください。
## カスタム関数のトラッキング
LLM アプリケーションには、トラッキングしたい追加のロジック (前処理や後処理、プロンプトなど) が含まれていることがよくあります。Weave が自動的にトレースする LLM Call とあわせて独自の関数も取得したい場合は、この方法を使用します。
Weave では、[`@weave.op`](/ja/weave/reference/python-sdk/#function-op) デコレータを使って、これらの Call を手動でトラッキングできます。例:
```python lines theme={null}
import weave
# Weave トレースを初期化
weave.init('intro-example')
# 関数をデコレート
@weave.op
def my_function(name: str):
return f"Hello, {name}!"
# 関数を呼び出す -- Weave が入力と出力を自動的にトラッキングします
print(my_function("World"))
```
[クラスの method](#track-class-and-object-methods) もトラッキングできます。
Weave では、関数を [`weave.op`](/ja/weave/reference/typescript-sdk/functions/op) でラップすることで、これらの Call を手動でトラッキングできます。例:
```typescript twoslash lines theme={null}
// @noErrors
import * as weave from 'weave'
await weave.init('intro-example')
function myFunction(name: string) {
return `Hello, ${name}!`
}
const myFunctionOp = weave.op(myFunction)
```
ラップをインラインで定義することもできます:
```typescript twoslash lines theme={null}
// @noErrors
const myFunctionOp = weave.op((name: string) => `Hello, ${name}!`)
```
これは関数だけでなく、クラスの method にも対応しています:
```typescript twoslash lines theme={null}
// @noErrors
class MyClass {
constructor() {
this.myMethod = weave.op(this.myMethod)
}
myMethod(name: string) {
return `Hello, ${name}!`
}
}
```
### クラスとオブジェクトの method をトラッキングする
スタンドアロン関数に加えて、クラスやオブジェクトの method もトラッキングできます。`weave.op` で method をデコレートすると、クラス内の任意の method をトラッキングできます。
```python lines theme={null}
import weave
# Weave トレースを初期化する
weave.init("intro-example")
class MyClass:
# method をデコレートする
@weave.op
def my_method(self, name: str):
return f"Hello, {name}!"
instance = MyClass()
# method を呼び出す -- Weave が 入力 と 出力 を自動的にトラッキングします
print(instance.my_method("World"))
```
**TypeScript でデコレータを使用する**
TypeScript コードで `@weave.op` デコレータ を使用するには、環境が適切に設定されていることを確認してください。
* **TypeScript v5.0 以降**: デコレータは標準でサポートされており、追加の設定は不要です。
* **TypeScript v5.0 より前**: デコレータの実験的サポートを有効にしてください。詳細は、[デコレータに関する TypeScript 公式ドキュメント](https://www.typescriptlang.org/docs/handbook/decorators.html)を参照してください。
トレースするには、インスタンスmethod に `@weave.op` を適用できます。
```typescript twoslash lines theme={null}
// @noErrors
class Foo {
@weave.op
async predict(prompt: string) {
return "bar"
}
}
```
クラス内のユーティリティ関数を監視するために、static method にも `@weave.op` を適用できます。
```typescript twoslash lines theme={null}
// @noErrors
class MathOps {
@weave.op
static square(n: number): number {
return n * n;
}
}
```
### 並列 (マルチスレッド) の関数Callをトレースする
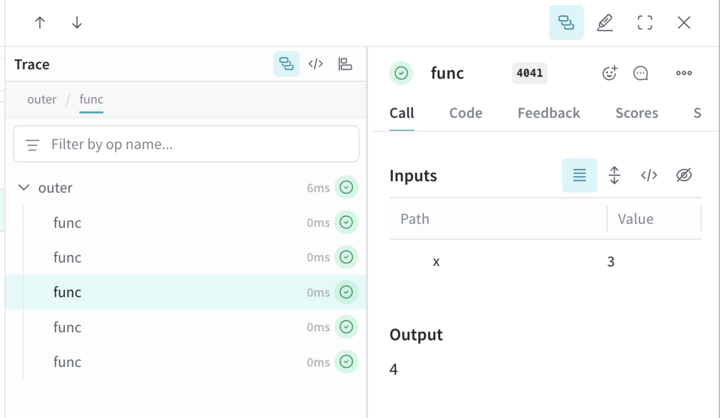
デフォルトでは、並列に実行された Call はすべて、Weave で個別のルート Call として表示されるため、トレース階層を追いにくくなります。同じ親 Op の下に正しくネストするには、`ThreadPoolExecutor` を使用します。
次のコード例は、[`ThreadPoolExecutor`](/ja/weave/reference/python-sdk/trace/util#class-contextawarethreadpoolexecutor) の使用方法を示しています。
1 つ目の関数 `func` は、`x` を受け取って `x+1` を返すシンプルな Op です。2 つ目の関数 `outer` は、入力のリストを受け取る別の Op です。
`outer` の内部で `ThreadPoolExecutor` と `exc.map(func, inputs)` を使用すると、`func` の各 Call に同じ親トレースコンテキストが引き継がれます。
```python lines theme={null}
import weave
@weave.op
def func(x):
return x+1
@weave.op
def outer(inputs):
with weave.ThreadPoolExecutor() as exc:
exc.map(func, inputs)
# Weave プロジェクト名を更新します
client = weave.init('my-weave-project')
outer([1,2,3,4,5])
```
```text theme={null}
この機能は、TypeScript SDK ではまだ利用できません。
```
Weave UI では、これにより 1 つの親 Call の下に 5 つの子 Call がネストされた形で表示されます。インクリメント処理が並列に実行されていても、完全な階層型トレースを取得できます。
## Call の手動トラッキング
自動インテグレーションや `weave.op` デコレータのいずれもワークフローに合わない場合は、API を直接使用して手動で Call を作成できます。この方法では、Call の開始と終了のタイミングを完全に制御できますが、その分ボイラープレートが増えます。
```python lines theme={null}
import weave
# Weave トレースを初期化
client = weave.init('intro-example')
def my_function(name: str):
# Call を開始
call = client.create_call(op="my_function", inputs={"name": name})
# ... 関数のコード ...
# Call を終了
client.finish_call(call, output="Hello, World!")
# 関数を呼び出す
print(my_function("World"))
```
```text theme={null}
この機能は、TypeScript SDK ではまだ利用できません。
```
* Call を開始: [POST `/call/start`](https://docs.wandb.ai/weave/reference/service-api/calls/call-start)。
* Call を終了: [POST `/call/end`](https://docs.wandb.ai/weave/reference/service-api/calls/call-end)。
```bash lines theme={null}
curl -L 'https://trace.wandb.ai/call/start' \
-H 'Content-Type: application/json' \
-H 'Accept: application/json' \
-d '{
"start": {
"project_id": "string",
"id": "string",
"op_name": "string",
"display_name": "string",
"trace_id": "string",
"parent_id": "string",
"started_at": "2024-09-08T20:07:34.849Z",
"attributes": {},
"inputs": {},
"wb_run_id": "string"
}
}
```