> ## Documentation Index
> Fetch the complete documentation index at: https://docs.wandb.ai/llms.txt
> Use this file to discover all available pages before exploring further.
# 로그 축 사용자 지정
> 기본 W&B step 카운터 대신 `define_metric()`을 사용해 로깅된 메트릭의 맞춤형 x축을 설정합니다.
W\&B에 메트릭을 로깅할 때 사용자 지정 x축을 설정할 수 있습니다. 기본적으로 W\&B는 메트릭을 *step* 단위로 로깅합니다. 각 step은 `wandb.Run.log()` API 호출 한 번에 해당합니다.
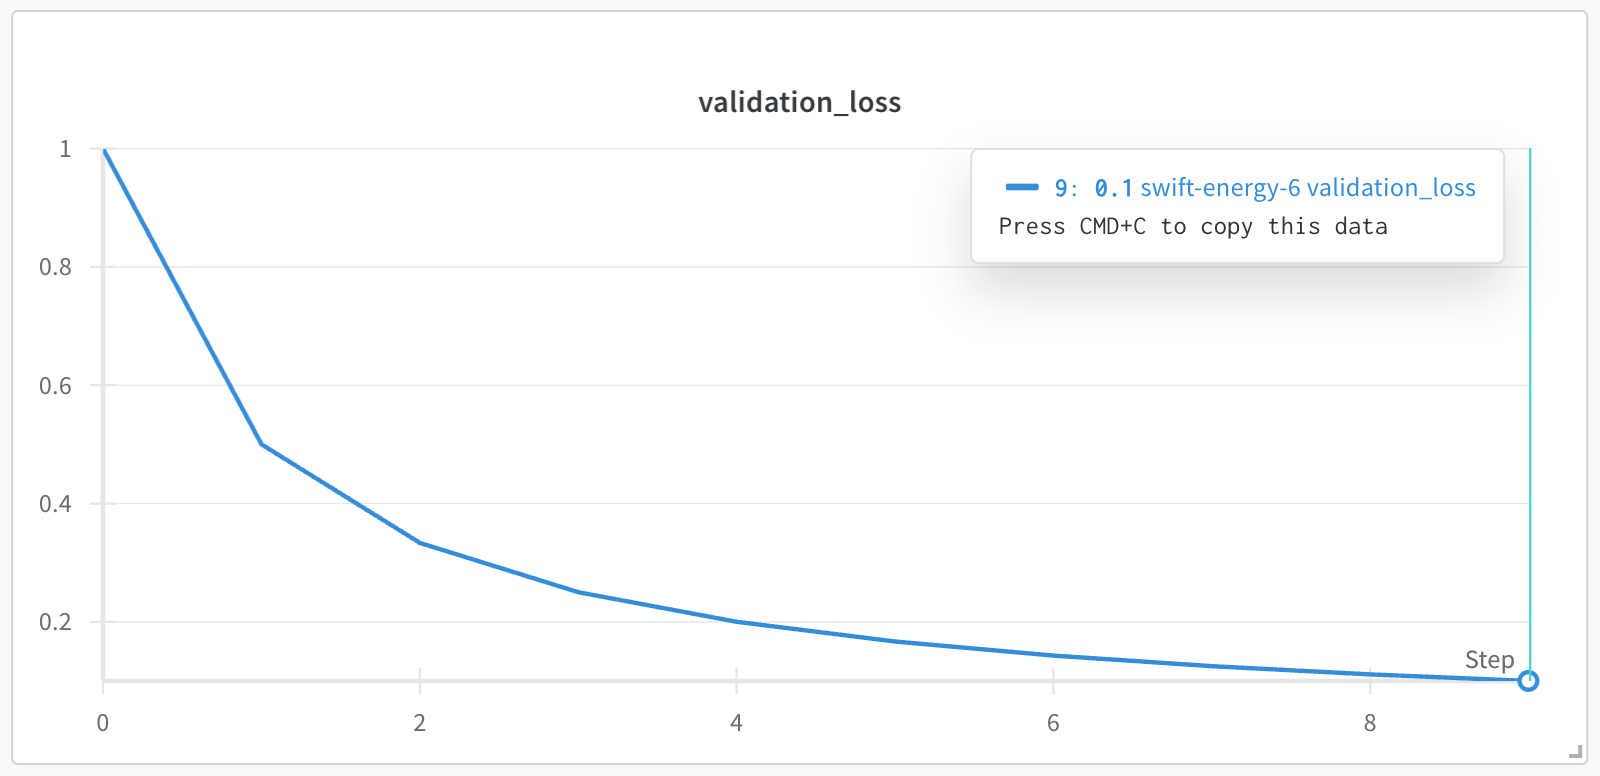
예를 들어, 다음 스크립트에는 10번 반복되는 `for` 루프가 있습니다. 각 반복마다 스크립트는 `validation_loss`라는 메트릭을 로깅하고 step 번호를 1씩 증가시킵니다.
```python theme={null}
import wandb
with wandb.init() as run:
# range 함수는 0부터 9까지의 숫자 시퀀스를 생성합니다
for i in range(10):
log_dict = {
"validation_loss": 1/(i+1)
}
run.log(log_dict)
```
프로젝트의 워크스페이스에서 `validation_loss` 메트릭은 x축인 `step`에 대해 그려지며, `wandb.Run.log()`가 호출될 때마다 `step` 값이 1씩 증가합니다. 앞의 코드에서 x축은 step 번호 0, 1, 2, ..., 9를 표시합니다.
 특정 상황에서는 로그 스케일과 같은 다른 x축에 대해 메트릭을 로깅하는 것이 더 적절할 수 있습니다. [`define_metric()`](/ko/models/ref/python/experiments/run/#define_metric) 메서드를 사용하면 로깅하는 원하는 메트릭을 맞춤형 x축으로 사용할 수 있습니다.
`name` 파라미터로 y축에 표시할 메트릭을 지정합니다. `step_metric` 파라미터는 x축으로 사용할 메트릭을 지정합니다. 맞춤형 메트릭을 로깅할 때는 사전의 키-값 쌍으로 x축과 y축 값 모두를 지정해야 합니다.
다음 코드 스니펫을 복사해 붙여넣어 맞춤형 x축 메트릭을 설정하세요. `<>` 안의 값을 자신의 값으로 바꾸세요:
```python theme={null}
import wandb
custom_step = "" # 맞춤형 x축 이름
metric_name = "" # y축 메트릭 이름
with wandb.init() as run:
# step 메트릭(x축)과 이에 대해 로깅할 메트릭(y축)을 지정합니다
run.define_metric(step_metric = custom_step, name = metric_name)
for i in range(10):
log_dict = {
custom_step : int, # x축 값
metric_name : int, # y축 값
}
run.log(log_dict)
```
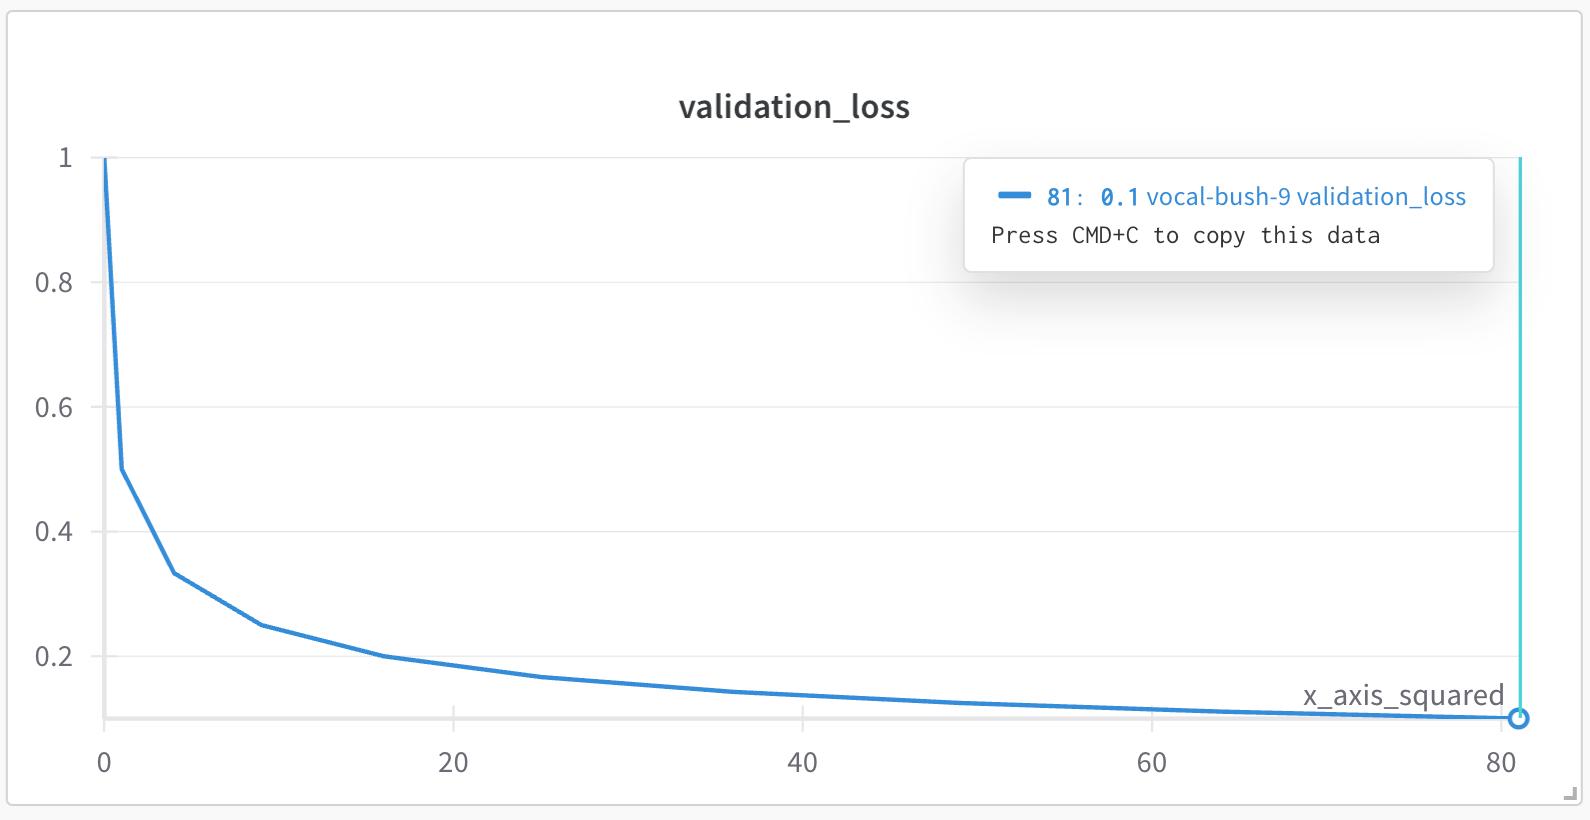
예를 들어, 다음 코드 스니펫은 `x_axis_squared`라는 맞춤형 x축을 생성합니다. 맞춤형 x축의 값은 for 루프 인덱스 `i`의 제곱(`i**2`)입니다. y축은 Python의 내장 `random` 모듈을 사용해 검증 손실(`"validation_loss"`)에 대한 예시 값으로 구성됩니다.
```python theme={null}
import wandb
import random
with wandb.init() as run:
run.define_metric(step_metric = "x_axis_squared", name = "validation_loss")
for i in range(10):
log_dict = {
"x_axis_squared": i**2,
"validation_loss": random.random(),
}
run.log(log_dict)
```
다음 이미지는 W\&B App UI에 표시되는 결과 플롯입니다. `validation_loss` 메트릭은 맞춤형 x축 `x_axis_squared`에 대해 플롯되며, 이는 for 루프 인덱스 `i`의 제곱입니다. x축 값은 `0, 1, 4, 9, 16, 25, 36, 49, 64, 81`이며, 각각 `0, 1, 2, ..., 9`의 제곱에 해당한다는 점에 유의하세요.
특정 상황에서는 로그 스케일과 같은 다른 x축에 대해 메트릭을 로깅하는 것이 더 적절할 수 있습니다. [`define_metric()`](/ko/models/ref/python/experiments/run/#define_metric) 메서드를 사용하면 로깅하는 원하는 메트릭을 맞춤형 x축으로 사용할 수 있습니다.
`name` 파라미터로 y축에 표시할 메트릭을 지정합니다. `step_metric` 파라미터는 x축으로 사용할 메트릭을 지정합니다. 맞춤형 메트릭을 로깅할 때는 사전의 키-값 쌍으로 x축과 y축 값 모두를 지정해야 합니다.
다음 코드 스니펫을 복사해 붙여넣어 맞춤형 x축 메트릭을 설정하세요. `<>` 안의 값을 자신의 값으로 바꾸세요:
```python theme={null}
import wandb
custom_step = "" # 맞춤형 x축 이름
metric_name = "" # y축 메트릭 이름
with wandb.init() as run:
# step 메트릭(x축)과 이에 대해 로깅할 메트릭(y축)을 지정합니다
run.define_metric(step_metric = custom_step, name = metric_name)
for i in range(10):
log_dict = {
custom_step : int, # x축 값
metric_name : int, # y축 값
}
run.log(log_dict)
```
예를 들어, 다음 코드 스니펫은 `x_axis_squared`라는 맞춤형 x축을 생성합니다. 맞춤형 x축의 값은 for 루프 인덱스 `i`의 제곱(`i**2`)입니다. y축은 Python의 내장 `random` 모듈을 사용해 검증 손실(`"validation_loss"`)에 대한 예시 값으로 구성됩니다.
```python theme={null}
import wandb
import random
with wandb.init() as run:
run.define_metric(step_metric = "x_axis_squared", name = "validation_loss")
for i in range(10):
log_dict = {
"x_axis_squared": i**2,
"validation_loss": random.random(),
}
run.log(log_dict)
```
다음 이미지는 W\&B App UI에 표시되는 결과 플롯입니다. `validation_loss` 메트릭은 맞춤형 x축 `x_axis_squared`에 대해 플롯되며, 이는 for 루프 인덱스 `i`의 제곱입니다. x축 값은 `0, 1, 4, 9, 16, 25, 36, 49, 64, 81`이며, 각각 `0, 1, 2, ..., 9`의 제곱에 해당한다는 점에 유의하세요.
 문자열 접두사와 함께 `globs`를 사용해서 여러 메트릭에 대해 맞춤형 x축을 설정할 수 있습니다. 예를 들어, 다음 코드 스니펫은 `train/*` 접두사가 붙은 로깅된 메트릭을 x축 `train/step`에 대해 플롯합니다:
```python theme={null}
import wandb
with wandb.init() as run:
# 다른 모든 train/ 메트릭이 이 스텝을 사용하도록 설정
run.define_metric("train/*", step_metric="train/step")
for i in range(10):
log_dict = {
"train/step": 2**i, # W&B 내부 스텝에 따른 지수적 증가
"train/loss": 1 / (i + 1), # x축은 train/step
"train/accuracy": 1 - (1 / (1 + i)), # x축은 train/step
"val/loss": 1 / (1 + i), # x축은 wandb 내부 스텝
}
run.log(log_dict)
```
문자열 접두사와 함께 `globs`를 사용해서 여러 메트릭에 대해 맞춤형 x축을 설정할 수 있습니다. 예를 들어, 다음 코드 스니펫은 `train/*` 접두사가 붙은 로깅된 메트릭을 x축 `train/step`에 대해 플롯합니다:
```python theme={null}
import wandb
with wandb.init() as run:
# 다른 모든 train/ 메트릭이 이 스텝을 사용하도록 설정
run.define_metric("train/*", step_metric="train/step")
for i in range(10):
log_dict = {
"train/step": 2**i, # W&B 내부 스텝에 따른 지수적 증가
"train/loss": 1 / (i + 1), # x축은 train/step
"train/accuracy": 1 - (1 / (1 + i)), # x축은 train/step
"val/loss": 1 / (1 + i), # x축은 wandb 내부 스텝
}
run.log(log_dict)
```