> ## Documentation Index
> Fetch the complete documentation index at: https://docs.wandb.ai/llms.txt
> Use this file to discover all available pages before exploring further.
# Chain Of Density
> W&B Weave를 사용해 chain-of-density 요약 기법을 구현하고, 반복적으로 텍스트를 압축하고 평가합니다.
이것은 대화형 노트북입니다. 로컬에서 실행하거나 아래 링크를 사용할 수 있습니다:
* [Google Colab에서 열기](https://colab.research.google.com/github/wandb/docs/blob/main/weave/cookbooks/source/chain_of_density.ipynb)
* [GitHub에서 소스 보기](https://github.com/wandb/docs/blob/main/weave/cookbooks/source/chain_of_density.ipynb)
핵심 세부 정보를 유지하면서 복잡한 기술 문서를 요약하는 일은 쉽지 않습니다. Chain of Density(CoD) 요약 기법은 요약을 반복적으로 다듬어 더 간결하면서도 정보 밀도가 높아지도록 함으로써 이 문제를 해결합니다. 이 가이드에서는 애플리케이션을 추적하고 평가하기 위해 Weave로 CoD를 구현하는 방법을 설명합니다.
## Chain of Density 요약이란 무엇인가요
[](https://arxiv.org/abs/2309.04269)
Chain of Density (CoD)는 점점 더 간결하면서도 정보 밀도가 높은 요약을 생성하는 반복형 요약 기법입니다. 작동 방식은 다음과 같습니다.
1. 초기 요약에서 시작합니다
2. 핵심 정보를 유지하면서 더 간결해지도록 요약을 반복적으로 다듬습니다
3. 반복할 때마다 Entities와 기술적 세부 정보의 밀도를 높입니다
이 접근 방식은 자세한 정보를 유지하는 것이 중요한 과학 논문이나 기술 문서를 요약할 때 특히 유용합니다.
## Weave를 사용하는 이유
이 튜토리얼에서는 Weave를 사용해 ArXiv 논문을 위한 Chain of Density 요약 파이프라인을 구현하고 평가하는 방법을 살펴봅니다. 다음 내용을 배우게 됩니다.
* **LLM 파이프라인 추적**: Weave를 사용해 요약 프로세스의 입력, 출력, 중간 단계를 자동으로 기록하세요.
* **LLM 출력 평가**: Weave에 내장된 도구를 사용해 요약을 일관된 방식으로 평가하세요.
* **조합 가능한 오퍼레이션 구축**: 요약 파이프라인의 여러 부분에서 Weave 오퍼레이션을 조합하고 재사용하세요.
* **기존 코드와 통합**: 기존 Python 코드에 Weave를 최소한의 오버헤드로 추가하세요.
이 튜토리얼을 마치면 모델 서빙, 평가, 결과 추적을 위해 Weave의 기능을 활용하는 CoD 요약 파이프라인을 만들게 됩니다.
## 환경 설정
먼저 환경을 설정하고 필요한 라이브러리를 임포트합니다. 이 단계에서는 파이프라인에 필요한 의존성을 설치하며, 여기에는 추적용 Weave, LLM용 Anthropic, 그리고 ArXiv PDF를 읽기 위한 PyPDF2가 포함됩니다.
```python lines theme={null}
!pip install -qU anthropic weave pydantic requests PyPDF2 set-env-colab-kaggle-dotenv
```
파이프라인이 Anthropic의 Claude 모델을 호출하므로, 다음 코드를 실행하기 전에 Anthropic API 키가 필요합니다.
> Anthropic API 키를 발급받으려면:
>
> 1. [https://www.anthropic.com](https://www.anthropic.com) 에서 계정을 만드세요.
> 2. 계정 설정의 API 섹션으로 이동하세요.
> 3. 새 API 키를 생성하세요.
> 4. API 키를 `.env` 파일에 안전하게 저장하세요.
```python lines theme={null}
import io
import os
from datetime import datetime, timezone
import anthropic
import requests
from pydantic import BaseModel
from PyPDF2 import PdfReader
from set_env import set_env
import weave
set_env("WANDB_API_KEY")
set_env("ANTHROPIC_API_KEY")
weave.init("summarization-chain-of-density-cookbook")
anthropic_client = anthropic.Anthropic(api_key=os.getenv("ANTHROPIC_API_KEY"))
```
이 코드는 Weave를 사용해 실험을 추적하고, 텍스트 생성을 위해 Anthropic의 Claude 모델을 사용합니다. `weave.init([PROJECT_NAME])` 호출로 요약 작업용 새 Weave 프로젝트를 설정합니다.
## ArxivPaper 모델 정의
환경이 준비되었으므로 다음 단계는 파이프라인에서 사용할 데이터 구조를 정의하는 것입니다. 데이터를 나타내는 `ArxivPaper` 클래스를 만드세요:
```python lines theme={null}
# ArxivPaper 모델 정의
class ArxivPaper(BaseModel):
entry_id: str
updated: datetime
published: datetime
title: str
authors: list[str]
summary: str
pdf_url: str
# ArxivPaper 샘플 생성
arxiv_paper = ArxivPaper(
entry_id="http://arxiv.org/abs/2406.04744v1",
updated=datetime(2024, 6, 7, 8, 43, 7, tzinfo=timezone.utc),
published=datetime(2024, 6, 7, 8, 43, 7, tzinfo=timezone.utc),
title="CRAG -- Comprehensive RAG Benchmark",
authors=["Xiao Yang", "Kai Sun", "Hao Xin"], # 간략히 표시
summary="Retrieval-Augmented Generation (RAG) has recently emerged as a promising solution...", # 간략히 표시
pdf_url="https://arxiv.org/pdf/2406.04744",
)
```
이 클래스는 요약 파이프라인의 입력으로 사용되는 ArXiv 논문의 메타데이터와 콘텐츠를 캡슐화합니다.
## PDF 콘텐츠 불러오기
`ArxivPaper` 모델은 메타데이터와 PDF URL만 포함하고 있으므로, 요약 파이프라인에는 논문의 전체 텍스트가 필요합니다. 논문 전체 내용을 사용하려면 PDF에서 텍스트를 불러와 추출하는 함수를 추가하세요:
```python lines theme={null}
@weave.op()
def load_pdf(pdf_url: str) -> str:
# PDF 다운로드
response = requests.get(pdf_url)
pdf_file = io.BytesIO(response.content)
# PDF 읽기
pdf_reader = PdfReader(pdf_file)
# 모든 페이지에서 텍스트 추출
text = ""
for page in pdf_reader.pages:
text += page.extract_text()
return text
```
## Chain of Density 요약 구현하기
이제 Weave 오퍼레이션을 사용해 핵심 CoD 요약 로직을 구현하세요:
 ```python lines theme={null}
# Chain of Density Summarization
@weave.op()
def summarize_current_summary(
document: str,
instruction: str,
current_summary: str = "",
iteration: int = 1,
model: str = "claude-3-sonnet-20240229",
):
prompt = f"""
Document: {document}
Current summary: {current_summary}
Instruction to focus on: {instruction}
Iteration: {iteration}
Generate an increasingly concise, entity-dense, and highly technical summary from the provided document that specifically addresses the given instruction.
"""
response = anthropic_client.messages.create(
model=model, max_tokens=4096, messages=[{"role": "user", "content": prompt}]
)
return response.content[0].text
@weave.op()
def iterative_density_summarization(
document: str,
instruction: str,
current_summary: str,
density_iterations: int,
model: str = "claude-3-sonnet-20240229",
):
iteration_summaries = []
for iteration in range(1, density_iterations + 1):
current_summary = summarize_current_summary(
document, instruction, current_summary, iteration, model
)
iteration_summaries.append(current_summary)
return current_summary, iteration_summaries
@weave.op()
def final_summary(
instruction: str, current_summary: str, model: str = "claude-3-sonnet-20240229"
):
prompt = f"""
Given this summary: {current_summary}
And this instruction to focus on: {instruction}
Create an extremely dense, final summary that captures all key technical information in the most concise form possible, while specifically addressing the given instruction.
"""
return (
anthropic_client.messages.create(
model=model, max_tokens=4096, messages=[{"role": "user", "content": prompt}]
)
.content[0]
.text
)
@weave.op()
def chain_of_density_summarization(
document: str,
instruction: str,
current_summary: str = "",
model: str = "claude-3-sonnet-20240229",
density_iterations: int = 2,
):
current_summary, iteration_summaries = iterative_density_summarization(
document, instruction, current_summary, density_iterations, model
)
final_summary_text = final_summary(instruction, current_summary, model)
return {
"final_summary": final_summary_text,
"accumulated_summary": current_summary,
"iteration_summaries": iteration_summaries,
}
```
다음은 각 함수의 역할입니다:
* `summarize_current_summary`: 현재 상태를 바탕으로 한 번의 요약 반복을 생성합니다.
* `iterative_density_summarization`: `summarize_current_summary`를 여러 번 호출해 CoD 기법을 적용합니다.
* `chain_of_density_summarization`: 전체 요약 과정을 조정하고 결과를 반환합니다.
`@weave.op()` 데코레이터는 Weave가 이러한 함수의 입력, 출력, 실행을 추적하도록 합니다.
```python lines theme={null}
# Chain of Density Summarization
@weave.op()
def summarize_current_summary(
document: str,
instruction: str,
current_summary: str = "",
iteration: int = 1,
model: str = "claude-3-sonnet-20240229",
):
prompt = f"""
Document: {document}
Current summary: {current_summary}
Instruction to focus on: {instruction}
Iteration: {iteration}
Generate an increasingly concise, entity-dense, and highly technical summary from the provided document that specifically addresses the given instruction.
"""
response = anthropic_client.messages.create(
model=model, max_tokens=4096, messages=[{"role": "user", "content": prompt}]
)
return response.content[0].text
@weave.op()
def iterative_density_summarization(
document: str,
instruction: str,
current_summary: str,
density_iterations: int,
model: str = "claude-3-sonnet-20240229",
):
iteration_summaries = []
for iteration in range(1, density_iterations + 1):
current_summary = summarize_current_summary(
document, instruction, current_summary, iteration, model
)
iteration_summaries.append(current_summary)
return current_summary, iteration_summaries
@weave.op()
def final_summary(
instruction: str, current_summary: str, model: str = "claude-3-sonnet-20240229"
):
prompt = f"""
Given this summary: {current_summary}
And this instruction to focus on: {instruction}
Create an extremely dense, final summary that captures all key technical information in the most concise form possible, while specifically addressing the given instruction.
"""
return (
anthropic_client.messages.create(
model=model, max_tokens=4096, messages=[{"role": "user", "content": prompt}]
)
.content[0]
.text
)
@weave.op()
def chain_of_density_summarization(
document: str,
instruction: str,
current_summary: str = "",
model: str = "claude-3-sonnet-20240229",
density_iterations: int = 2,
):
current_summary, iteration_summaries = iterative_density_summarization(
document, instruction, current_summary, density_iterations, model
)
final_summary_text = final_summary(instruction, current_summary, model)
return {
"final_summary": final_summary_text,
"accumulated_summary": current_summary,
"iteration_summaries": iteration_summaries,
}
```
다음은 각 함수의 역할입니다:
* `summarize_current_summary`: 현재 상태를 바탕으로 한 번의 요약 반복을 생성합니다.
* `iterative_density_summarization`: `summarize_current_summary`를 여러 번 호출해 CoD 기법을 적용합니다.
* `chain_of_density_summarization`: 전체 요약 과정을 조정하고 결과를 반환합니다.
`@weave.op()` 데코레이터는 Weave가 이러한 함수의 입력, 출력, 실행을 추적하도록 합니다.
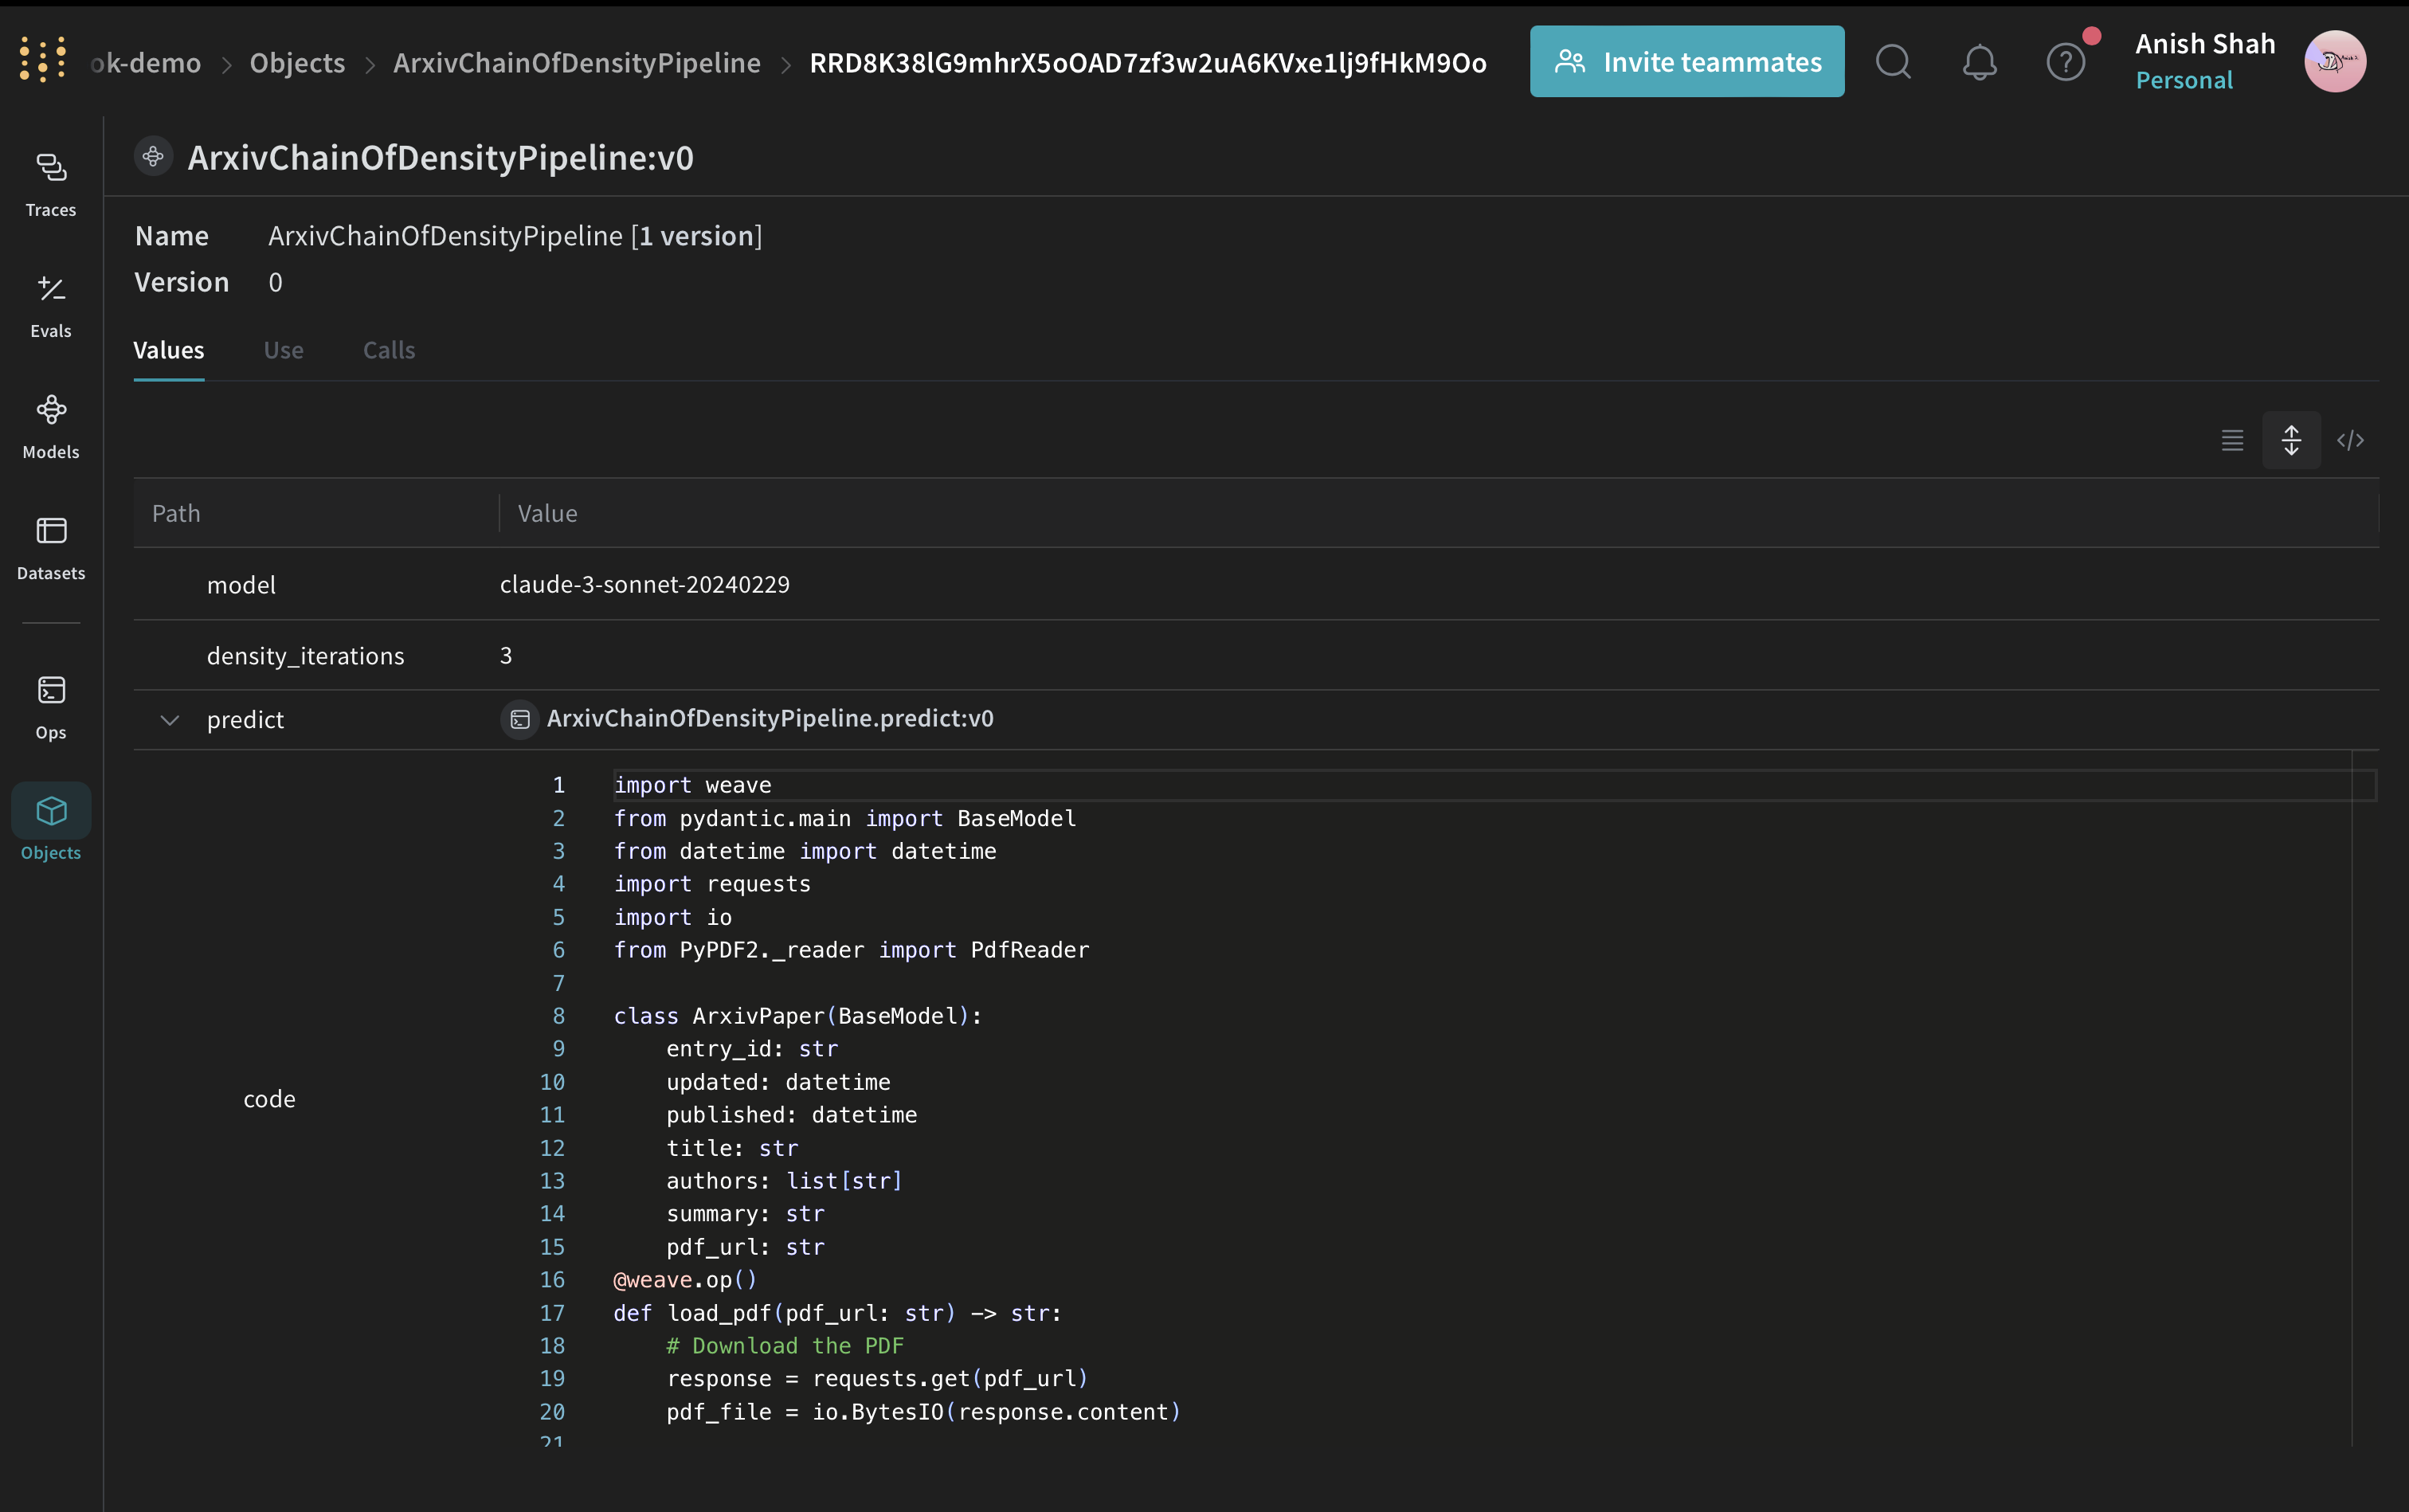
## Weave Model 만들기
요약 함수가 준비되었으므로, 다음 단계는 이를 Weave Model로 패키징하여 Runs, 파라미터, 버전이 함께 추적되도록 하는 것입니다. 이제 요약 파이프라인을 Weave Model로 감싸 보겠습니다:
 ```python lines theme={null}
# Weave Model
class ArxivChainOfDensityPipeline(weave.Model):
model: str = "claude-3-sonnet-20240229"
density_iterations: int = 3
@weave.op()
def predict(self, paper: ArxivPaper, instruction: str) -> dict:
text = load_pdf(paper.pdf_url)
result = chain_of_density_summarization(
text,
instruction,
model=self.model,
density_iterations=self.density_iterations,
)
return result
```
이 `ArxivChainOfDensityPipeline` 클래스는 요약 로직을 Weave Model로 캡슐화하며, 다음과 같은 주요 이점을 제공합니다:
* 자동 실험 추적: Weave는 모델의 각 실행에 대한 입력, 출력, 파라미터를 자동으로 캡처합니다.
* 버전 관리: 모델의 속성이나 코드 변경 사항이 자동으로 버전 관리되므로, 시간이 지남에 따라 요약 파이프라인이 어떻게 발전했는지 명확한 이력을 남길 수 있습니다.
* 재현성: 버전 관리와 추적 기능을 통해 요약 파이프라인의 이전 결과나 설정을 재현할 수 있습니다.
* 하이퍼파라미터 관리: `model`, `density_iterations`와 같은 모델 속성이 서로 다른 실행 전반에서 명확하게 정의되고 추적되므로 실험을 더 쉽게 수행할 수 있습니다.
* Weave 에코시스템과의 인테그레이션: `weave.Model`을 사용하면 evaluations 및 서빙 기능과 같은 다른 Weave 도구와 함께 작동합니다.
```python lines theme={null}
# Weave Model
class ArxivChainOfDensityPipeline(weave.Model):
model: str = "claude-3-sonnet-20240229"
density_iterations: int = 3
@weave.op()
def predict(self, paper: ArxivPaper, instruction: str) -> dict:
text = load_pdf(paper.pdf_url)
result = chain_of_density_summarization(
text,
instruction,
model=self.model,
density_iterations=self.density_iterations,
)
return result
```
이 `ArxivChainOfDensityPipeline` 클래스는 요약 로직을 Weave Model로 캡슐화하며, 다음과 같은 주요 이점을 제공합니다:
* 자동 실험 추적: Weave는 모델의 각 실행에 대한 입력, 출력, 파라미터를 자동으로 캡처합니다.
* 버전 관리: 모델의 속성이나 코드 변경 사항이 자동으로 버전 관리되므로, 시간이 지남에 따라 요약 파이프라인이 어떻게 발전했는지 명확한 이력을 남길 수 있습니다.
* 재현성: 버전 관리와 추적 기능을 통해 요약 파이프라인의 이전 결과나 설정을 재현할 수 있습니다.
* 하이퍼파라미터 관리: `model`, `density_iterations`와 같은 모델 속성이 서로 다른 실행 전반에서 명확하게 정의되고 추적되므로 실험을 더 쉽게 수행할 수 있습니다.
* Weave 에코시스템과의 인테그레이션: `weave.Model`을 사용하면 evaluations 및 서빙 기능과 같은 다른 Weave 도구와 함께 작동합니다.
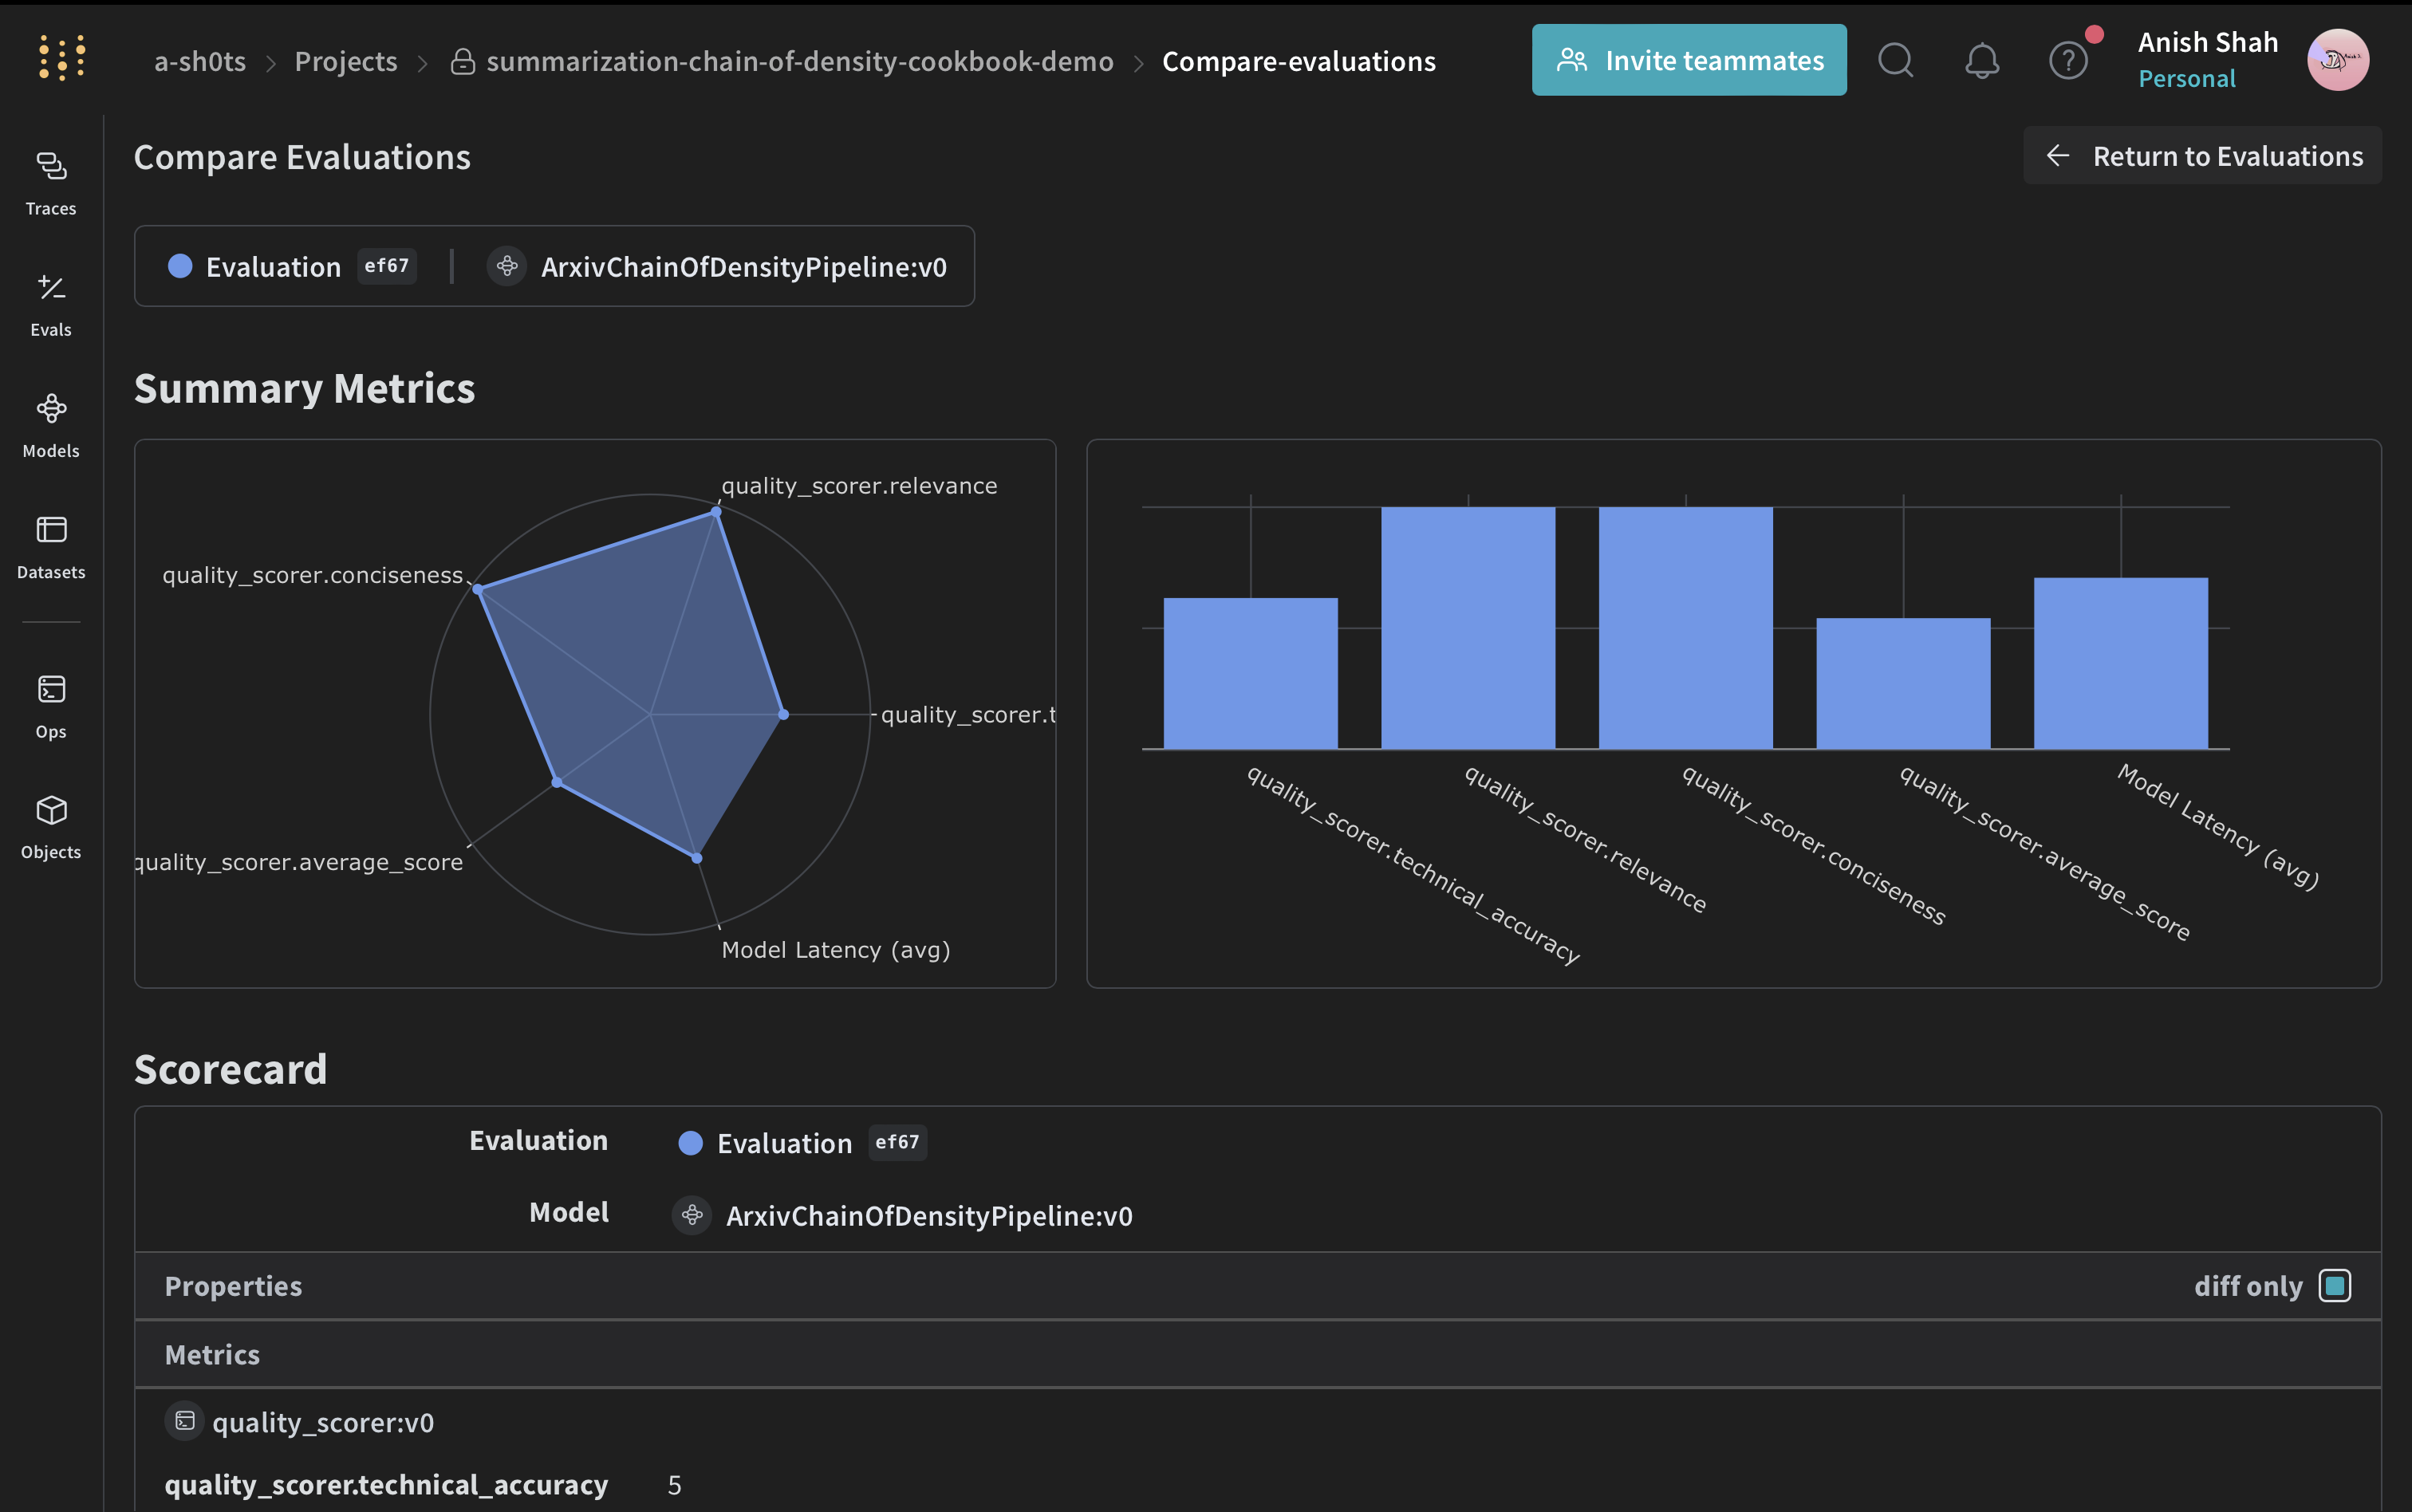
## 평가 메트릭 구현
파이프라인이 요약을 생성하므로, 이제 그 품질을 체계적으로 측정할 방법이 필요합니다. 요약의 품질을 평가하기 위해 단순한 평가 메트릭을 구현해 보겠습니다:
```python lines theme={null}
import json
@weave.op()
def evaluate_summary(
summary: str, instruction: str, model: str = "claude-3-sonnet-20240229"
) -> dict:
prompt = f"""
Summary: {summary}
Instruction: {instruction}
Evaluate the summary based on the following criteria:
1. Relevance (1-5): How well does the summary address the given instruction?
2. Conciseness (1-5): How concise is the summary while retaining key information?
3. Technical Accuracy (1-5): How accurately does the summary convey technical details?
Your response MUST be in the following JSON format:
{{
"relevance": {{
"score": ,
"explanation": ""
}},
"conciseness": {{
"score": ,
"explanation": ""
}},
"technical_accuracy": {{
"score": ,
"explanation": ""
}}
}}
Ensure that the scores are integers between 1 and 5, and that the explanations are concise.
"""
response = anthropic_client.messages.create(
model=model, max_tokens=1000, messages=[{"role": "user", "content": prompt}]
)
print(response.content[0].text)
eval_dict = json.loads(response.content[0].text)
return {
"relevance": eval_dict["relevance"]["score"],
"conciseness": eval_dict["conciseness"]["score"],
"technical_accuracy": eval_dict["technical_accuracy"]["score"],
"average_score": sum(eval_dict[k]["score"] for k in eval_dict) / 3,
"evaluation_text": response.content[0].text,
}
```
이 평가 함수는 Claude 모델을 사용해 관련성, 간결성, 기술적 정확도를 바탕으로 생성된 요약의 품질을 평가합니다.
## Weave 데이터셋을 만들고 평가를 실행하세요
이제 점수화 함수가 정의되었으므로, 마지막 단계는 이를 샘플 입력에 적용해 평가를 실행하는 것입니다. 파이프라인을 평가하려면 Weave 데이터셋을 만들고 평가를 실행하세요.
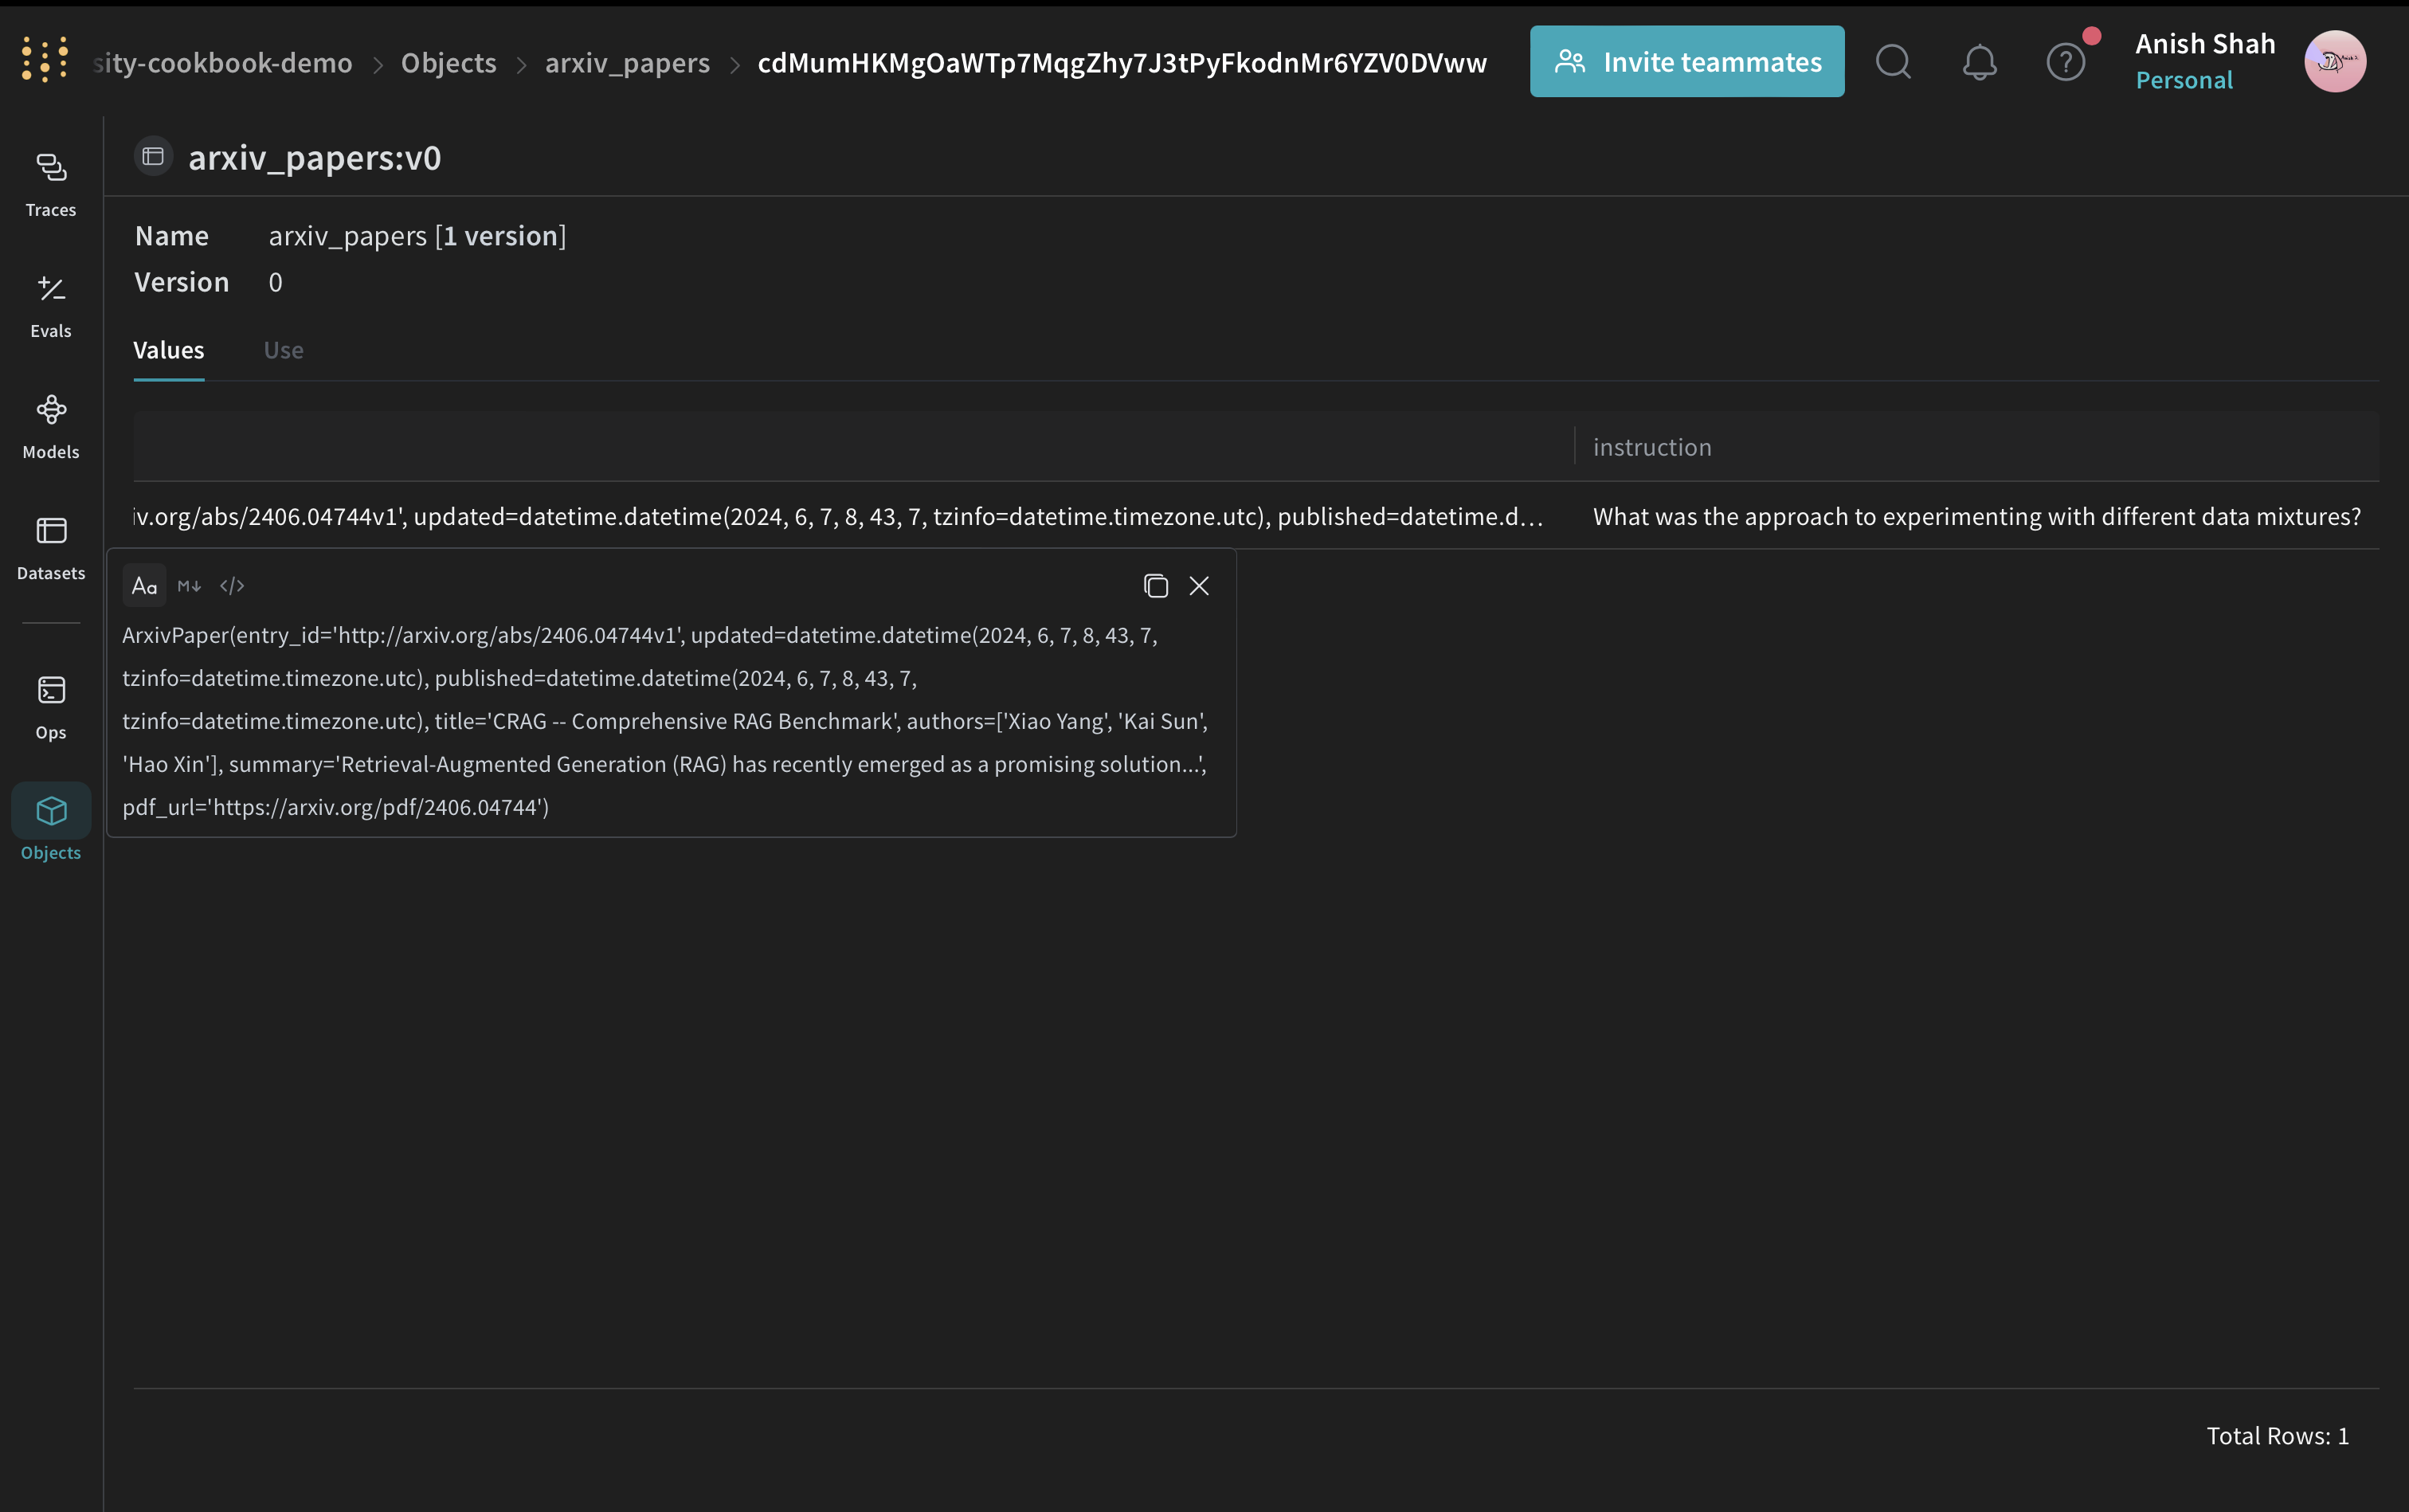 ```python lines theme={null}
# Weave 데이터셋 생성
dataset = weave.Dataset(
name="arxiv_papers",
rows=[
{
"paper": arxiv_paper,
"instruction": "What was the approach to experimenting with different data mixtures?",
},
],
)
weave.publish(dataset)
```
평가에는 LLM-as-a-judge 접근 방식을 사용하세요. 이 기법은 언어 모델을 사용해 다른 모델이나 시스템이 생성한 출력의 품질을 평가합니다. 특히 기존 메트릭만으로는 충분하지 않을 수 있는 작업에서, LLM의 이해력과 추론 능력을 바탕으로 더 세밀한 평가를 제공합니다.
[](https://arxiv.org/abs/2306.05685)
```python lines theme={null}
# Scorer 함수 정의
@weave.op()
def quality_scorer(instruction: str, output: dict) -> dict:
result = evaluate_summary(output["final_summary"], instruction)
return result
```
```python lines theme={null}
# 평가 실행
evaluation = weave.Evaluation(dataset=dataset, scorers=[quality_scorer])
arxiv_chain_of_density_pipeline = ArxivChainOfDensityPipeline()
results = await evaluation.evaluate(arxiv_chain_of_density_pipeline)
```
이 코드는 샘플 ArXiv 논문으로 데이터셋을 만들고, 품질 Scorer를 정의한 다음, 요약 파이프라인을 평가합니다.
```python lines theme={null}
# Weave 데이터셋 생성
dataset = weave.Dataset(
name="arxiv_papers",
rows=[
{
"paper": arxiv_paper,
"instruction": "What was the approach to experimenting with different data mixtures?",
},
],
)
weave.publish(dataset)
```
평가에는 LLM-as-a-judge 접근 방식을 사용하세요. 이 기법은 언어 모델을 사용해 다른 모델이나 시스템이 생성한 출력의 품질을 평가합니다. 특히 기존 메트릭만으로는 충분하지 않을 수 있는 작업에서, LLM의 이해력과 추론 능력을 바탕으로 더 세밀한 평가를 제공합니다.
[](https://arxiv.org/abs/2306.05685)
```python lines theme={null}
# Scorer 함수 정의
@weave.op()
def quality_scorer(instruction: str, output: dict) -> dict:
result = evaluate_summary(output["final_summary"], instruction)
return result
```
```python lines theme={null}
# 평가 실행
evaluation = weave.Evaluation(dataset=dataset, scorers=[quality_scorer])
arxiv_chain_of_density_pipeline = ArxivChainOfDensityPipeline()
results = await evaluation.evaluate(arxiv_chain_of_density_pipeline)
```
이 코드는 샘플 ArXiv 논문으로 데이터셋을 만들고, 품질 Scorer를 정의한 다음, 요약 파이프라인을 평가합니다.
## 결론
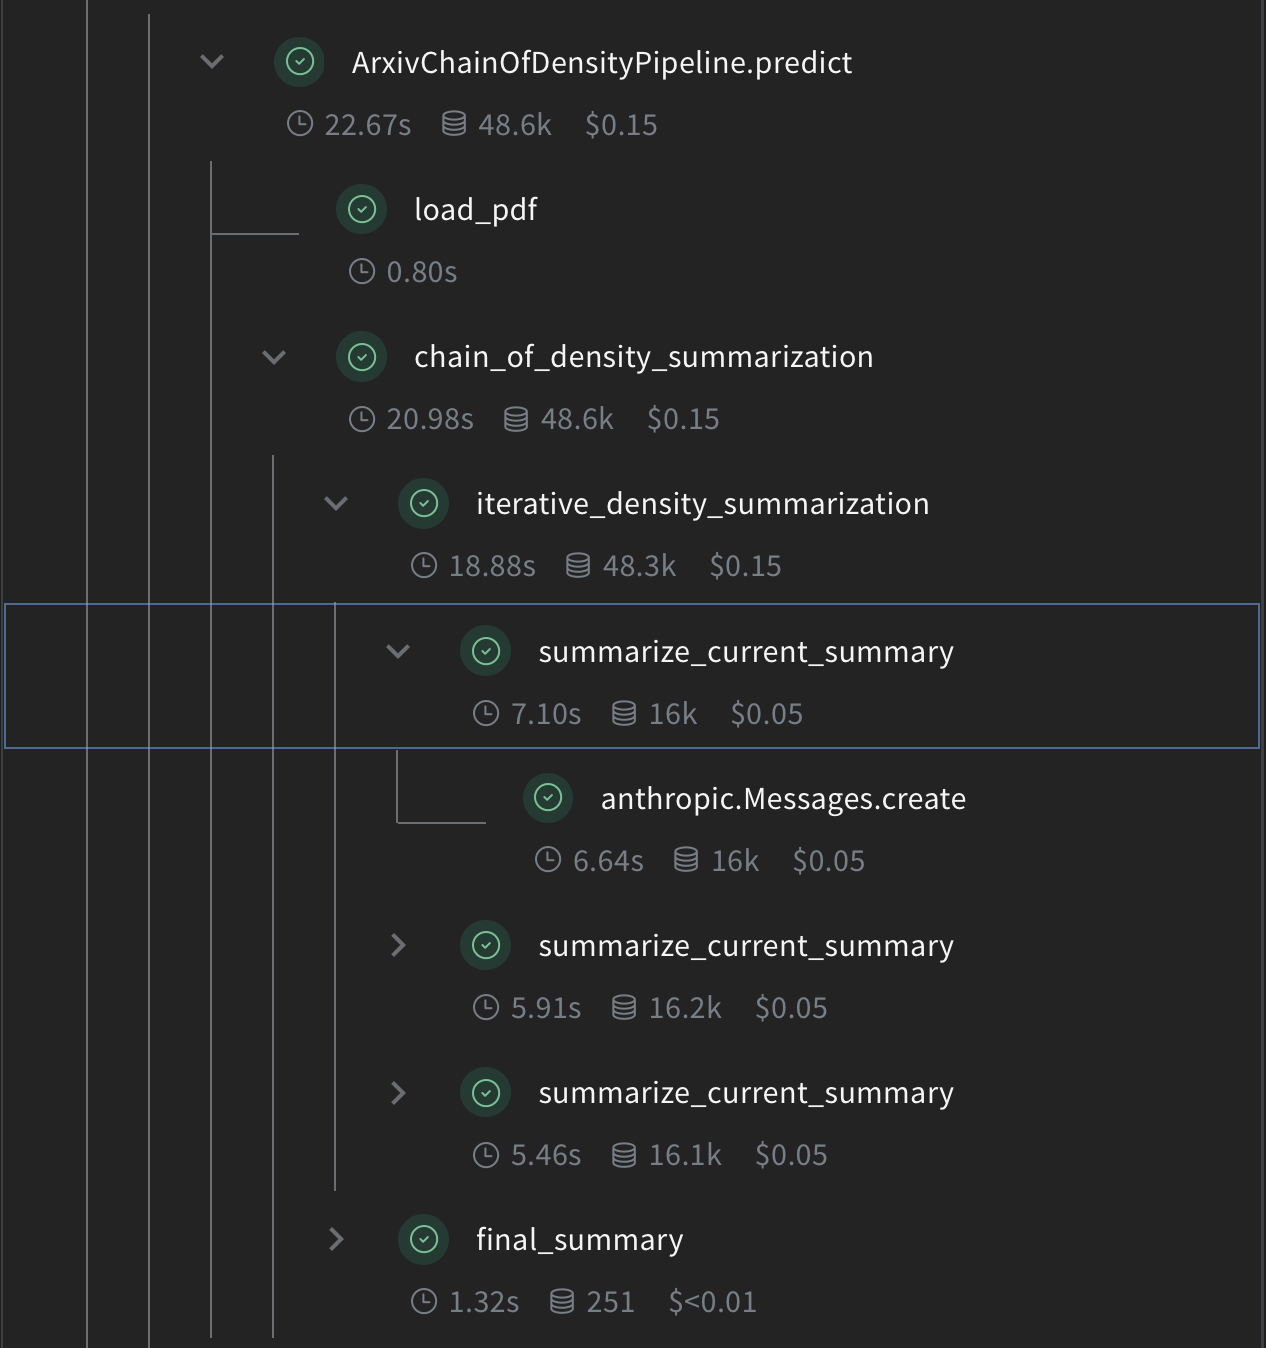
이 예제에서는 Weave를 사용해 ArXiv 논문용 Chain of Density 요약 파이프라인을 구현하는 방법을 보여드렸습니다. 다음 내용을 배웠습니다.
* 요약 프로세스의 각 단계에 대한 Weave 오퍼레이션 만들기
* 추적 및 평가를 위해 파이프라인을 Weave Model로 래핑하기
* Weave 오퍼레이션을 사용해 맞춤형 평가 메트릭 구현하기
* 데이터셋을 만들고 파이프라인 평가를 실행하기
Weave는 요약 프로세스 전반에서 입력, 출력, 중간 단계를 추적하므로 LLM 애플리케이션을 더 쉽게 디버그하고, 최적화하고, 평가할 수 있습니다.
이 예제를 확장해 더 큰 데이터셋을 처리하거나, 더 정교한 평가 메트릭을 구현하거나, 다른 LLM 워크플로와 통합할 수 있습니다.
W\&B에서 전체 Report 보기