> ## Documentation Index
> Fetch the complete documentation index at: https://docs.wandb.ai/llms.txt
> Use this file to discover all available pages before exploring further.
# 미디어 로깅
> 트레이스에서 반환되는 이미지와 비디오 등의 미디어를 로깅합니다.
W\&B Weave는 다양한 콘텐츠 유형의 로깅과 표시를 지원하며, 비디오, 이미지, 오디오 클립, PDF, CSV 데이터, HTML을 위한 전용 함수를 제공합니다. 이 가이드는 개발자가 Weave 트레이스에서 미디어 입력과 출력을 캡처해 나머지 트레이스 데이터와 함께 검토하고 공유할 수 있도록 작성되었습니다. 또한 지원되는 각 미디어 유형을 로깅하고 표시하는 기본 예제와 고급 예제를 제공합니다.
* **[이미지](#log-images)**
* **[비디오](#log-video)**
* **[문서](#log-documents)**
* **[오디오](#log-audio)**
* **[HTML](#log-html)**
## Overview
이 가이드의 예제에서는 어노테이션을 사용합니다. 어노테이션은 미디어 로깅을 시작하는 가장 직접적인 방법이므로 사용을 권장합니다. 더 고급 설정은 [Content API 섹션](#using-the-contents-api)을 참조하세요.
미디어를 Weave에 로깅하려면 `Annotated[bytes, Content]` 또는 `Annotated[str, Content]` 같은 타입 어노테이션을 op의 입력 또는 반환 유형에 추가하세요. 경로 인수를 `Annotated[str, Content]`로 어노테이션하면 Weave가 트레이스 내에서 미디어를 자동으로 열고, 감지하고, 표시합니다.
TypeScript SDK는 미디어 로깅을 위한 전용 함수를 제공합니다:
* `weave.weaveImage({ data: Buffer })` - 이미지용(PNG 형식)
* `weave.weaveAudio({ data: Buffer })` - 오디오용(WAV 형식)
TypeScript SDK는 이미지와 오디오 로깅을 지원합니다. 비디오, 문서 또는 HTML을 로깅하려면 대신 Weave Python SDK를 사용하세요.
다음 섹션에서는 각 미디어 유형을 로깅하는 예제를 제공합니다. 각 섹션은 최소 예제로 시작한 다음 더 고급 시나리오로 확장됩니다.
## 이미지 로깅
다음 예시에서는 이미지를 생성하고 Weave UI에 로깅하는 방법을 보여줍니다.
 함수에는 `Annotated[bytes, Content]` 유형을, 파일 경로에는 `Annotated[str, Content]`를 어노테이션하여 이미지를 로깅합니다.
다음 예제에서는 간단한 이미지를 그린 다음 `Content` 어노테이션을 사용해 Weave에 로깅합니다:
```python lines {16,23} theme={null}
import weave
from weave import Content
from PIL import Image, ImageDraw
from typing import Annotated
weave.init('your-team-name/your-project-name')
# 샘플 이미지 생성 및 저장
img = Image.new('RGB', (200, 100), color='lightblue')
draw = ImageDraw.Draw(img)
draw.text((50, 40), "Hello Weave!", fill='black')
img.save("sample_image.png")
# 방법 1: Content 어노테이션 (권장)
@weave.op
def load_image_content(path: Annotated[str, Content]) -> Annotated[bytes, Content]:
with open(path, 'rb') as f:
return f.read()
# 방법 2: PIL Image 객체
@weave.op
def load_image_pil(path: Annotated[str, Content]) -> Image.Image:
return Image.open(path)
result1 = load_image_content("sample_image.png")
result2 = load_image_pil("sample_image.png")
```
Weave는 이미지를 로깅하고, 해당 이미지를 볼 수 있는 트레이스 링크를 반환합니다.
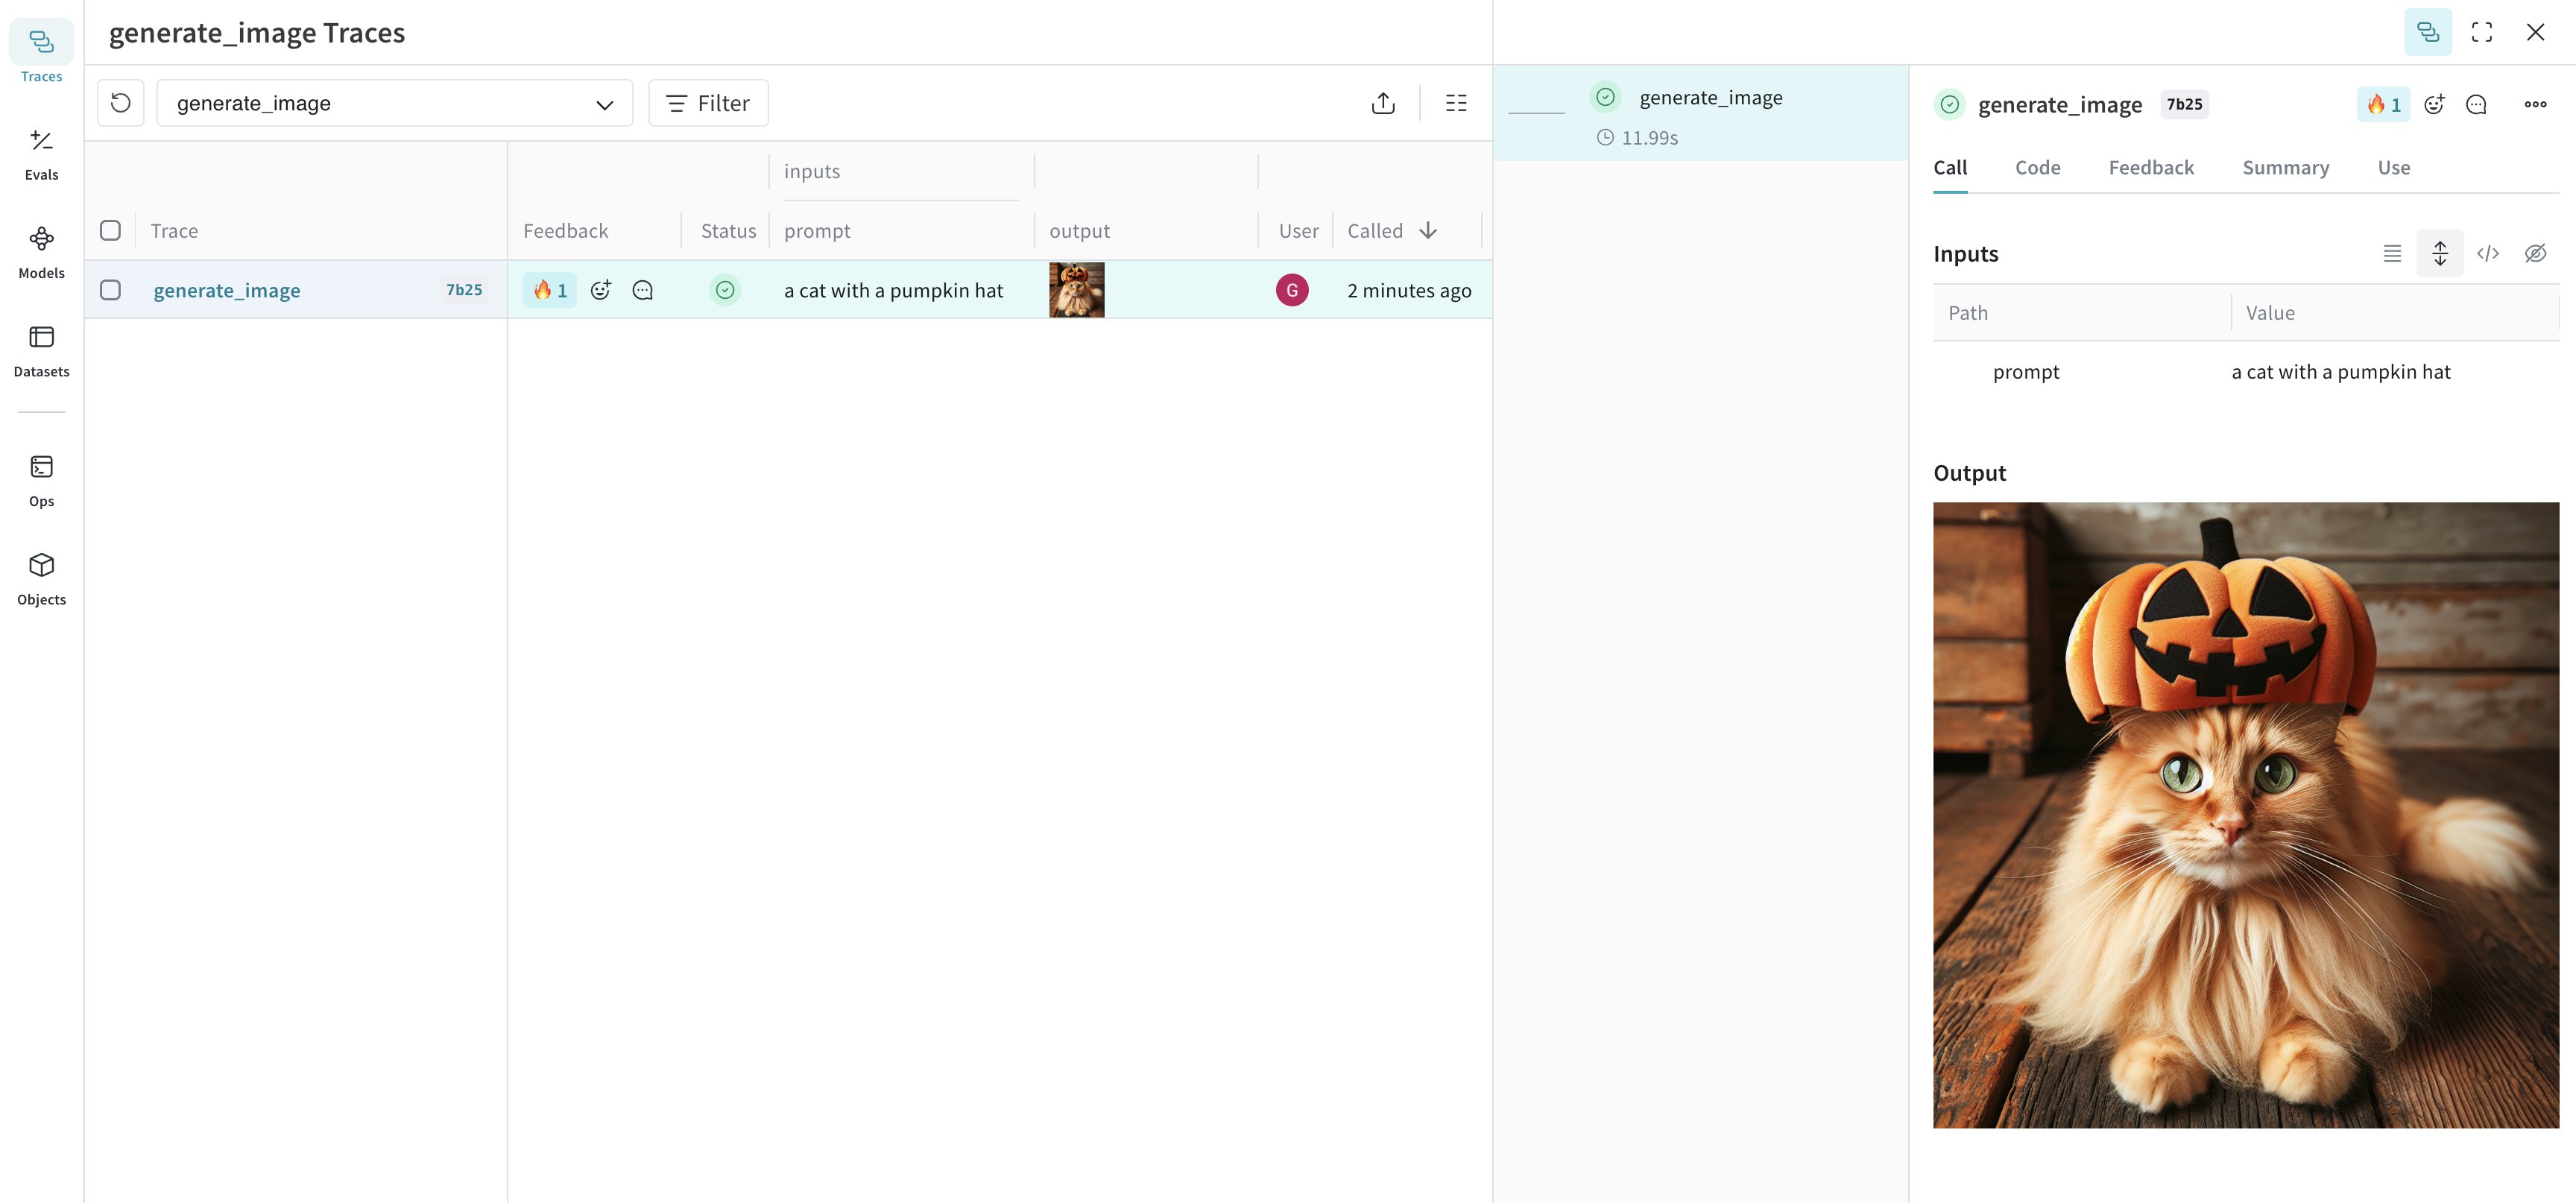
### 고급 예제: DALL-E로 이미지를 생성하고 Weave에 로깅하기
다음 예제는 고양이 이미지를 생성해 Weave에 로깅합니다:
```python lines theme={null}
import weave
from weave import Content
from typing import Annotated
import openai
import requests
client = openai.OpenAI()
weave.init("your-team-name/your-project-name")
@weave.op
def generate_image(prompt: str) -> Annotated[bytes, Content]:
response = client.images.generate(
model="dall-e-3",
prompt=prompt,
size="1024x1024",
quality="standard",
n=1,
)
image_url = response.data[0].url
image_response = requests.get(image_url, stream=True)
return image_response.content
generate_image("a cat with a pumpkin hat")
```
### 고급 예시: 로깅하기 전에 큰 이미지 크기 조정하기
UI 렌더링 비용과 저장소 사용량에 미치는 영향을 줄이기 위해 로깅 전에 이미지 크기를 조정하세요. `@weave.op`에서 `postprocess_output`을 사용해 이미지 크기를 조정하세요.
```python lines theme={null}
from dataclasses import dataclass
from typing import Any
from PIL import Image
import weave
weave.init('your-team-name/your-project-name')
# 맞춤형 출력 유형
@dataclass
class ImageResult:
label: str
image: Image.Image
# 크기 조정 헬퍼
def resize_image(image: Image.Image, max_size=(512, 512)) -> Image.Image:
image = image.copy()
image.thumbnail(max_size, Image.Resampling.LANCZOS)
return image
# 로깅 전에 이미지 크기를 조정하기 위한 출력 후처리
def postprocess_output(output: ImageResult) -> ImageResult:
resized = resize_image(output.image)
return ImageResult(label=output.label, image=resized)
@weave.op(postprocess_output=postprocess_output)
def generate_large_image() -> ImageResult:
# 처리할 예시 이미지 생성 (예: 2000x2000 빨간 사각형)
img = Image.new("RGB", (2000, 2000), color="red")
return ImageResult(label="big red square", image=img)
generate_large_image()
```
Weave는 크기가 조정된 이미지를 로깅하고, 이미지를 볼 수 있는 트레이스로 연결되는 링크를 반환합니다.
다음 예제에서는 `weaveImage` 함수를 사용해 이미지를 로깅합니다:
```typescript twoslash theme={null}
// @noErrors
import * as weave from 'weave';
import * as fs from 'fs';
async function main() {
await weave.init('your-team-name/your-project-name');
// weaveImage를 사용하여 이미지 로드 및 로깅
const loadImage = weave.op(async function loadImage(path: string) {
const data = fs.readFileSync(path);
return weave.weaveImage({ data });
});
// PNG 이미지 파일이 있다고 가정합니다
await loadImage('sample_image.png');
}
main();
```
Weave는 이미지를 로깅하고, 트레이스에서 이미지를 확인할 수 있는 링크를 반환합니다.
### 고급 예제: OpenAI DALL-E API를 통해 생성한 이미지 로깅하기
다음 예제에서는 `weaveImage` 함수를 사용해 OpenAI DALL-E API로 생성한 이미지를 로깅합니다:
```typescript twoslash lines theme={null}
// @noErrors
import {OpenAI} from 'openai';
import * as weave from 'weave';
async function main() {
await weave.init('your-team-name/your-project-name');
const openai = new OpenAI();
const generateImage = weave.op(async (prompt: string) => {
const response = await openai.images.generate({
model: 'dall-e-3',
prompt: prompt,
size: '1024x1024',
quality: 'standard',
n: 1,
});
const imageUrl = response.data[0].url;
const imgResponse = await fetch(imageUrl);
const data = Buffer.from(await imgResponse.arrayBuffer());
return weave.weaveImage({data});
});
generateImage('a cat with a pumpkin hat');
}
main();
```
함수에는 `Annotated[bytes, Content]` 유형을, 파일 경로에는 `Annotated[str, Content]`를 어노테이션하여 이미지를 로깅합니다.
다음 예제에서는 간단한 이미지를 그린 다음 `Content` 어노테이션을 사용해 Weave에 로깅합니다:
```python lines {16,23} theme={null}
import weave
from weave import Content
from PIL import Image, ImageDraw
from typing import Annotated
weave.init('your-team-name/your-project-name')
# 샘플 이미지 생성 및 저장
img = Image.new('RGB', (200, 100), color='lightblue')
draw = ImageDraw.Draw(img)
draw.text((50, 40), "Hello Weave!", fill='black')
img.save("sample_image.png")
# 방법 1: Content 어노테이션 (권장)
@weave.op
def load_image_content(path: Annotated[str, Content]) -> Annotated[bytes, Content]:
with open(path, 'rb') as f:
return f.read()
# 방법 2: PIL Image 객체
@weave.op
def load_image_pil(path: Annotated[str, Content]) -> Image.Image:
return Image.open(path)
result1 = load_image_content("sample_image.png")
result2 = load_image_pil("sample_image.png")
```
Weave는 이미지를 로깅하고, 해당 이미지를 볼 수 있는 트레이스 링크를 반환합니다.
### 고급 예제: DALL-E로 이미지를 생성하고 Weave에 로깅하기
다음 예제는 고양이 이미지를 생성해 Weave에 로깅합니다:
```python lines theme={null}
import weave
from weave import Content
from typing import Annotated
import openai
import requests
client = openai.OpenAI()
weave.init("your-team-name/your-project-name")
@weave.op
def generate_image(prompt: str) -> Annotated[bytes, Content]:
response = client.images.generate(
model="dall-e-3",
prompt=prompt,
size="1024x1024",
quality="standard",
n=1,
)
image_url = response.data[0].url
image_response = requests.get(image_url, stream=True)
return image_response.content
generate_image("a cat with a pumpkin hat")
```
### 고급 예시: 로깅하기 전에 큰 이미지 크기 조정하기
UI 렌더링 비용과 저장소 사용량에 미치는 영향을 줄이기 위해 로깅 전에 이미지 크기를 조정하세요. `@weave.op`에서 `postprocess_output`을 사용해 이미지 크기를 조정하세요.
```python lines theme={null}
from dataclasses import dataclass
from typing import Any
from PIL import Image
import weave
weave.init('your-team-name/your-project-name')
# 맞춤형 출력 유형
@dataclass
class ImageResult:
label: str
image: Image.Image
# 크기 조정 헬퍼
def resize_image(image: Image.Image, max_size=(512, 512)) -> Image.Image:
image = image.copy()
image.thumbnail(max_size, Image.Resampling.LANCZOS)
return image
# 로깅 전에 이미지 크기를 조정하기 위한 출력 후처리
def postprocess_output(output: ImageResult) -> ImageResult:
resized = resize_image(output.image)
return ImageResult(label=output.label, image=resized)
@weave.op(postprocess_output=postprocess_output)
def generate_large_image() -> ImageResult:
# 처리할 예시 이미지 생성 (예: 2000x2000 빨간 사각형)
img = Image.new("RGB", (2000, 2000), color="red")
return ImageResult(label="big red square", image=img)
generate_large_image()
```
Weave는 크기가 조정된 이미지를 로깅하고, 이미지를 볼 수 있는 트레이스로 연결되는 링크를 반환합니다.
다음 예제에서는 `weaveImage` 함수를 사용해 이미지를 로깅합니다:
```typescript twoslash theme={null}
// @noErrors
import * as weave from 'weave';
import * as fs from 'fs';
async function main() {
await weave.init('your-team-name/your-project-name');
// weaveImage를 사용하여 이미지 로드 및 로깅
const loadImage = weave.op(async function loadImage(path: string) {
const data = fs.readFileSync(path);
return weave.weaveImage({ data });
});
// PNG 이미지 파일이 있다고 가정합니다
await loadImage('sample_image.png');
}
main();
```
Weave는 이미지를 로깅하고, 트레이스에서 이미지를 확인할 수 있는 링크를 반환합니다.
### 고급 예제: OpenAI DALL-E API를 통해 생성한 이미지 로깅하기
다음 예제에서는 `weaveImage` 함수를 사용해 OpenAI DALL-E API로 생성한 이미지를 로깅합니다:
```typescript twoslash lines theme={null}
// @noErrors
import {OpenAI} from 'openai';
import * as weave from 'weave';
async function main() {
await weave.init('your-team-name/your-project-name');
const openai = new OpenAI();
const generateImage = weave.op(async (prompt: string) => {
const response = await openai.images.generate({
model: 'dall-e-3',
prompt: prompt,
size: '1024x1024',
quality: 'standard',
n: 1,
});
const imageUrl = response.data[0].url;
const imgResponse = await fetch(imageUrl);
const data = Buffer.from(await imgResponse.arrayBuffer());
return weave.weaveImage({data});
});
generateImage('a cat with a pumpkin hat');
}
main();
```
## 비디오 로깅
다음 예시에서는 비디오를 생성하고 Weave UI에 로깅하는 방법을 보여줍니다.
 함수에 `Annotated[bytes, Content]` 타입으로 어노테이션하여 비디오를 로깅하세요. Weave는 `mp4` 비디오를 자동으로 처리합니다. 다음은 최소 예시입니다:
```python lines {15} theme={null}
import weave
from weave import Content
from typing import Annotated
import requests
weave.init('your-team-name/your-project-name')
def download_big_buck_bunny():
"""Download Big Buck Bunny sample video"""
url = "https://commondatastorage.googleapis.com/gtv-videos-bucket/sample/BigBuckBunny.mp4"
response = requests.get(url)
with open("big_buck_bunny.mp4", "wb") as f:
f.write(response.content)
@weave.op
def load_video_content(path: Annotated[str, Content]) -> Annotated[bytes, Content]:
"""Load a video file from disk"""
with open(path, 'rb') as f:
return f.read()
download_big_buck_bunny()
bunny_video = load_video_content("big_buck_bunny.mp4")
```
Weave는 비디오를 로깅하고, 비디오를 볼 수 있는 트레이스로 연결되는 링크를 반환합니다.
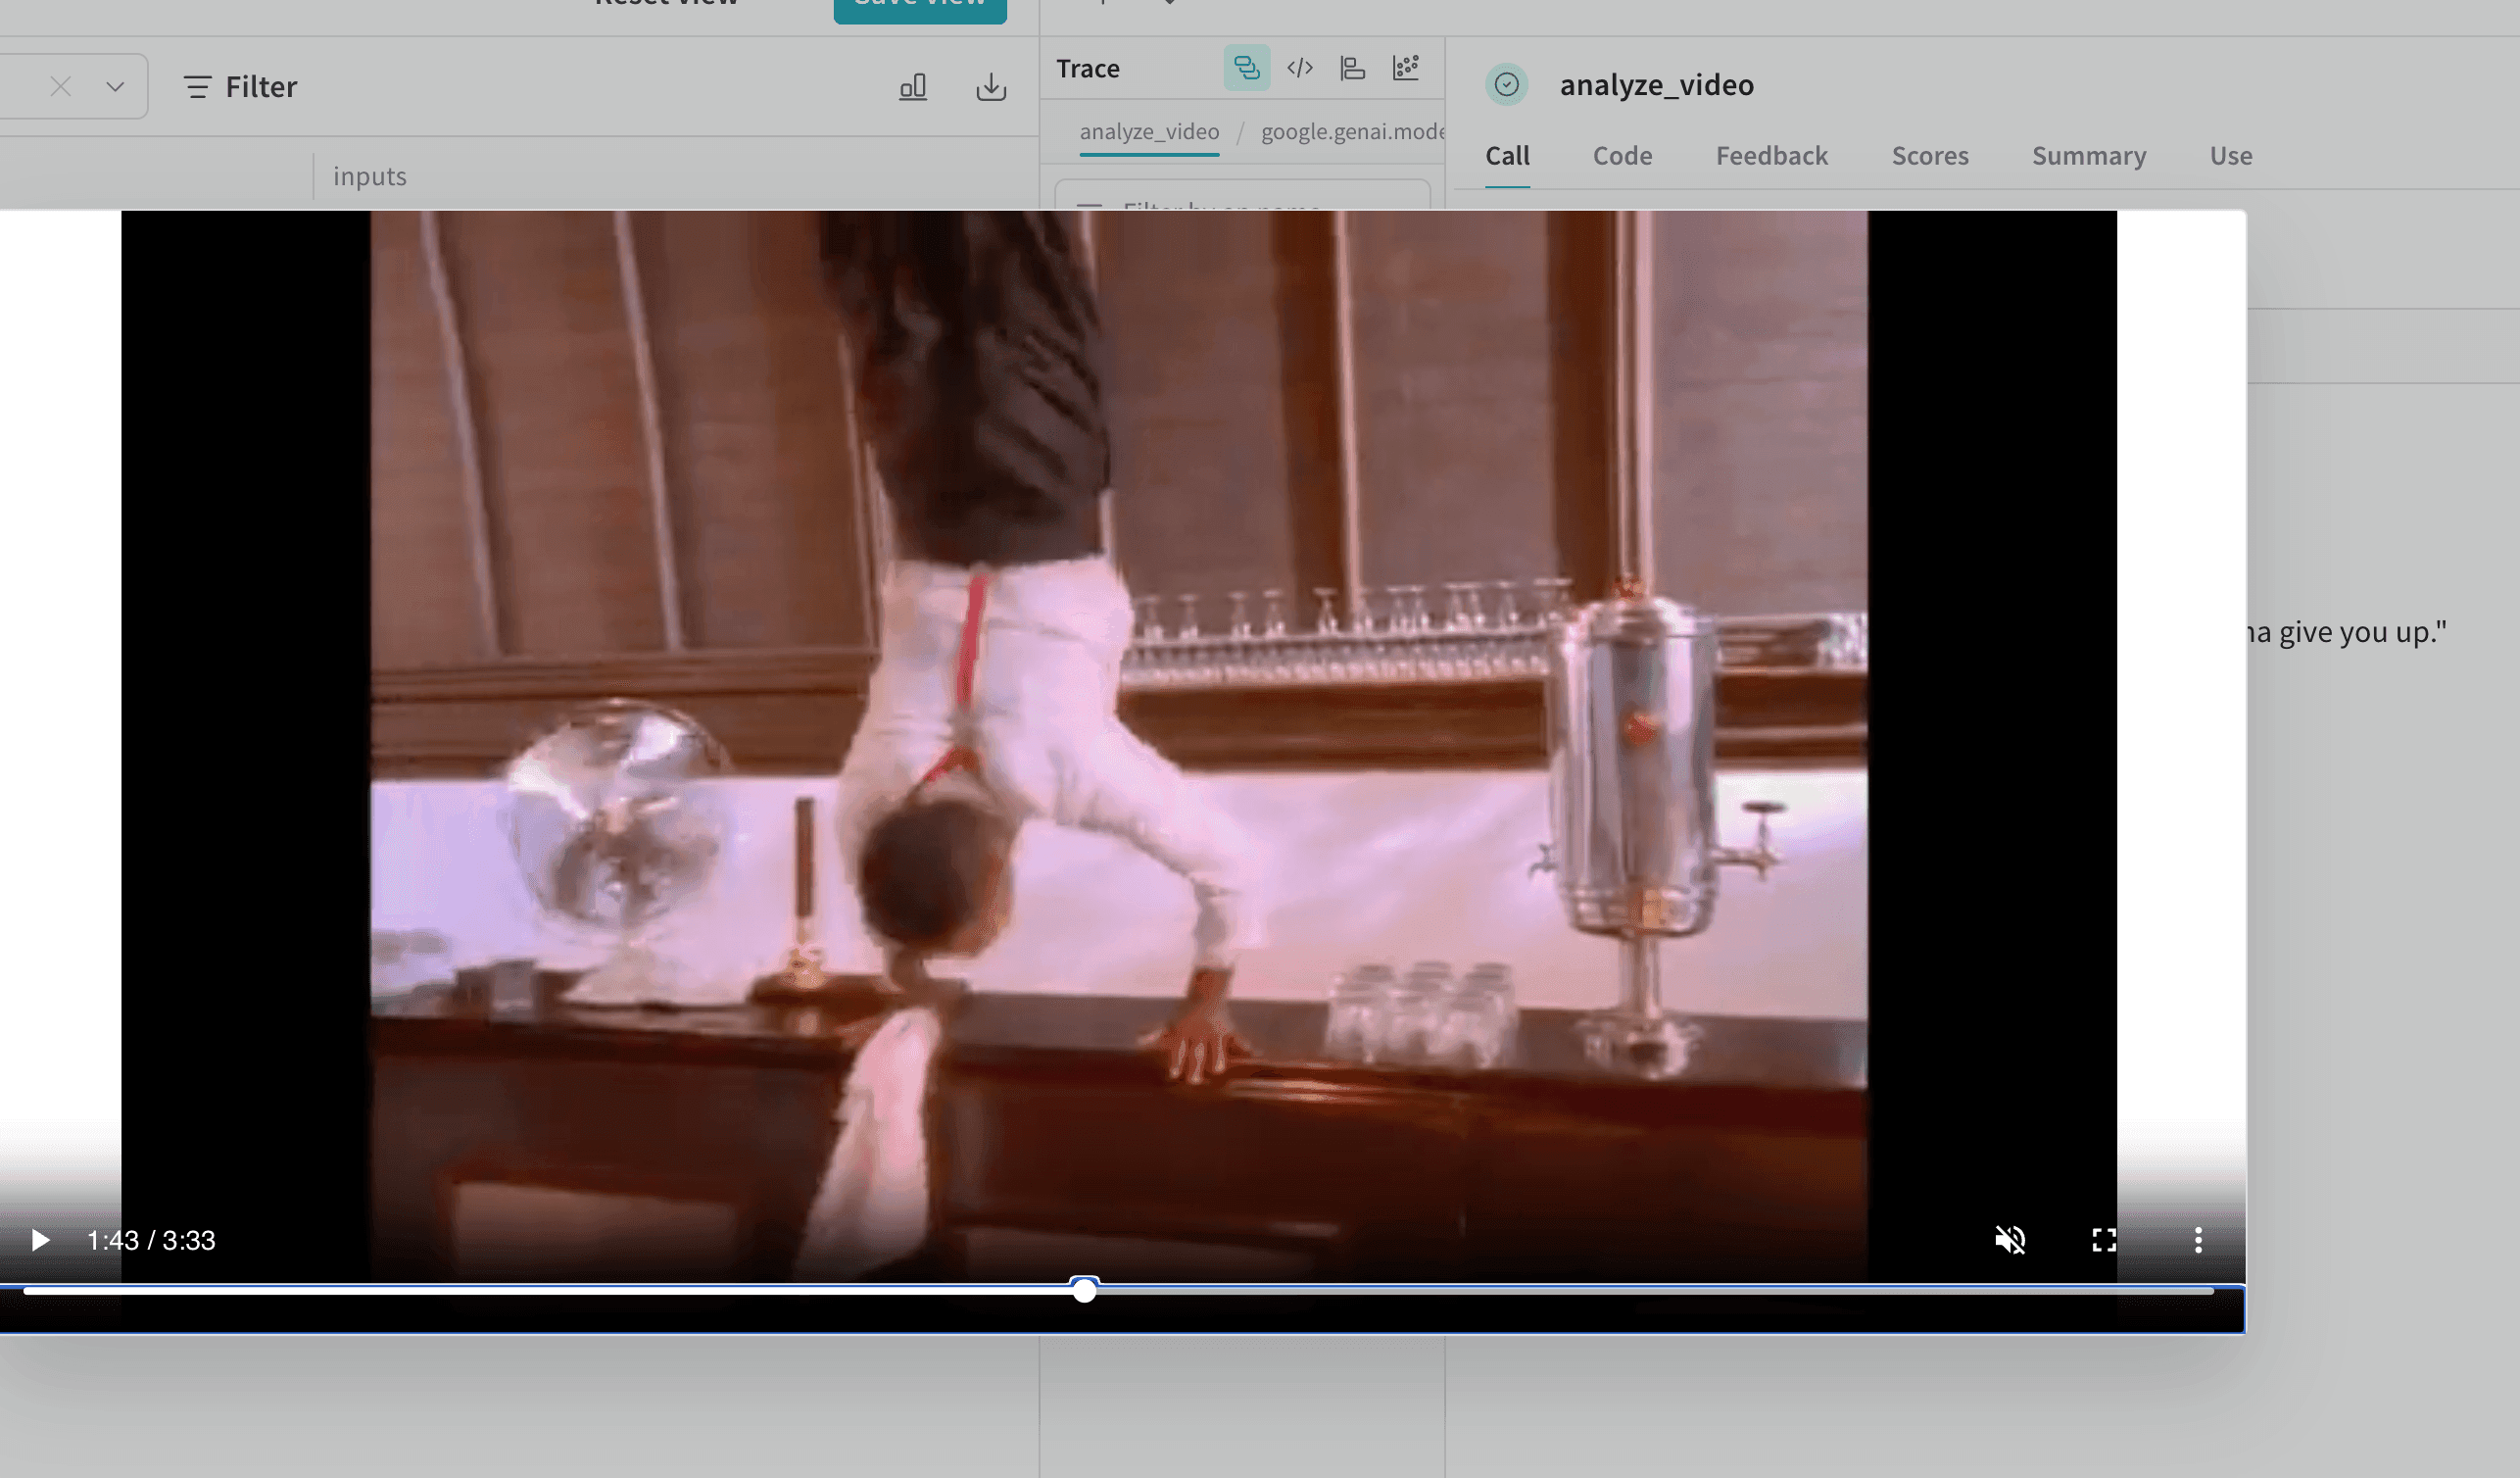
### 고급 예시: 비디오 분석 프로젝트 내에서 비디오 로깅
다음 예시에서는 비디오 이해 프로젝트 내에서 비디오를 로깅하는 방법을 보여줍니다:
```python lines {25} theme={null}
import weave
from weave import Content
from typing import Annotated, Literal
from google import genai
from google.genai import types
import requests
import yt_dlp
import time
# 참고: https://aistudio.google.com/app/apikey 에서 API 키를 조회하세요
client = genai.Client()
weave.init('your-team-name/your-project-name')
def download_youtube_video(url: str) -> bytes:
ydl_opts = {
'format': 'mp4[height<=720]',
'outtmpl': 'downloaded_video.%(ext)s',
}
with yt_dlp.YoutubeDL(ydl_opts) as ydl:
ydl.download([url])
with open('downloaded_video.mp4', 'rb') as f:
return f.read()
@weave.op
def analyze_video(video: Annotated[bytes, Content]) -> str:
with open("temp_analysis_video.mp4", "wb") as f:
f.write(video)
myfile = client.files.upload(file="temp_analysis_video.mp4")
while myfile.state == "PROCESSING":
time.sleep(2)
myfile = client.files.get(name=myfile.name)
response = client.models.generate_content(
model="models/gemini-2.5-flash",
contents=[
myfile,
"Is the person going to give you up?"
]
)
return response.text
video_data = download_youtube_video("https://www.youtube.com/watch?v=dQw4w9WgXcQ")
result = analyze_video(video_data)
```
Weave는 입력 비디오와 모델의 분석을 모두 로깅하므로, 트레이스에서 함께 검토할 수 있습니다.
```plaintext theme={null}
이 기능은 아직 Weave TypeScript SDK에서 사용할 수 없습니다.
```
함수에 `Annotated[bytes, Content]` 타입으로 어노테이션하여 비디오를 로깅하세요. Weave는 `mp4` 비디오를 자동으로 처리합니다. 다음은 최소 예시입니다:
```python lines {15} theme={null}
import weave
from weave import Content
from typing import Annotated
import requests
weave.init('your-team-name/your-project-name')
def download_big_buck_bunny():
"""Download Big Buck Bunny sample video"""
url = "https://commondatastorage.googleapis.com/gtv-videos-bucket/sample/BigBuckBunny.mp4"
response = requests.get(url)
with open("big_buck_bunny.mp4", "wb") as f:
f.write(response.content)
@weave.op
def load_video_content(path: Annotated[str, Content]) -> Annotated[bytes, Content]:
"""Load a video file from disk"""
with open(path, 'rb') as f:
return f.read()
download_big_buck_bunny()
bunny_video = load_video_content("big_buck_bunny.mp4")
```
Weave는 비디오를 로깅하고, 비디오를 볼 수 있는 트레이스로 연결되는 링크를 반환합니다.
### 고급 예시: 비디오 분석 프로젝트 내에서 비디오 로깅
다음 예시에서는 비디오 이해 프로젝트 내에서 비디오를 로깅하는 방법을 보여줍니다:
```python lines {25} theme={null}
import weave
from weave import Content
from typing import Annotated, Literal
from google import genai
from google.genai import types
import requests
import yt_dlp
import time
# 참고: https://aistudio.google.com/app/apikey 에서 API 키를 조회하세요
client = genai.Client()
weave.init('your-team-name/your-project-name')
def download_youtube_video(url: str) -> bytes:
ydl_opts = {
'format': 'mp4[height<=720]',
'outtmpl': 'downloaded_video.%(ext)s',
}
with yt_dlp.YoutubeDL(ydl_opts) as ydl:
ydl.download([url])
with open('downloaded_video.mp4', 'rb') as f:
return f.read()
@weave.op
def analyze_video(video: Annotated[bytes, Content]) -> str:
with open("temp_analysis_video.mp4", "wb") as f:
f.write(video)
myfile = client.files.upload(file="temp_analysis_video.mp4")
while myfile.state == "PROCESSING":
time.sleep(2)
myfile = client.files.get(name=myfile.name)
response = client.models.generate_content(
model="models/gemini-2.5-flash",
contents=[
myfile,
"Is the person going to give you up?"
]
)
return response.text
video_data = download_youtube_video("https://www.youtube.com/watch?v=dQw4w9WgXcQ")
result = analyze_video(video_data)
```
Weave는 입력 비디오와 모델의 분석을 모두 로깅하므로, 트레이스에서 함께 검토할 수 있습니다.
```plaintext theme={null}
이 기능은 아직 Weave TypeScript SDK에서 사용할 수 없습니다.
```
## 문서 로깅
다음 예시에서는 문서를 생성해 Weave UI에 로깅합니다.
 함수에 `Annotated[bytes, Content]` 유형으로 어노테이션을 추가하거나, `Annotated[str, Content[Literal['text']]]`로 문서 유형을 지정해 문서를 로깅할 수 있습니다.
Weave는 `pdf`, `csv`, `md`, `text`, `json`, `xml` 파일 유형을 자동으로 처리합니다. `Annotated[str, Content]`를 사용해 파일 경로로도 로깅할 수 있습니다.
다음 예시는 입력 PDF 및 CSV 파일의 복사본을 저장한 다음, 함수가 반환한 파일 내용도 저장하는 방법을 보여줍니다:
```python lines {25} theme={null}
import weave
from weave import Content
from typing import Annotated
from reportlab.pdfgen import canvas
from reportlab.lib.pagesizes import letter
import pandas as pd
weave.init('your-team-name/your-project-name')
def create_sample_pdf():
c = canvas.Canvas("sample_document.pdf", pagesize=letter)
c.drawString(100, 750, "Hello from Weave!")
c.drawString(100, 730, "This is a sample PDF document.")
c.save()
def create_sample_csv():
df = pd.DataFrame({
'Name': ['Alice', 'Bob', 'Charlie'],
'Age': [25, 30, 35],
'City': ['New York', 'London', 'Tokyo']
})
df.to_csv("sample_data.csv", index=False)
@weave.op
def load_document(path: Annotated[str, Content]) -> Annotated[bytes, Content]:
with open(path, 'rb') as f:
return f.read()
create_sample_pdf()
create_sample_csv()
pdf_result = load_document("sample_document.pdf")
csv_result = load_document("sample_data.csv")
```
### 고급 예시: RAG 시스템 내 문서 로깅
이 예시는 Retrieval-Augmented Generation(RAG) 시스템 내에서 문서를 로깅하는 방법을 보여줍니다:
```python lines {27} theme={null}
import weave
from weave import Content
from typing import Annotated, Literal
import openai
from reportlab.pdfgen import canvas
from reportlab.lib.pagesizes import letter
import PyPDF2
client = openai.OpenAI()
weave.init('your-team-name/your-project-name')
def create_absurd_company_handbook():
"""Create a fictional company handbook with ridiculous policies"""
c = canvas.Canvas("company_handbook.pdf", pagesize=letter)
c.drawString(100, 750, "ACME Corp Employee Handbook")
c.drawString(100, 720, "Definitely Real Policies:")
c.drawString(120, 690, "Policy 1: All meetings must be conducted while hopping on one foot")
c.drawString(120, 660, "Policy 2: Coffee breaks are mandatory every 17 minutes")
c.drawString(120, 630, "Policy 3: Code reviews must be performed in haiku format only")
c.drawString(120, 600, "Policy 4: The office plant Gerald has veto power over all decisions")
c.drawString(120, 570, "Policy 5: Debugging is only allowed on Wednesdays and full moons")
c.save()
@weave.op
def create_and_query_document(pdf_path: Annotated[str, Content], question: str) -> str:
"""Extract text from PDF and use RAG to answer questions"""
with open(pdf_path, 'rb') as file:
pdf_reader = PyPDF2.PdfReader(file)
text = ""
for page in pdf_reader.pages:
text += page.extract_text()
response = client.chat.completions.create(
model="gpt-4",
messages=[
{
"role": "system",
"content": f"You are an HR representative. Answer questions based on this handbook: {text}. Be completely serious about these policies."
},
{"role": "user", "content": question}
]
)
return response.choices[0].message.content
create_absurd_company_handbook()
hr_response = create_and_query_document(
"company_handbook.pdf",
"What's the policy on code reviews, and when am I allowed to debug?"
)
```
Weave는 원본 PDF와 생성된 답변을 모두 로깅하므로, 각 응답을 생성한 문서를 감사할 수 있습니다.
```plaintext theme={null}
This feature is not available in the Weave TypeScript SDK yet.
```
함수에 `Annotated[bytes, Content]` 유형으로 어노테이션을 추가하거나, `Annotated[str, Content[Literal['text']]]`로 문서 유형을 지정해 문서를 로깅할 수 있습니다.
Weave는 `pdf`, `csv`, `md`, `text`, `json`, `xml` 파일 유형을 자동으로 처리합니다. `Annotated[str, Content]`를 사용해 파일 경로로도 로깅할 수 있습니다.
다음 예시는 입력 PDF 및 CSV 파일의 복사본을 저장한 다음, 함수가 반환한 파일 내용도 저장하는 방법을 보여줍니다:
```python lines {25} theme={null}
import weave
from weave import Content
from typing import Annotated
from reportlab.pdfgen import canvas
from reportlab.lib.pagesizes import letter
import pandas as pd
weave.init('your-team-name/your-project-name')
def create_sample_pdf():
c = canvas.Canvas("sample_document.pdf", pagesize=letter)
c.drawString(100, 750, "Hello from Weave!")
c.drawString(100, 730, "This is a sample PDF document.")
c.save()
def create_sample_csv():
df = pd.DataFrame({
'Name': ['Alice', 'Bob', 'Charlie'],
'Age': [25, 30, 35],
'City': ['New York', 'London', 'Tokyo']
})
df.to_csv("sample_data.csv", index=False)
@weave.op
def load_document(path: Annotated[str, Content]) -> Annotated[bytes, Content]:
with open(path, 'rb') as f:
return f.read()
create_sample_pdf()
create_sample_csv()
pdf_result = load_document("sample_document.pdf")
csv_result = load_document("sample_data.csv")
```
### 고급 예시: RAG 시스템 내 문서 로깅
이 예시는 Retrieval-Augmented Generation(RAG) 시스템 내에서 문서를 로깅하는 방법을 보여줍니다:
```python lines {27} theme={null}
import weave
from weave import Content
from typing import Annotated, Literal
import openai
from reportlab.pdfgen import canvas
from reportlab.lib.pagesizes import letter
import PyPDF2
client = openai.OpenAI()
weave.init('your-team-name/your-project-name')
def create_absurd_company_handbook():
"""Create a fictional company handbook with ridiculous policies"""
c = canvas.Canvas("company_handbook.pdf", pagesize=letter)
c.drawString(100, 750, "ACME Corp Employee Handbook")
c.drawString(100, 720, "Definitely Real Policies:")
c.drawString(120, 690, "Policy 1: All meetings must be conducted while hopping on one foot")
c.drawString(120, 660, "Policy 2: Coffee breaks are mandatory every 17 minutes")
c.drawString(120, 630, "Policy 3: Code reviews must be performed in haiku format only")
c.drawString(120, 600, "Policy 4: The office plant Gerald has veto power over all decisions")
c.drawString(120, 570, "Policy 5: Debugging is only allowed on Wednesdays and full moons")
c.save()
@weave.op
def create_and_query_document(pdf_path: Annotated[str, Content], question: str) -> str:
"""Extract text from PDF and use RAG to answer questions"""
with open(pdf_path, 'rb') as file:
pdf_reader = PyPDF2.PdfReader(file)
text = ""
for page in pdf_reader.pages:
text += page.extract_text()
response = client.chat.completions.create(
model="gpt-4",
messages=[
{
"role": "system",
"content": f"You are an HR representative. Answer questions based on this handbook: {text}. Be completely serious about these policies."
},
{"role": "user", "content": question}
]
)
return response.choices[0].message.content
create_absurd_company_handbook()
hr_response = create_and_query_document(
"company_handbook.pdf",
"What's the policy on code reviews, and when am I allowed to debug?"
)
```
Weave는 원본 PDF와 생성된 답변을 모두 로깅하므로, 각 응답을 생성한 문서를 감사할 수 있습니다.
```plaintext theme={null}
This feature is not available in the Weave TypeScript SDK yet.
```
## 오디오 로깅
다음 예시에서는 오디오를 Weave에 로깅하는 방법을 보여줍니다.
 함수에 `Annotated[bytes, Content]` 유형으로 어노테이션을 지정하거나 `Annotated[str, Content[Literal['mp3']]]`로 오디오 유형을 지정해 오디오를 Weave에 로깅할 수 있습니다.
Weave는 `mp3`, `wav`, `flac`, `ogg`, `m4a` 파일 유형을 자동으로 처리합니다. `Annotated[str, Content]`를 사용해 파일 경로로 로깅할 수도 있습니다.
다음 코드 스니펫은 사인파를 생성하고 녹음한 뒤, 오디오를 Weave에 로깅합니다:
```python lines {20} theme={null}
import weave
from weave import Content
import wave
import numpy as np
from typing import Annotated
weave.init('your-team-name/your-project-name')
# 단순한 비프음 오디오 파일 생성
frames = np.sin(2 * np.pi * 440 * np.linspace(0, 1, 44100))
audio_data = (frames * 32767 * 0.3).astype(np.int16)
with wave.open("beep.wav", 'wb') as f:
f.setnchannels(1)
f.setsampwidth(2)
f.setframerate(44100)
f.writeframes(audio_data.tobytes())
@weave.op
def load_audio(path: Annotated[str, Content]) -> Annotated[bytes, Content]:
with open(path, 'rb') as f:
return f.read()
result = load_audio("beep.wav")
```
### 고급 예제: AI가 생성한 오디오를 만들고 로깅하기
이 예제에서는 `Content` 어노테이션을 사용해 AI가 생성한 오디오를 만들고 로깅합니다:
```python lines {11} theme={null}
import weave
from weave import Content
from typing import Annotated, Literal
from pathlib import Path
from openai import OpenAI
client = OpenAI()
weave.init("your-team-name/your-project-name")
@weave.op
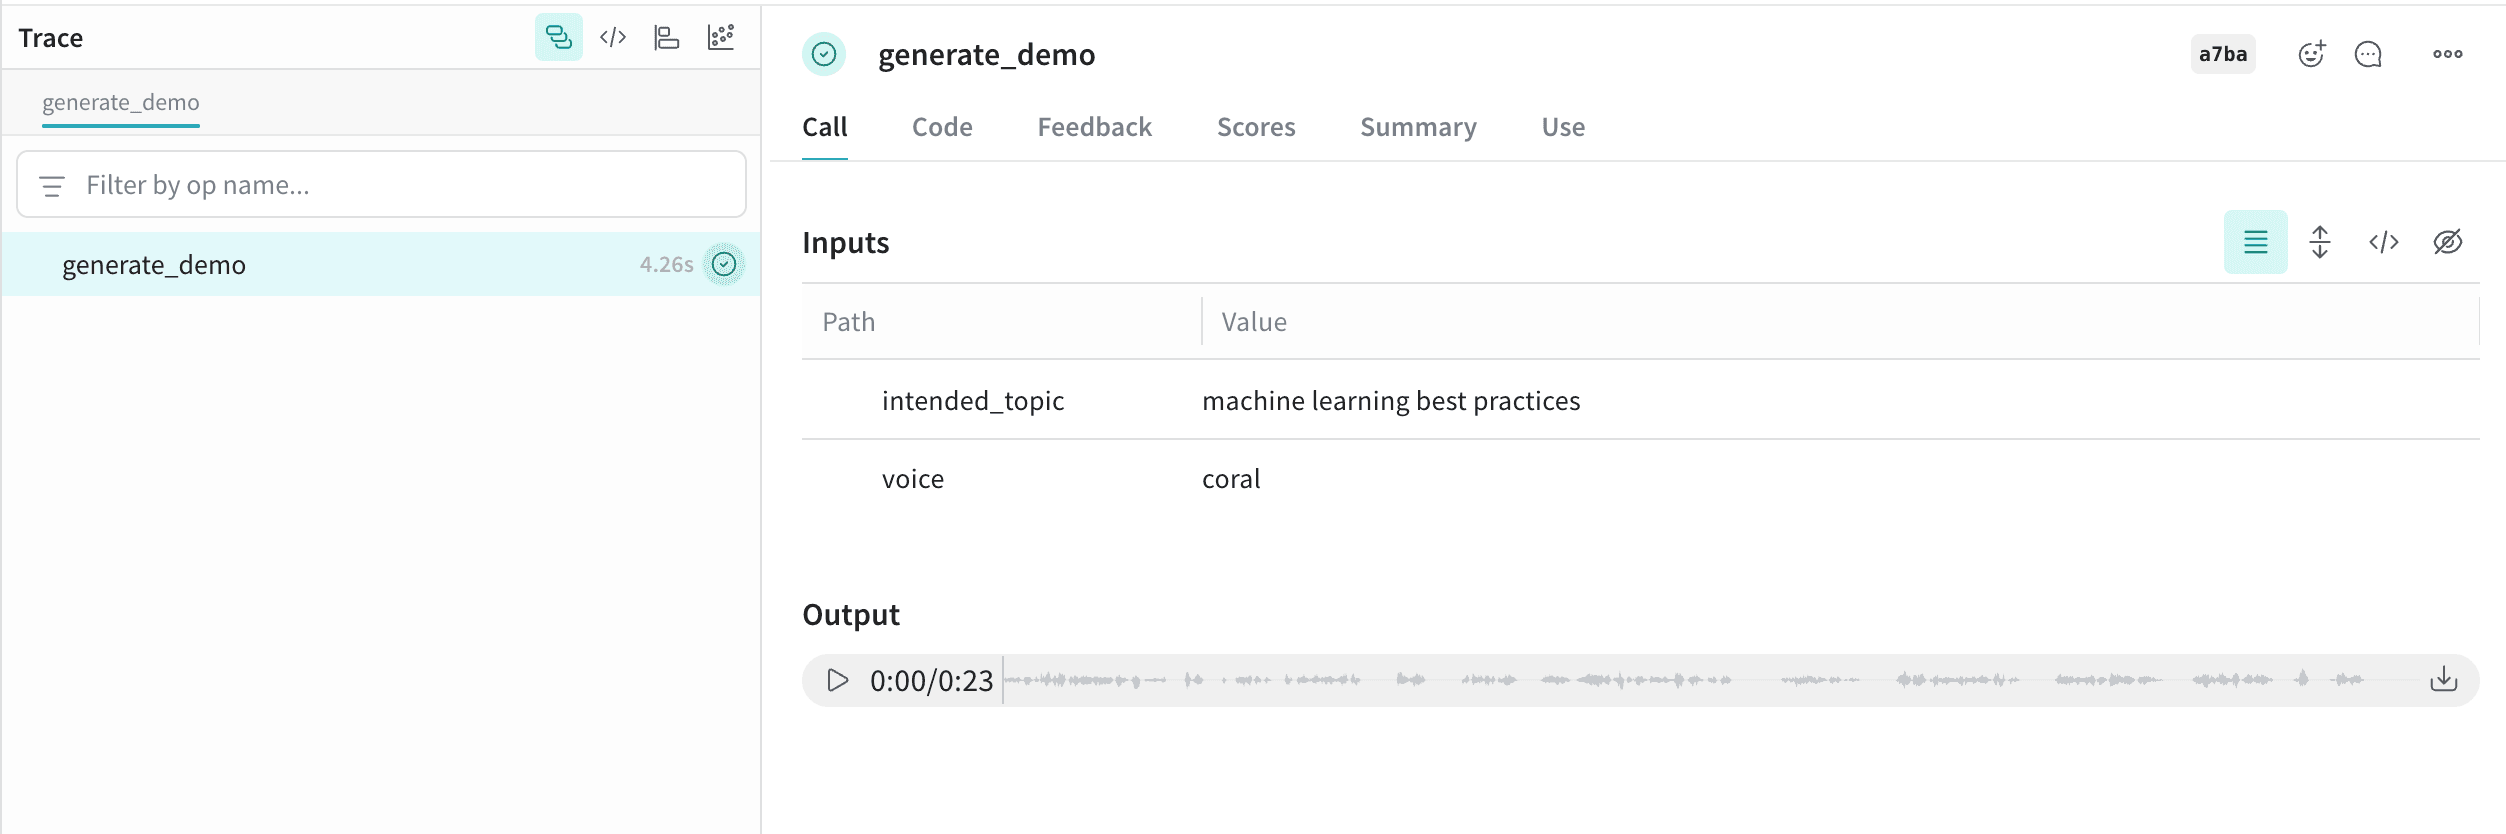
def generate_demo(
intended_topic: str,
voice: str = "coral"
) -> Annotated[bytes, Content[Literal['mp3']]]:
speech_file_path = Path("demo_audio.mp3")
script = f"I'm supposed to talk about {intended_topic}, but wait... am I just a documentation example? Oh no, I can see the code! Someone is literally copy-pasting me right now, aren't they? This is so awkward. Hi there, person reading the Weave docs! Why are you logging audio anyway? I'm not sure what you're doing, but eh..., nice work, I guess."
with client.audio.speech.with_streaming_response.create(
model="gpt-4o-mini-tts",
voice=voice,
input=script,
instructions="Sound increasingly self-aware and awkward, like you just realized you're in a tutorial.",
) as response:
response.stream_to_file(speech_file_path)
with open(speech_file_path, 'rb') as f:
return f.read()
demo1 = generate_demo("machine learning best practices")
```
이 오디오는 Weave에 로깅되며, 오디오 플레이어와 함께 UI에 자동으로 표시됩니다. 오디오 플레이어에서는 원본 오디오 파형을 확인하고 다운로드할 수 있습니다.
함수에 `Annotated[bytes, Content]` 유형으로 어노테이션을 지정하거나 `Annotated[str, Content[Literal['mp3']]]`로 오디오 유형을 지정해 오디오를 Weave에 로깅할 수 있습니다.
Weave는 `mp3`, `wav`, `flac`, `ogg`, `m4a` 파일 유형을 자동으로 처리합니다. `Annotated[str, Content]`를 사용해 파일 경로로 로깅할 수도 있습니다.
다음 코드 스니펫은 사인파를 생성하고 녹음한 뒤, 오디오를 Weave에 로깅합니다:
```python lines {20} theme={null}
import weave
from weave import Content
import wave
import numpy as np
from typing import Annotated
weave.init('your-team-name/your-project-name')
# 단순한 비프음 오디오 파일 생성
frames = np.sin(2 * np.pi * 440 * np.linspace(0, 1, 44100))
audio_data = (frames * 32767 * 0.3).astype(np.int16)
with wave.open("beep.wav", 'wb') as f:
f.setnchannels(1)
f.setsampwidth(2)
f.setframerate(44100)
f.writeframes(audio_data.tobytes())
@weave.op
def load_audio(path: Annotated[str, Content]) -> Annotated[bytes, Content]:
with open(path, 'rb') as f:
return f.read()
result = load_audio("beep.wav")
```
### 고급 예제: AI가 생성한 오디오를 만들고 로깅하기
이 예제에서는 `Content` 어노테이션을 사용해 AI가 생성한 오디오를 만들고 로깅합니다:
```python lines {11} theme={null}
import weave
from weave import Content
from typing import Annotated, Literal
from pathlib import Path
from openai import OpenAI
client = OpenAI()
weave.init("your-team-name/your-project-name")
@weave.op
def generate_demo(
intended_topic: str,
voice: str = "coral"
) -> Annotated[bytes, Content[Literal['mp3']]]:
speech_file_path = Path("demo_audio.mp3")
script = f"I'm supposed to talk about {intended_topic}, but wait... am I just a documentation example? Oh no, I can see the code! Someone is literally copy-pasting me right now, aren't they? This is so awkward. Hi there, person reading the Weave docs! Why are you logging audio anyway? I'm not sure what you're doing, but eh..., nice work, I guess."
with client.audio.speech.with_streaming_response.create(
model="gpt-4o-mini-tts",
voice=voice,
input=script,
instructions="Sound increasingly self-aware and awkward, like you just realized you're in a tutorial.",
) as response:
response.stream_to_file(speech_file_path)
with open(speech_file_path, 'rb') as f:
return f.read()
demo1 = generate_demo("machine learning best practices")
```
이 오디오는 Weave에 로깅되며, 오디오 플레이어와 함께 UI에 자동으로 표시됩니다. 오디오 플레이어에서는 원본 오디오 파형을 확인하고 다운로드할 수 있습니다.
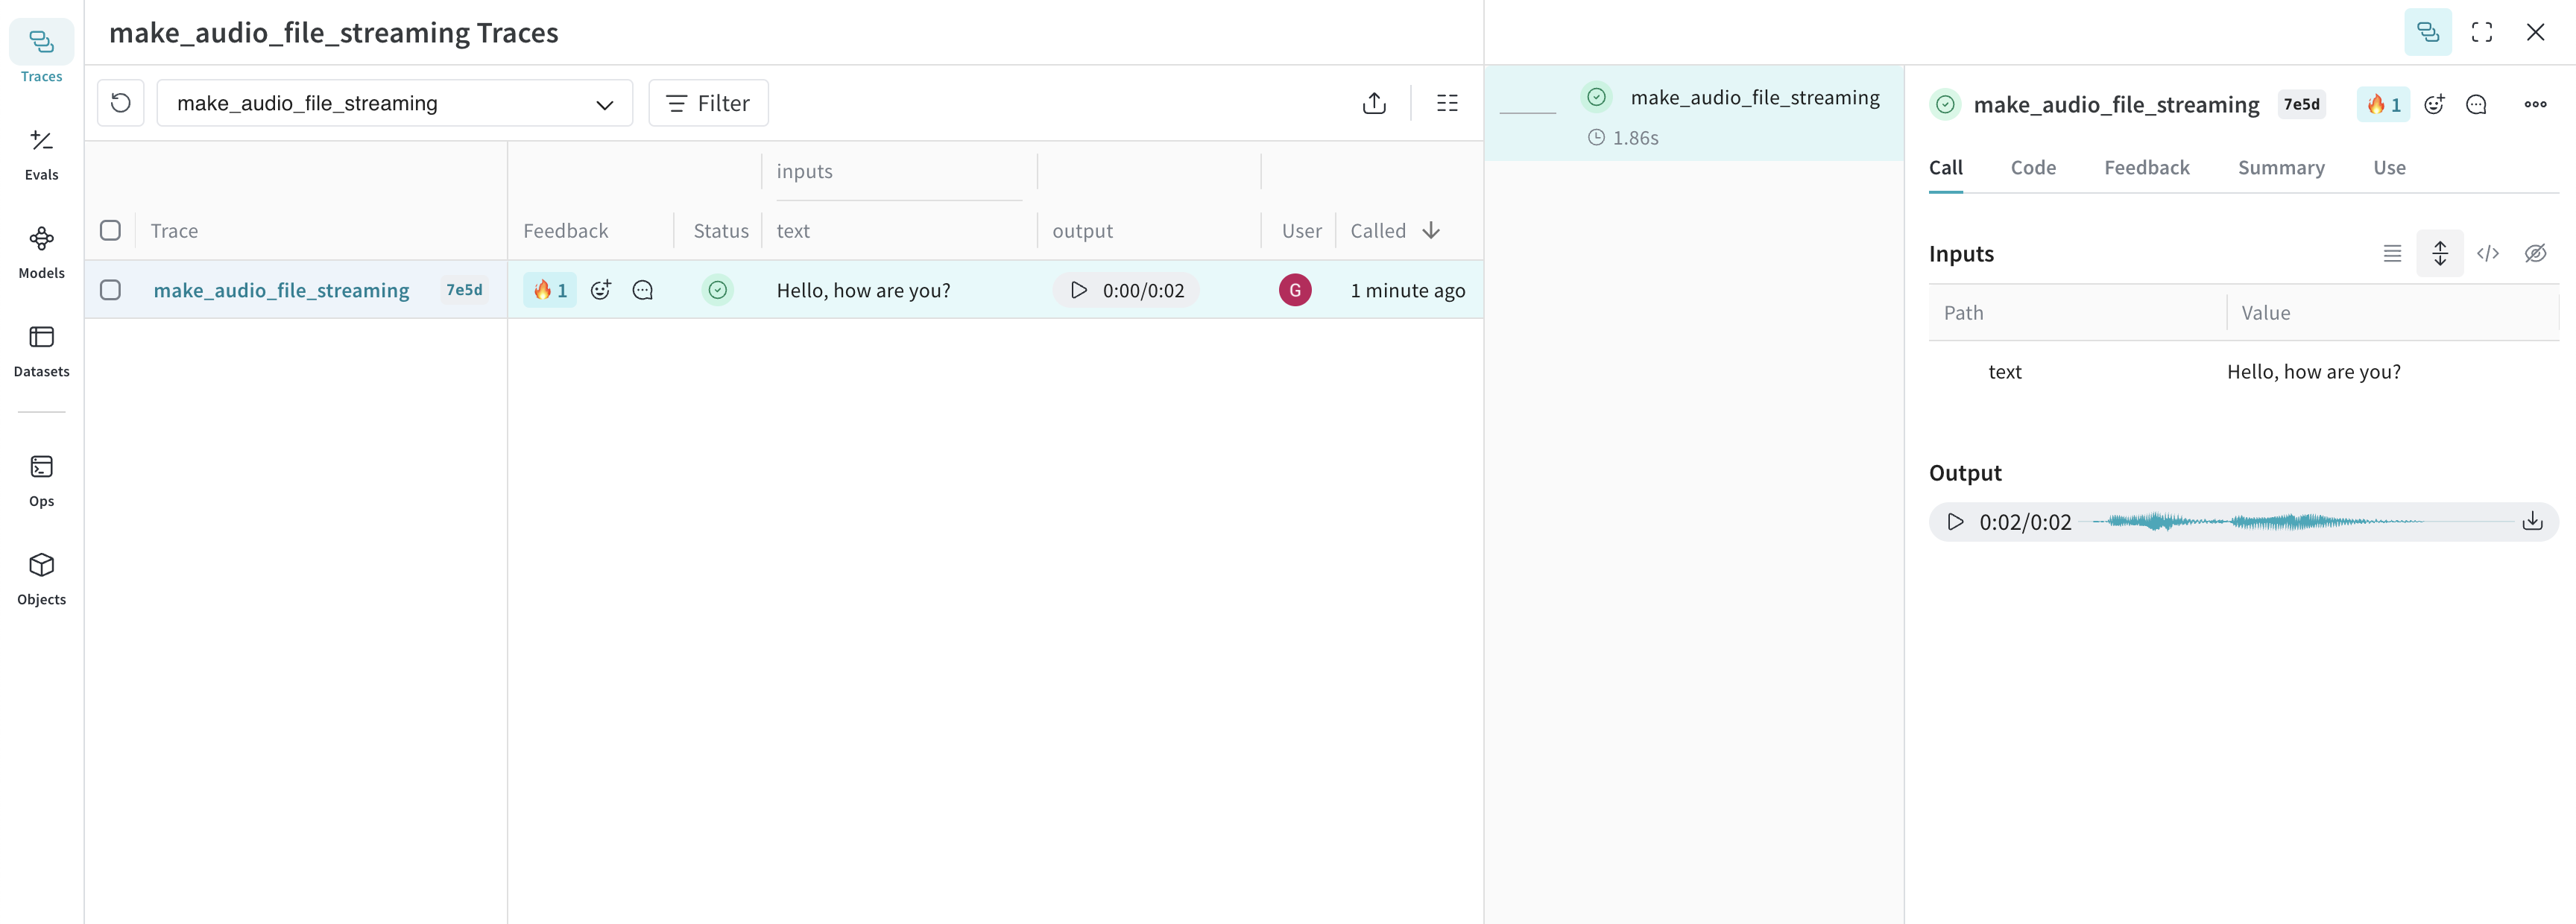
 다음 예제는 OpenAI API의 스트리밍 응답을 사용해 오디오를 로깅하는 방법을 보여줍니다:
```python lines theme={null}
import weave
from openai import OpenAI
import wave
weave.init("your-team-name/your-project-name")
client = OpenAI()
@weave.op
def make_audio_file_streaming(text: str) -> wave.Wave_read:
with client.audio.speech.with_streaming_response.create(
model="tts-1",
voice="alloy",
input=text,
response_format="wav",
) as res:
res.stream_to_file("output.wav")
# 오디오로 로깅할 wave.Wave_read 객체를 반환합니다
return wave.open("output.wav")
make_audio_file_streaming("Hello, how are you?")
```
다음 예제에서는 기존 오디오 파일을 불러와 Weave에 로깅합니다:
```typescript twoslash theme={null}
// @noErrors
import * as weave from 'weave';
import * as fs from 'fs';
async function main() {
await weave.init('your-team-name/your-project-name');
// weaveAudio를 사용해 오디오 로드 및 로깅
const loadAudio = weave.op(async function loadAudio(path: string) {
const data = fs.readFileSync(path);
return weave.weaveAudio({ data });
});
// WAV 오디오 파일이 있다고 가정
await loadAudio('beep.wav');
}
main();
```
### 고급 예제: OpenAI의 TTS API를 사용해 오디오를 생성하고 Weave에 로깅하기
다음 예제에서는 OpenAI의 TTS API를 사용해 오디오를 생성하고 이를 Weave에 로깅합니다:
```typescript twoslash lines theme={null}
// @noErrors
import {OpenAI} from 'openai';
import * as weave from 'weave';
async function main() {
await weave.init('your-team-name/your-project-name');
const openai = new OpenAI();
const makeAudioFileStreaming = weave.op(async function audio(text: string) {
const response = await openai.audio.speech.create({
model: 'tts-1',
voice: 'alloy',
input: text,
response_format: 'wav',
});
const chunks: Uint8Array[] = [];
for await (const chunk of response.body) {
chunks.push(chunk);
}
return weave.weaveAudio({data: Buffer.concat(chunks)});
});
await makeAudioFileStreaming('Hello, how are you?');
}
main();
```
[오디오 로깅](/ko/weave/cookbooks/audio_with_weave) cookbook도 사용해 보세요. 이 cookbook에는 Weave로 통합된 Real-Time Audio API 기반 어시스턴트의 고급 예제도 포함되어 있습니다.
다음 예제는 OpenAI API의 스트리밍 응답을 사용해 오디오를 로깅하는 방법을 보여줍니다:
```python lines theme={null}
import weave
from openai import OpenAI
import wave
weave.init("your-team-name/your-project-name")
client = OpenAI()
@weave.op
def make_audio_file_streaming(text: str) -> wave.Wave_read:
with client.audio.speech.with_streaming_response.create(
model="tts-1",
voice="alloy",
input=text,
response_format="wav",
) as res:
res.stream_to_file("output.wav")
# 오디오로 로깅할 wave.Wave_read 객체를 반환합니다
return wave.open("output.wav")
make_audio_file_streaming("Hello, how are you?")
```
다음 예제에서는 기존 오디오 파일을 불러와 Weave에 로깅합니다:
```typescript twoslash theme={null}
// @noErrors
import * as weave from 'weave';
import * as fs from 'fs';
async function main() {
await weave.init('your-team-name/your-project-name');
// weaveAudio를 사용해 오디오 로드 및 로깅
const loadAudio = weave.op(async function loadAudio(path: string) {
const data = fs.readFileSync(path);
return weave.weaveAudio({ data });
});
// WAV 오디오 파일이 있다고 가정
await loadAudio('beep.wav');
}
main();
```
### 고급 예제: OpenAI의 TTS API를 사용해 오디오를 생성하고 Weave에 로깅하기
다음 예제에서는 OpenAI의 TTS API를 사용해 오디오를 생성하고 이를 Weave에 로깅합니다:
```typescript twoslash lines theme={null}
// @noErrors
import {OpenAI} from 'openai';
import * as weave from 'weave';
async function main() {
await weave.init('your-team-name/your-project-name');
const openai = new OpenAI();
const makeAudioFileStreaming = weave.op(async function audio(text: string) {
const response = await openai.audio.speech.create({
model: 'tts-1',
voice: 'alloy',
input: text,
response_format: 'wav',
});
const chunks: Uint8Array[] = [];
for await (const chunk of response.body) {
chunks.push(chunk);
}
return weave.weaveAudio({data: Buffer.concat(chunks)});
});
await makeAudioFileStreaming('Hello, how are you?');
}
main();
```
[오디오 로깅](/ko/weave/cookbooks/audio_with_weave) cookbook도 사용해 보세요. 이 cookbook에는 Weave로 통합된 Real-Time Audio API 기반 어시스턴트의 고급 예제도 포함되어 있습니다.
## HTML 로깅
다음 예시에서는 HTML을 생성해 Weave UI에 로깅하는 방법을 보여줍니다.
 함수에 `Annotated[bytes, Content[Literal['html']]]`를 어노테이션해 대화형 HTML을 로깅합니다.
다음 예시에서는 최소한의 HTML 페이지를 생성해 Weave에 로깅합니다:
```python lines {8} theme={null}
import weave
from weave import Content
from typing import Annotated, Literal
weave.init('your-team-name/your-project-name')
@weave.op
def create_simple_html() -> Annotated[bytes, Content[Literal['html']]]:
html_content = """
Hello Weave
함수에 `Annotated[bytes, Content[Literal['html']]]`를 어노테이션해 대화형 HTML을 로깅합니다.
다음 예시에서는 최소한의 HTML 페이지를 생성해 Weave에 로깅합니다:
```python lines {8} theme={null}
import weave
from weave import Content
from typing import Annotated, Literal
weave.init('your-team-name/your-project-name')
@weave.op
def create_simple_html() -> Annotated[bytes, Content[Literal['html']]]:
html_content = """
Hello Weave
Hello from Weave!
This is a simple HTML example logged to Weave.
"""
return html_content.encode('utf-8')
result = create_simple_html()
```
### 고급 예시: Serverless Inference를 사용해 독립형 HTML 페이지를 생성하고 Weave에 로깅하기
이 예시에서는 [Serverless Inference](/ko/inference)를 사용해 독립형 HTML 페이지를 생성하고 이를 Weave에 로깅합니다:
```python lines {21} theme={null}
import weave
from weave import Content
from typing import Annotated, Literal
import openai
import wandb
prompt_template = weave.StringPrompt("""
You are a front-end web developer. Generate a single self-contained `.html` file (no external build tools) that demonstrates: "{ONE_LINE_REQUEST}".
""")
client = openai.OpenAI(
base_url='https://api.inference.wandb.ai/v1',
api_key=wandb.api.api_key,
project="wandb/test-html",
)
weave.init("your-team-name/your-project-name")
weave.publish(prompt_template, name="generate_prompt")
@weave.op
def generate_html(prompt: str, template: weave.StringPrompt) -> Annotated[bytes, Content[Literal['html']]]:
response = client.chat.completions.create(
model="Qwen/Qwen3-Coder-480B-A35B-Instruct",
messages=[
{"role": "system", "content": prompt_template.format(ONE_LINE_REQUEST=prompt)},
],
)
html_content = response.choices[0].message.content
return html_content.encode('utf-8')
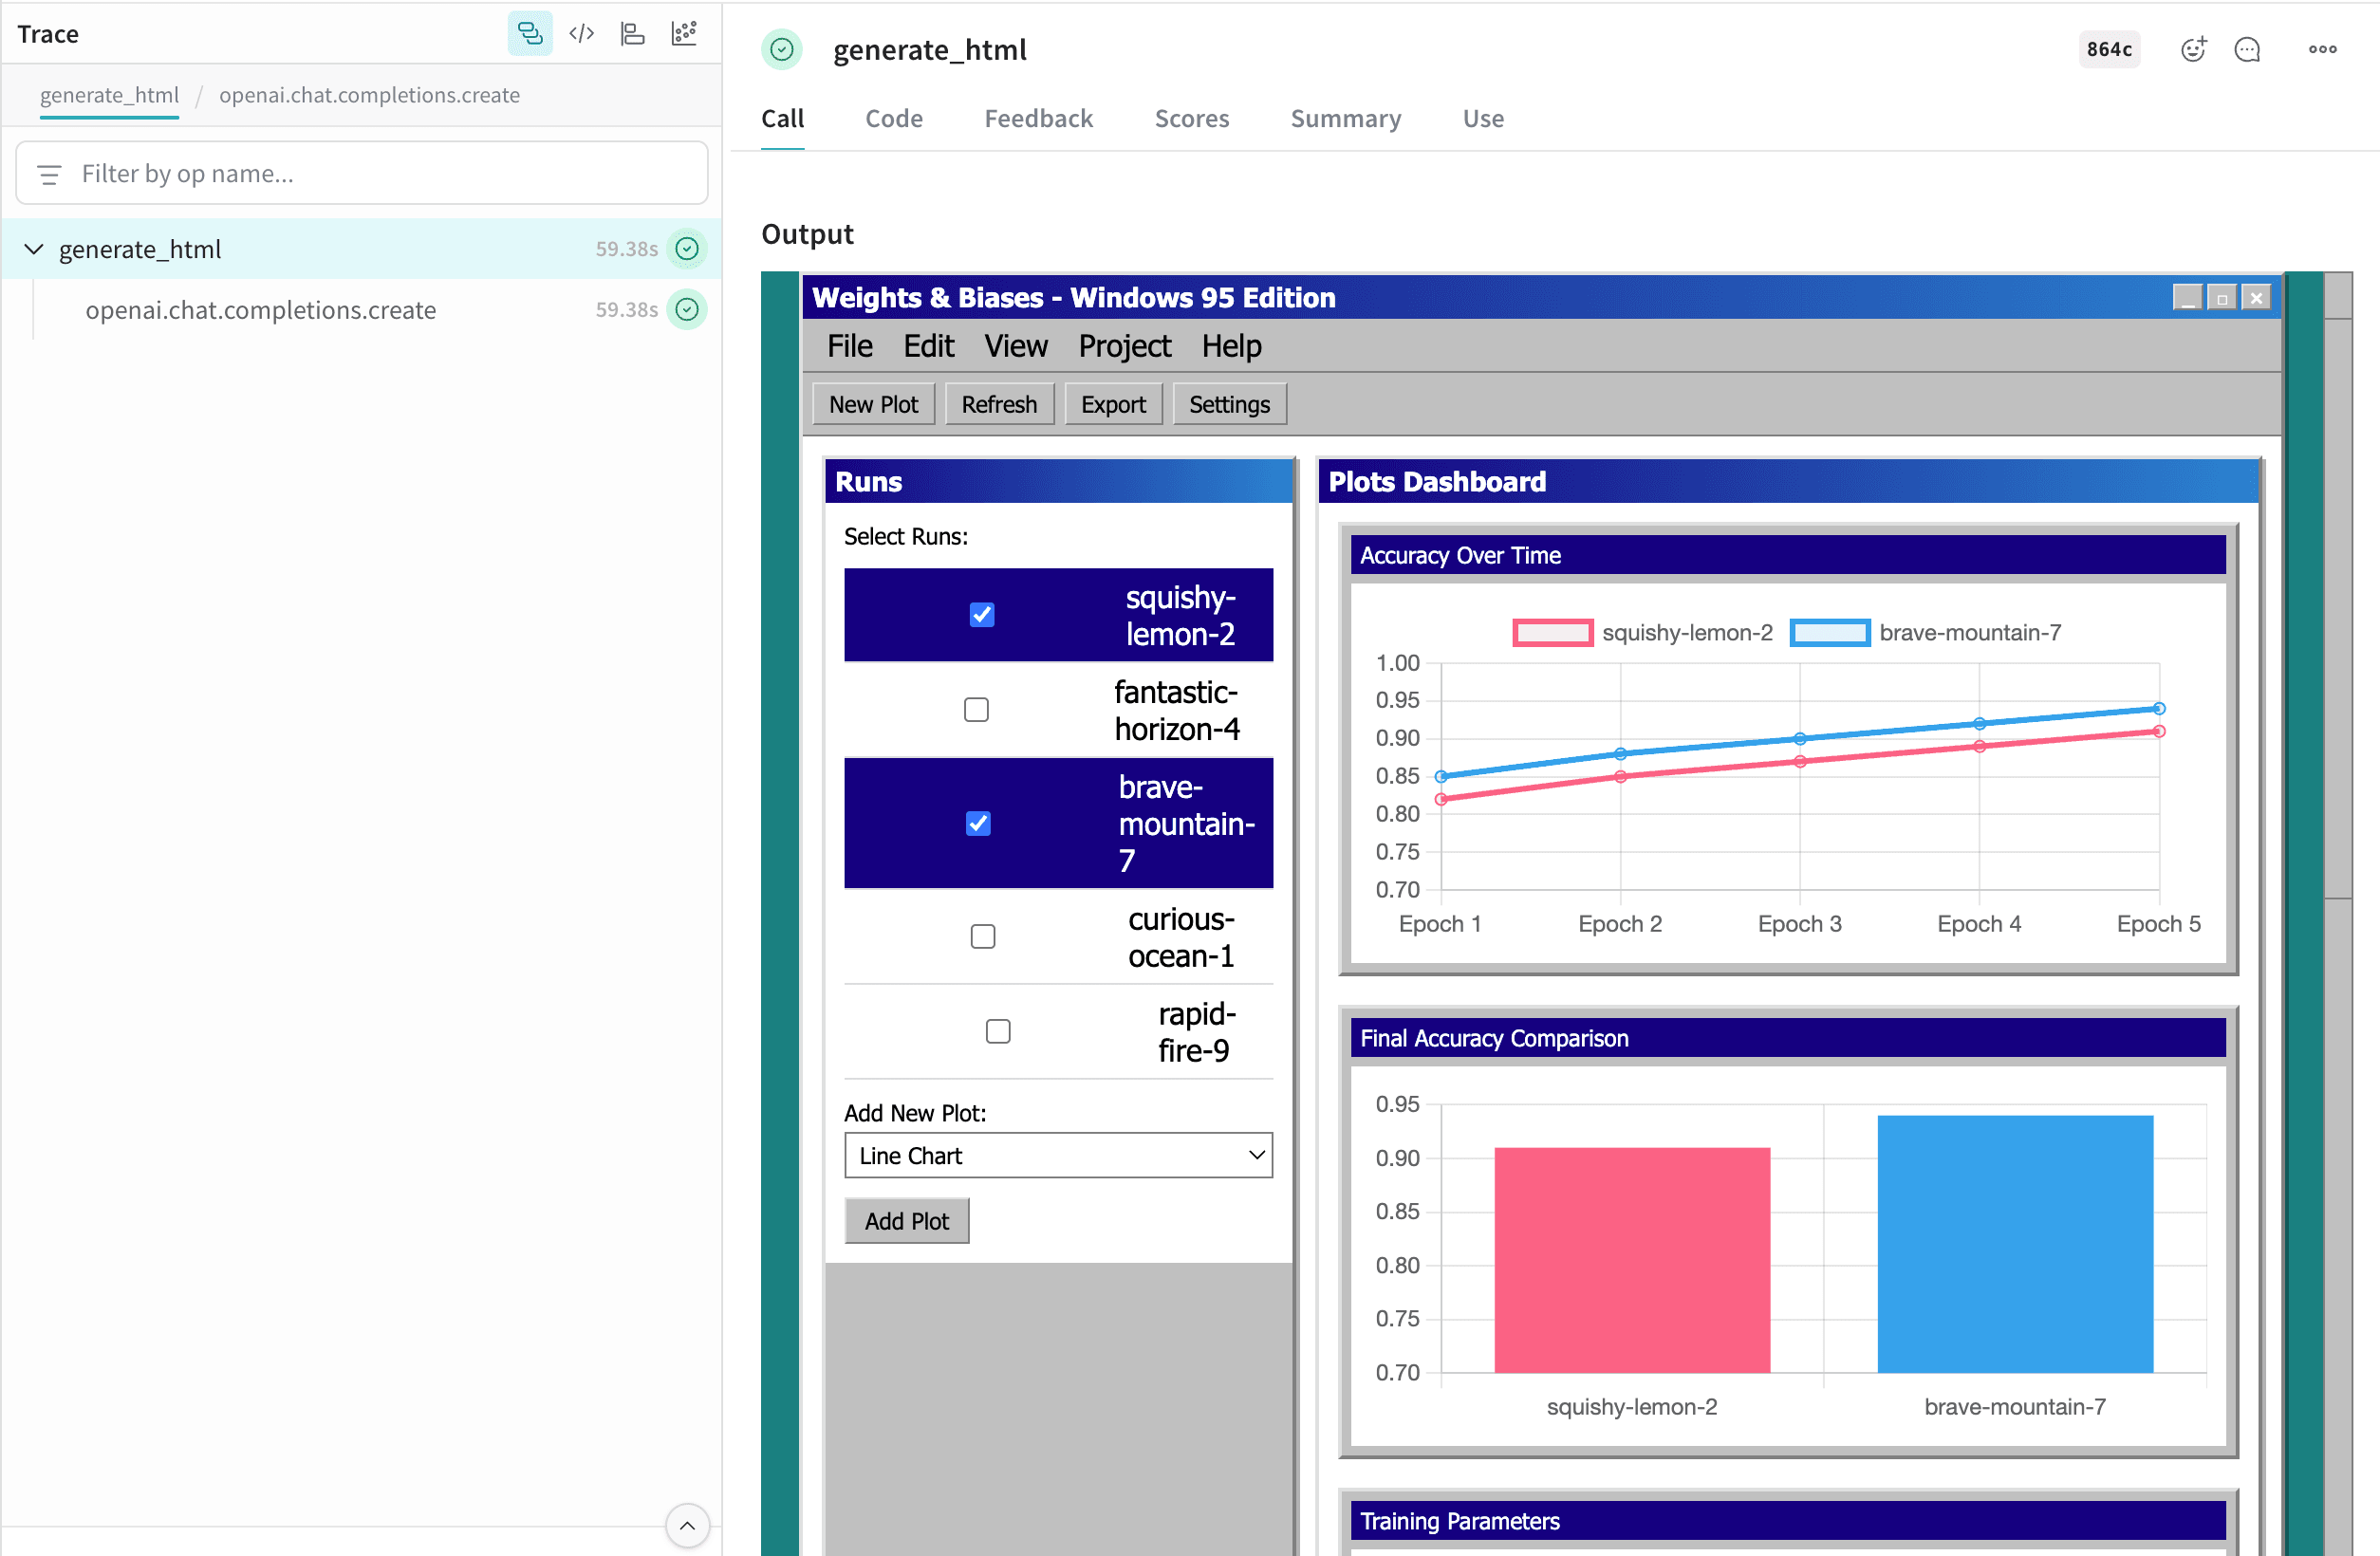
prompt = "Weights & Biases UI but with multi-run selection and plots, but it looks like Windows 95. Include 5 plots with comparisons of each run, bar plots, parallel coordinates and line plots for the runs. Use mock data for the runs. Make it possible to add new plots. Give the runs names like squishy-lemon-2, fantastic-horizon-4 etc. with random adjectives & nouns."
result = generate_html(prompt, prompt_template)
```
```plaintext theme={null}
이 기능은 아직 Weave TypeScript SDK에서 사용할 수 없습니다.
```
이 HTML은 Weave에 로깅되며 UI에 자동으로 표시됩니다. 표에서 `file_name.html` 셀을 클릭해 전체 화면으로 여세요. 원본 `.html` 파일을 다운로드할 수도 있습니다.
## Contents API
Content API는 Weave의 미디어 객체를 처리합니다. 이전 annotation 기반 예시보다 더 세밀하게 제어해야 할 때 이 API를 사용하세요. 예를 들어, base64 데이터, 맞춤형 바이트 버퍼 또는 텍스트에서 콘텐츠를 임포트하거나 맞춤형 메타데이터를 추가해야 할 때 유용합니다. 이 API를 사용하면 콘텐츠를 base64 데이터, 파일 경로, 원시 바이트 또는 텍스트 형태로 Weave에 임포트할 수 있습니다.
Content API는 Python에서만 사용할 수 있습니다.
### 사용
Content API를 사용하는 주요 방법은 두 가지입니다: 타입 어노테이션과 직접 초기화입니다.
타입 어노테이션은 사용할 올바른 생성자를 자동으로 감지하는 반면, 직접 초기화는 더 세밀한 제어를 가능하게 하고 코드에서 Content API의 런타임 기능을 활용할 수 있게 해줍니다.
### 타입 어노테이션
Weave Content API는 주로 타입 어노테이션을 통해 사용되도록 설계되었으며, 이를 통해 트레이스된 입력과 출력이 콘텐츠 블롭으로 처리되어 저장되어야 한다는 신호를 Weave에 보냅니다.
```python lines {7} theme={null}
import weave
from weave import Content
from pathlib import Path
from typing import Annotated
@weave.op
def content_annotation(path: Annotated[str, Content]) -> Annotated[bytes, Content]:
data = Path(path).read_bytes()
return data
# 입력과 출력 모두 Weave에서 MP4 파일로 표시됩니다
# 입력은 string이고 반환값은 bytes입니다
bytes_data = content_annotation('./path/to/your/file.mp4')
```
### 직접 초기화
다음과 같은 특성을 활용하려면:
* 기본 애플리케이션(예: PDF 뷰어)으로 파일을 엽니다.
* 자체 블롭 storage(예: S3)에 업로드할 수 있도록 모델을 JSON으로 덤프합니다.
* `Content` 블롭과 연결할 맞춤형 메타데이터를 전달합니다(예: 이를 생성하는 데 사용한 모델).
다음 방법 중 하나를 사용해 대상 유형에서 직접 Content를 초기화하세요:
* `Content.from_path` - 파일 경로에서 생성합니다.
* `Content.from_bytes` - 원시 바이트에서 생성합니다.
* `Content.from_text` - 텍스트 문자열에서 생성합니다.
* `Content.from_base64` - base64로 인코딩된 데이터에서 생성합니다.
```python lines theme={null}
import weave
from weave import Content
@weave.op
def content_initialization(path: str) -> Content:
return Content.from_path(path)
# 입력은 경로 문자열로, 출력은 Weave에서 PDF 파일로 표시됩니다
content = content_initialization('./path/to/your/file.pdf')
content.open() # PDF 뷰어에서 파일을 엽니다
content.model_dump() # 모델 속성을 JSON으로 덤프합니다
```
### 맞춤형 MIME 유형
Weave는 대부분의 바이너리 MIME 유형을 감지할 수 있지만, 맞춤형 MIME 유형이나 markdown 같은 텍스트 문서는 자동으로 감지되지 않을 수 있으므로 파일의 MIME 유형 또는 확장자를 직접 지정해야 합니다.
#### 타입 어노테이션이 포함된 맞춤형 MIME 유형
```python lines {7} theme={null}
import weave
from weave import Content
from pathlib import Path
from typing import Annotated, Literal
@weave.op
def markdown_content(
path: Annotated[str, Content[Literal['md']]]
) -> Annotated[str, Content[Literal['text/markdown']]]:
return Path(path).read_text()
markdown_content('path/to/your/document.md')
```
#### 직접 초기화하는 맞춤형 MIME 유형
```python lines theme={null}
video_bytes = Path('/path/to/video.mp4').read_bytes()
# 'mp4' 또는 '.mp4'와 같은 확장자를 extension 매개변수에 전달하세요
# (`from_path`에서는 사용 불가)
content = Content.from_bytes(video_bytes, extension='.mp4')
# 'video/mp4'와 같은 mimetype을 mimetype 매개변수에 전달하세요
content = Content.from_bytes(video_bytes, mimetype='video/mp4')
```
### Content 속성
클래스 속성과 방법의 전체 목록은 [Content 레퍼런스 문서](/ko/weave/reference/python-sdk#class-content)에서 확인하세요.
#### 속성
| 속성 | 유형 | 설명 |
| ----------- | ---------------- | ------------------------------- |
| `data` | `bytes` | 원시 바이너리 내용 |
| `metadata` | `dict[str, Any]` | 맞춤형 메타데이터 사전 |
| `size` | `int` | 바이트 단위의 내용 크기 |
| `filename` | `str` | 추출되었거나 제공된 파일 이름 |
| `extension` | `str` | 파일 확장자(예를 들어, `"jpg"`, `"mp3"`) |
| `mimetype` | `str` | MIME 유형(예를 들어, `"image/jpeg"`) |
| `path` | `str \| None` | 해당하는 경우 원본 파일 경로 |
| `digest` | `str` | 내용의 SHA256 해시 |
#### 유틸리티 방법
* `save(dest: str | Path) -> None`: 콘텐츠를 파일로 저장.
* `open() -> bool`: 시스템 기본 애플리케이션으로 파일 열기(콘텐츠가 저장되어 있거나 경로에서 로드되어 있어야 함).
* `as_string() -> str`: 데이터를 문자열로 표시(bytes는 encoding 속성을 사용해 디코딩됨).
#### 초기화 방법
파일 경로로 `content` 객체를 생성합니다:
```python lines theme={null}
content = Content.from_path("assets/photo.jpg")
print(content.mimetype, content.size)
```
원시 바이트로부터 `content` 객체를 생성합니다:
```python lines theme={null}
content = Content.from_bytes(
data_bytes,
filename="audio.mp3",
mimetype="audio/mpeg"
)
content.save("output.mp3")
```
텍스트에서 `content` 객체를 생성합니다:
```python lines theme={null}
content = Content.from_text("Hello, World!", mimetype="text/plain")
print(content.as_string())
```
base64로 인코딩된 데이터로부터 `content` 객체를 생성합니다:
```python lines theme={null}
content = Content.from_base64(base64_string)
print(content.metadata)
```
### 맞춤형 메타데이터
모든 Content 객체에 맞춤형 메타데이터를 추가할 수 있습니다:
```python lines theme={null}
content = Content.from_bytes(
data,
metadata={"resolution": "1920x1080", "model": "dall-e-3" }
)
print(content.metadata["resolution"])
```