> ## Documentation Index
> Fetch the complete documentation index at: https://docs.wandb.ai/llms.txt
> Use this file to discover all available pages before exploring further.
# Agno
> OpenTelemetry를 사용해 Weave에서 Agno 멀티 에이전트 시스템을 트레이스하여 에이전트 상호작용, 도구 Call, 멀티모달 워크플로를 포착합니다.
[OpenTelemetry (OTEL)](https://opentelemetry.io/)을 사용하면 Weave에서 [Agno](https://docs.agno.com/) 에이전트와 도구 Call을 트레이스할 수 있습니다. Agno는 공유 메모리, 지식, 추론을 갖춘 멀티 에이전트 시스템을 구축하기 위한 Python 프레임워크입니다. 가볍고 모델에 독립적으로 설계되었으며, 텍스트, 이미지, 오디오, 비디오 처리 등 멀티모달 기능을 지원합니다.
이 가이드에서는 OTEL을 사용해 Agno 에이전트와 도구 Call을 트레이스하고, Weave에서 해당 트레이스를 시각화하는 방법을 설명합니다. 필요한 의존성을 설치하고, 데이터를 Weave로 전송하도록 OTEL 트레이서를 설정하고, Agno 에이전트와 도구를 계측하는 방법을 알아봅니다.
Weave의 OTEL 트레이싱에 대한 자세한 내용은 [Send OTEL Traces to Weave](../tracking/otel)를 참조하세요.
## 사전 요구 사항
1. 필요한 의존성을 설치합니다:
```bash theme={null}
pip install agno openinference-instrumentation-agno opentelemetry-sdk opentelemetry-exporter-otlp-proto-http
```
2. OpenAI API 키(또는 다른 모델 제공업체의 API 키)를 환경 변수로 설정합니다:
```bash theme={null}
export OPENAI_API_KEY=your_api_key_here
```
3. [Weave에서 OTEL 트레이싱 구성](#configure-otel-tracing-in-weave).
### Weave에서 OTEL 트레이싱 설정
Agno에서 Weave로 트레이스를 전송하려면 `TracerProvider`와 `OTLPSpanExporter`를 사용해 OTEL을 설정하세요. 익스포터가 [인증 및 프로젝트 식별에 필요한 올바른 엔드포인트와 HTTP 헤더](#required-configuration)를 사용하도록 설정하세요.
API 키와 프로젝트 정보 같은 민감한 환경 변수는 환경 파일(예를 들어 `.env`)에 저장하고 `os.environ`으로 불러오세요. 이렇게 하면 자격 증명을 안전하게 보호하고 코드베이스에 직접 포함하지 않을 수 있습니다.
#### 필수 설정
다음 엔드포인트 및 헤더로 OTLP 익스포터를 설정하세요:
* **엔드포인트:** `https://trace.wandb.ai/otel/v1/traces`
* **헤더:**
* `Authorization`: W\&B API 키를 사용한 Basic 인증.
* `project_id`: W\&B entity/프로젝트 이름(예를 들어, `myteam/myproject`).
## Agno에서 Weave로 OTEL 트레이스 보내기
[사전 요구 사항](#prerequisites)을 완료한 후에는 Agno에서 Weave로 OTEL 트레이스를 보낼 수 있습니다. 다음 코드 스니펫은 Agno 애플리케이션에서 Weave로 OTEL 트레이스를 보내도록 OTLP span 익스포터와 트레이서 프로바이더를 설정하는 방법을 보여줍니다.
Weave가 Agno를 올바르게 트레이스할 수 있도록, 코드에서 Agno 컴포넌트를 사용하기 *전에* 전역 트레이서 프로바이더를 설정하세요.
```python lines theme={null}
# tracing.py
import base64
import os
from openinference.instrumentation.agno import AgnoInstrumentor
from opentelemetry.exporter.otlp.proto.http.trace_exporter import OTLPSpanExporter
from opentelemetry.sdk import trace as trace_sdk
from opentelemetry.sdk.trace.export import SimpleSpanProcessor
from opentelemetry import trace
# 환경 변수에서 민감한 값 로드
WANDB_BASE_URL = "https://trace.wandb.ai"
# W&B entity/프로젝트 이름 (예: "myteam/myproject")
PROJECT_ID = os.environ.get("WANDB_PROJECT_ID")
# https://wandb.ai/settings 에서 W&B API 키 생성
WANDB_API_KEY = os.environ.get("WANDB_API_KEY")
OTEL_EXPORTER_OTLP_ENDPOINT = f"{WANDB_BASE_URL}/otel/v1/traces"
AUTH = base64.b64encode(f"api:{WANDB_API_KEY}".encode()).decode()
OTEL_EXPORTER_OTLP_HEADERS = {
"Authorization": f"Basic {AUTH}",
"project_id": PROJECT_ID,
}
# 엔드포인트와 헤더로 OTLP span exporter 생성
exporter = OTLPSpanExporter(
endpoint=OTEL_EXPORTER_OTLP_ENDPOINT,
headers=OTEL_EXPORTER_OTLP_HEADERS,
)
# 트레이서 프로바이더 생성 및 exporter 추가
tracer_provider = trace_sdk.TracerProvider()
tracer_provider.add_span_processor(SimpleSpanProcessor(exporter))
# Agno를 임포트하거나 사용하기 전에 전역 트레이서 프로바이더 설정
trace.set_tracer_provider(tracer_provider)
```
## OTEL로 Agno 에이전트 트레이스하기
트레이서 프로바이더를 설정한 후에는 자동 트레이싱으로 Agno 에이전트를 생성하고 실행할 수 있습니다. 이후의 모든 에이전트 활동을 Weave가 캡처하도록 하려면 에이전트를 생성하기 전에 Agno를 계측하세요. 다음 예제에서는 도구가 포함된 에이전트를 만드는 방법을 보여줍니다:
```python lines theme={null}
from agno.agent import Agent
from agno.models.openai import OpenAIChat
from agno.tools.yfinance import YFinanceTools
from dotenv import load_dotenv
load_dotenv()
# 위에서 생성한 파일에서 AgnoInstrumentor 로드
from tracing import AgnoInstrumentor
# Agno 계측 시작
AgnoInstrumentor().instrument()
# 금융 에이전트 생성
finance_agent = Agent(
name="Finance Agent",
model=OpenAIChat(id="gpt-4o-mini"),
tools=[
YFinanceTools(
stock_price=True,
analyst_recommendations=True,
company_info=True,
company_news=True
)
],
instructions=["Use tables to display data"],
show_tool_calls=True,
markdown=True,
)
# 에이전트 사용 - Weave가 이 호출을 자동으로 트레이스합니다
finance_agent.print_response(
"What is the current stock price of Apple and what are the latest analyst recommendations?",
stream=True
)
```
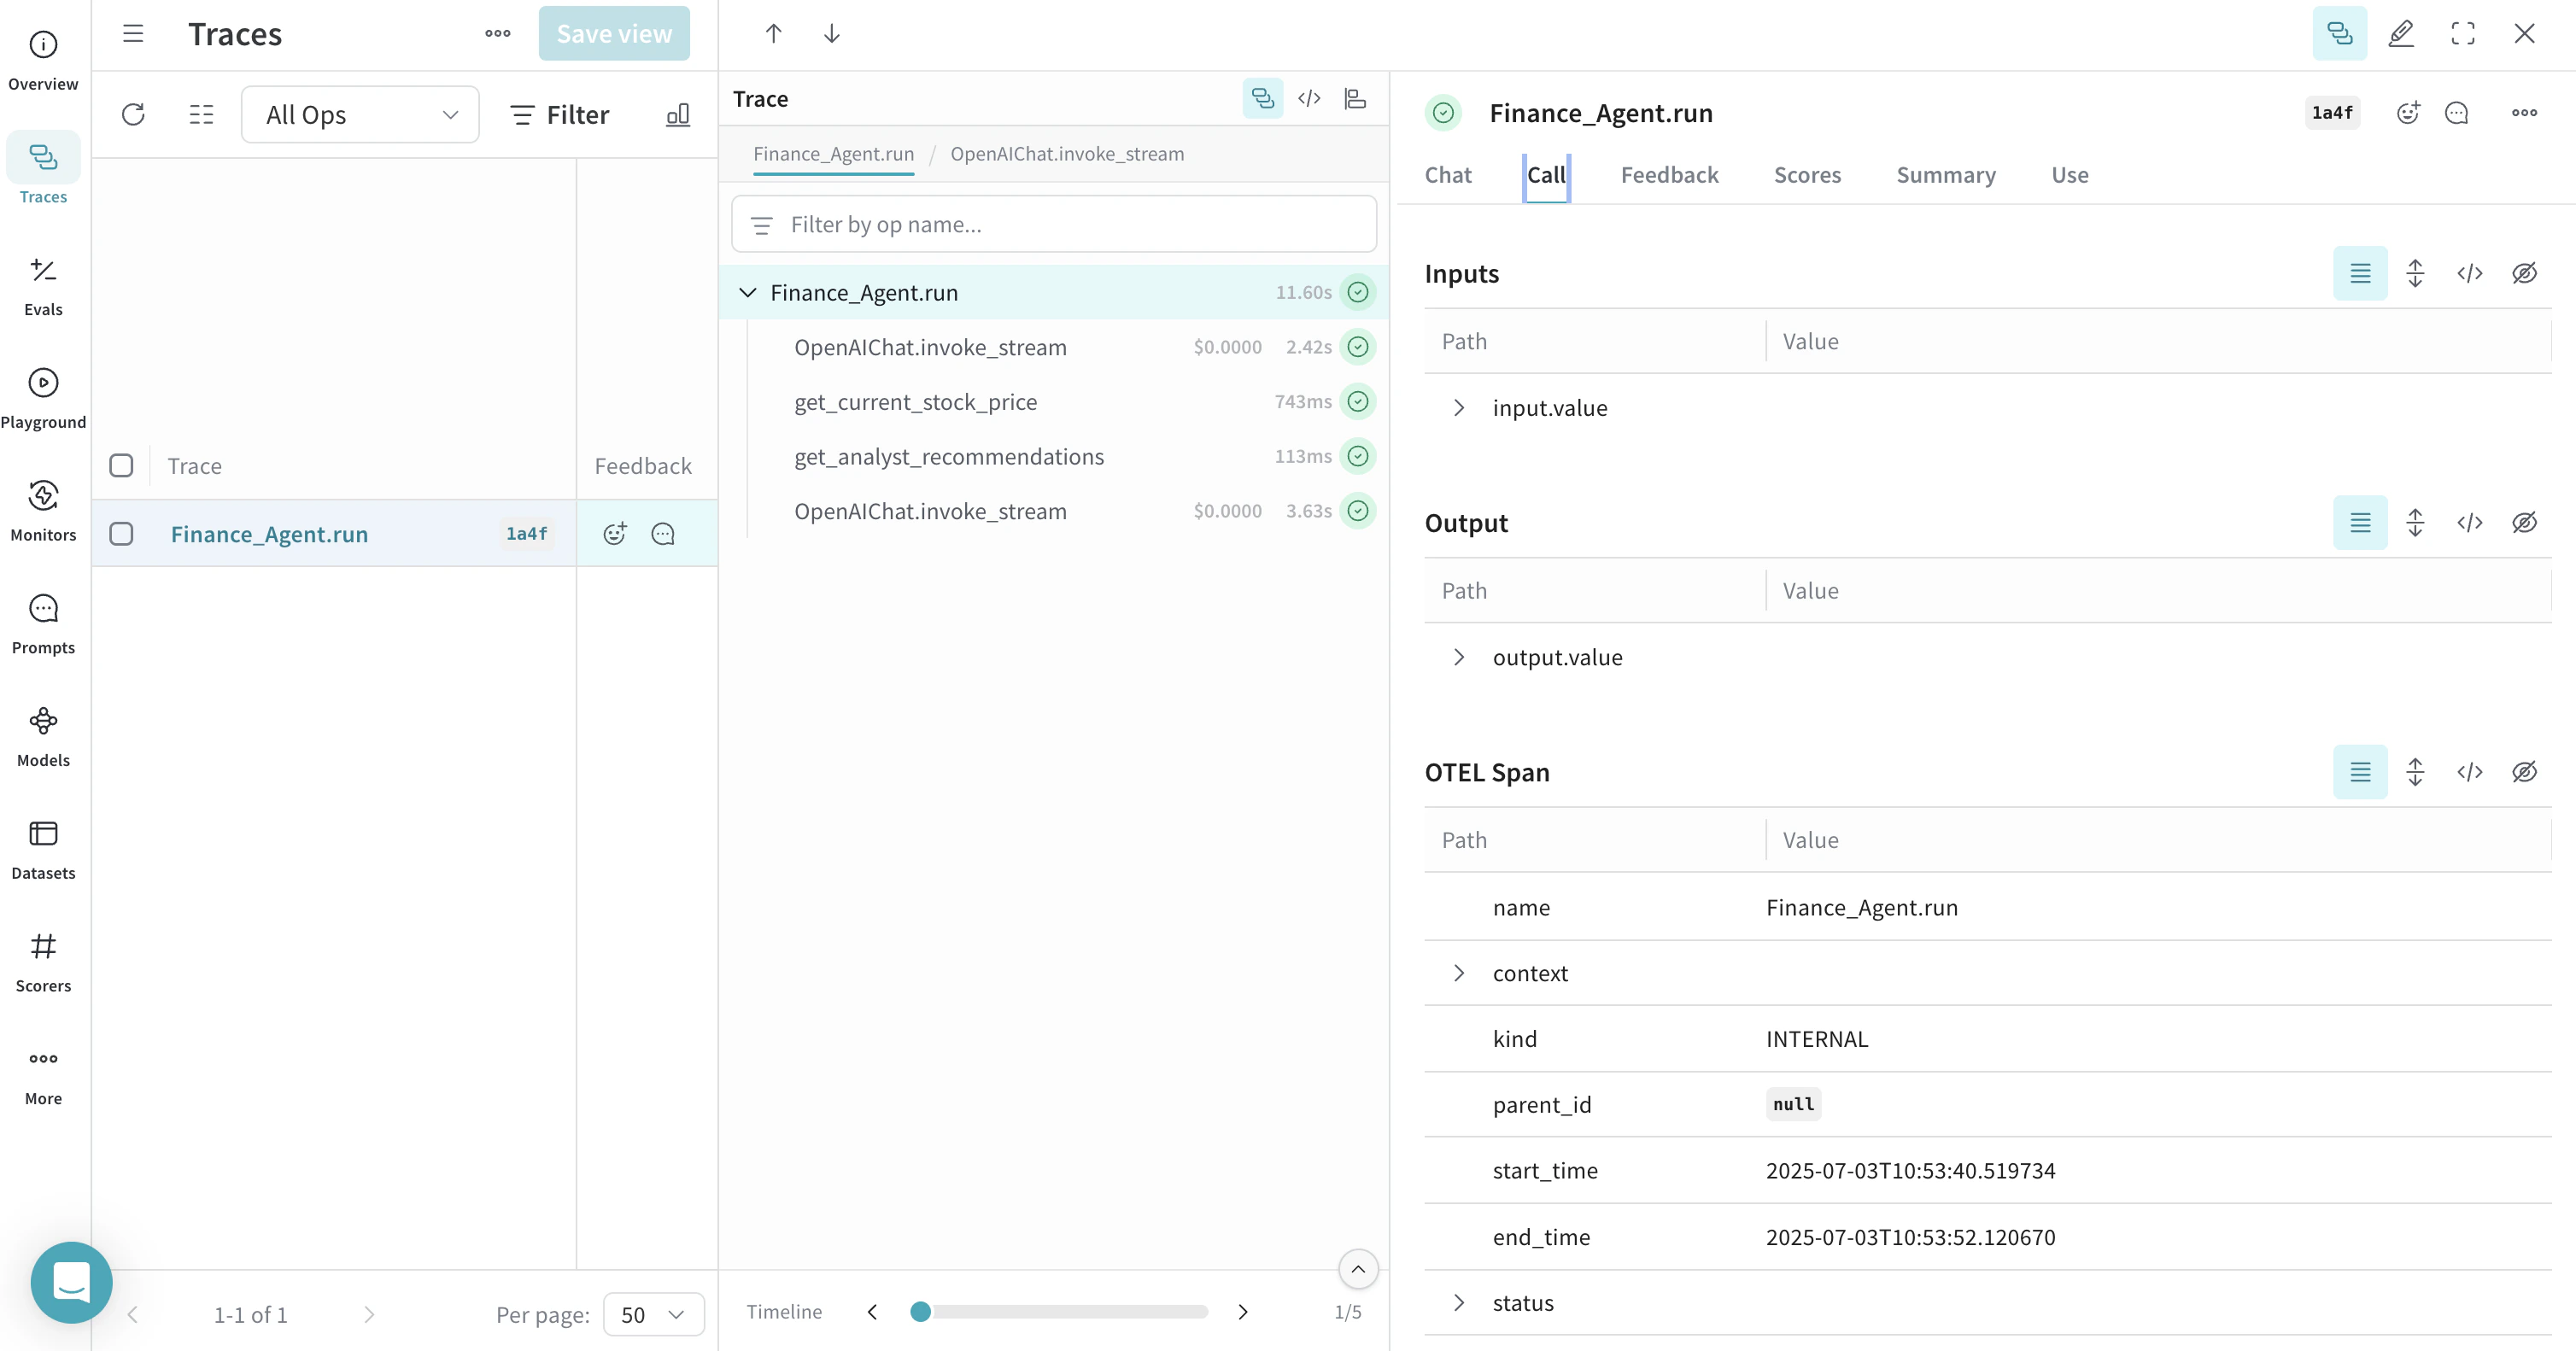
Weave는 모든 에이전트 오퍼레이션을 자동으로 트레이스하므로, 실행 흐름, 모델 호출, 추론 단계, 도구 호출을 시각화할 수 있습니다.
## OTEL로 Agno 도구 트레이스하기
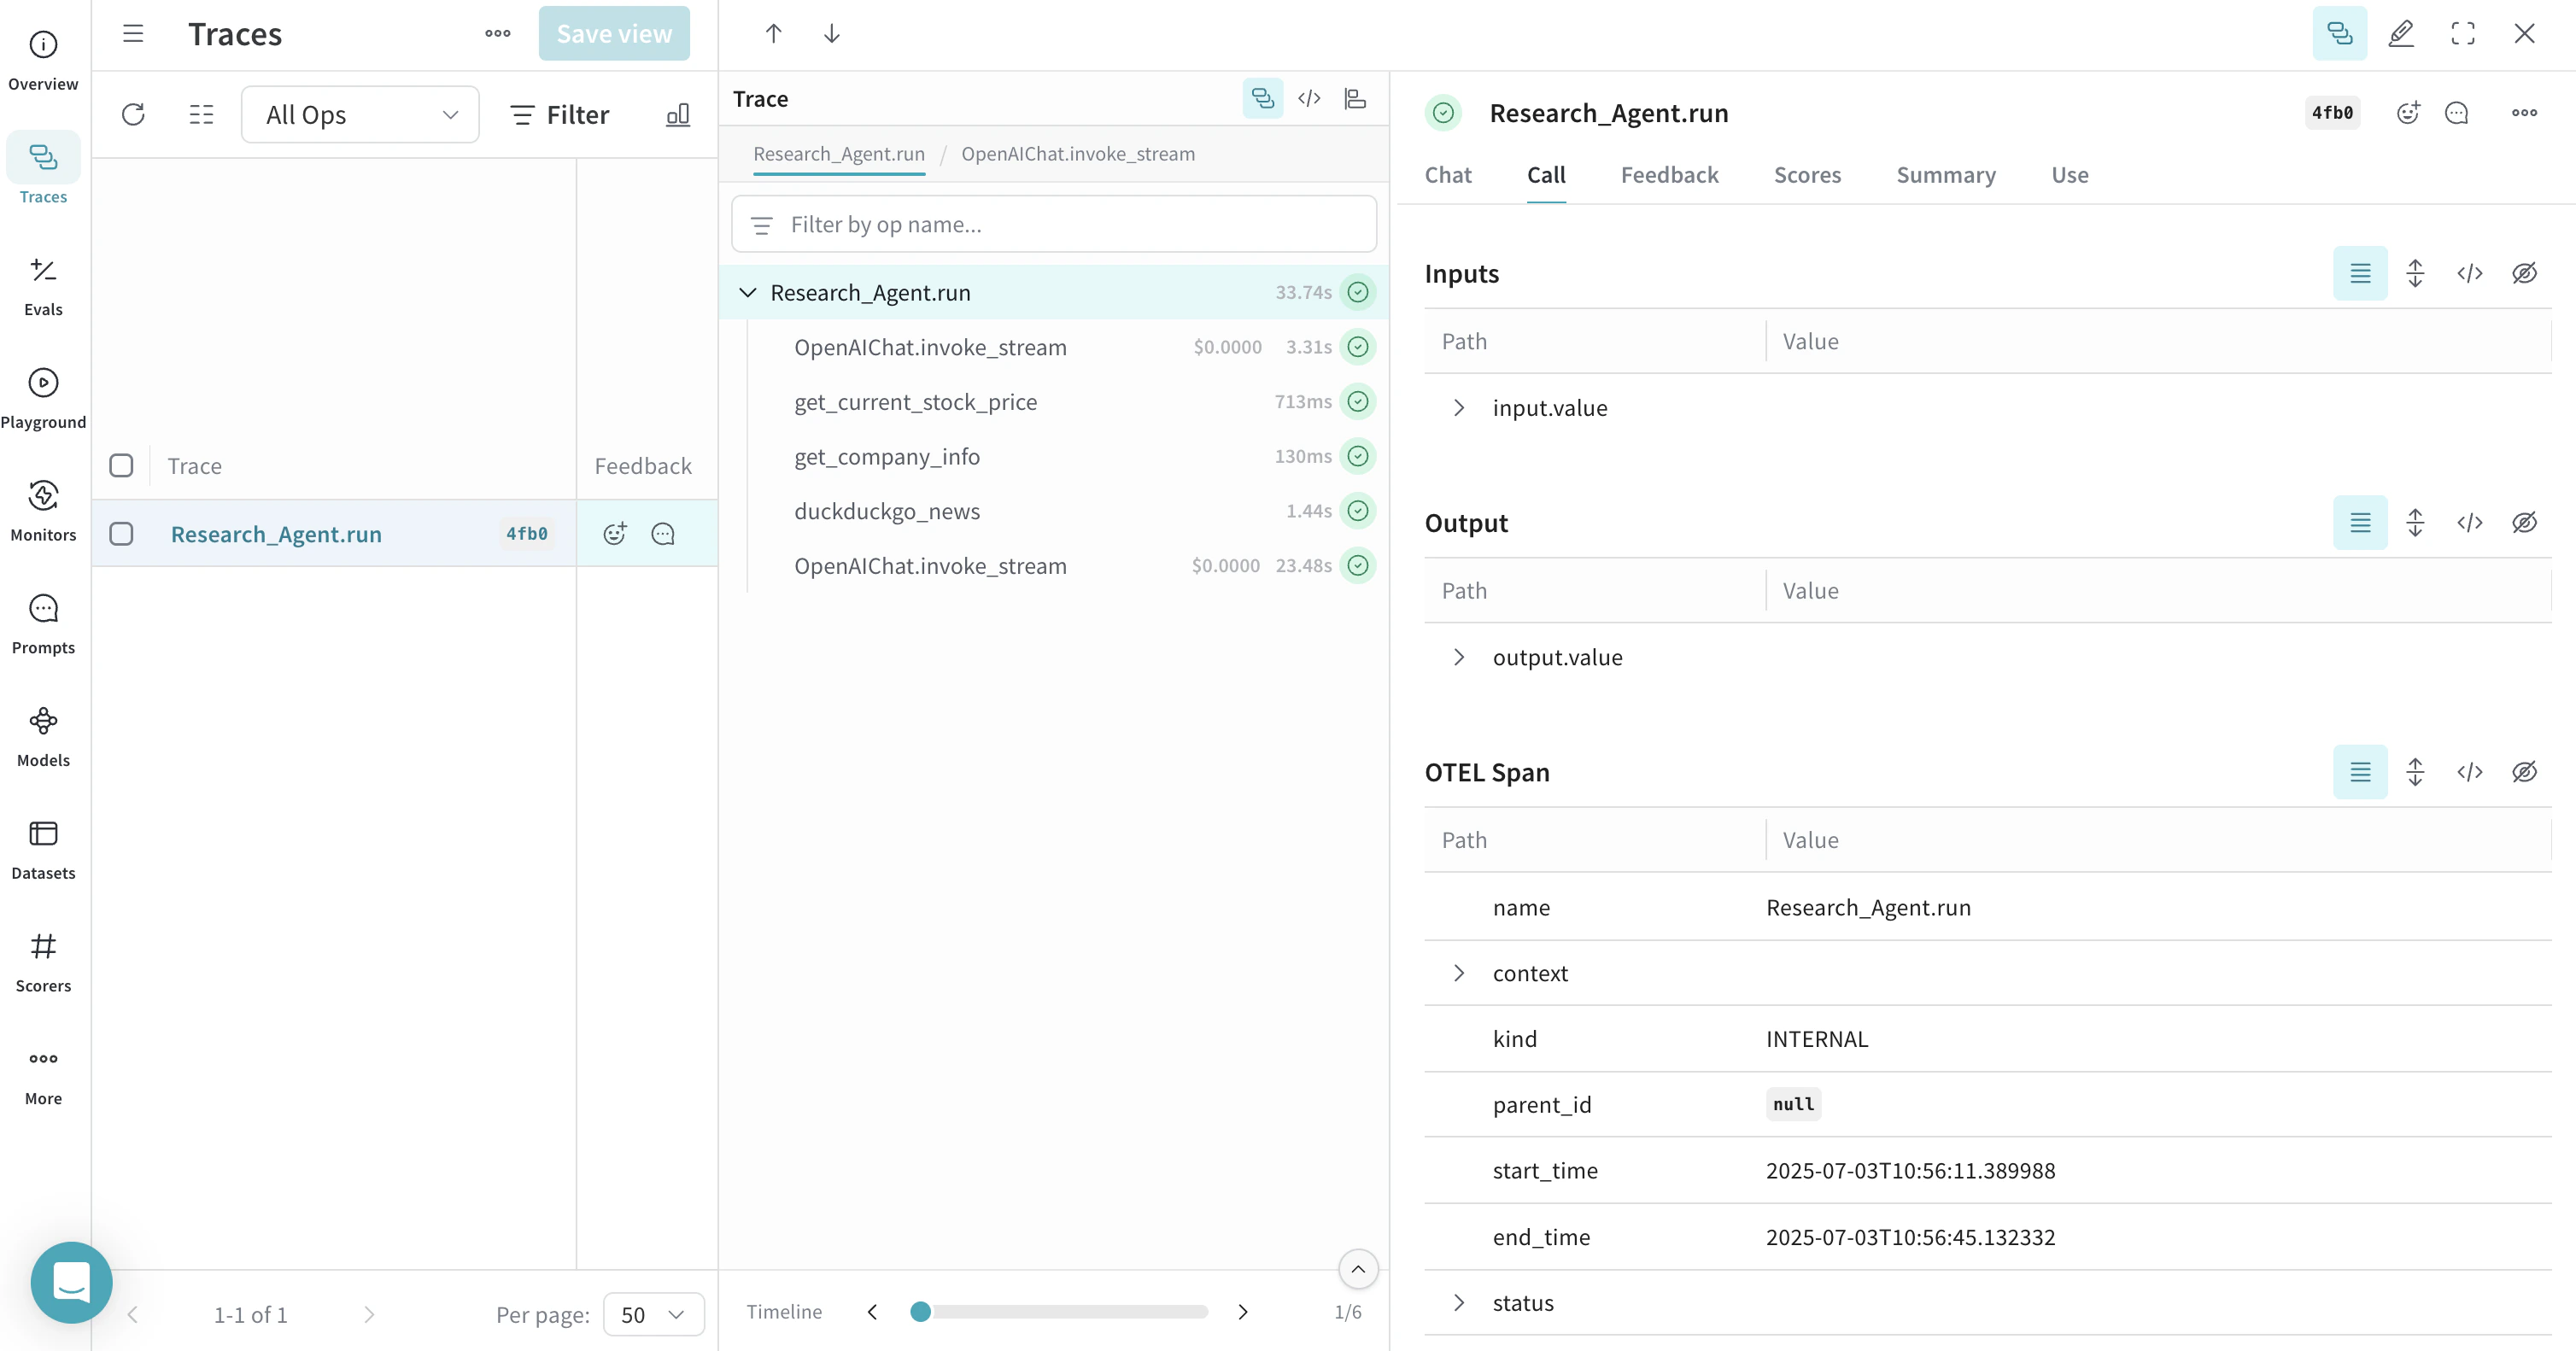
Agno에서 도구를 정의하고 사용하면 트레이스가 이러한 도구 Call도 캡처합니다. OTEL 인테그레이션은 에이전트의 추론 과정과 개별 도구 실행을 모두 자동으로 계측하여 에이전트 동작을 종합적으로 볼 수 있는 뷰를 제공합니다.
다음은 여러 도구를 사용하는 예시입니다:
```python lines theme={null}
from agno.agent import Agent
from agno.models.openai import OpenAIChat
from agno.tools.duckduckgo import DuckDuckGoTools
from agno.tools.yfinance import YFinanceTools
from dotenv import load_dotenv
load_dotenv()
# 위에서 생성한 파일에서 AgnoInstrumentor 로드
from tracing import AgnoInstrumentor
# Agno 계측 시작
AgnoInstrumentor().instrument()
# 여러 도구를 사용하는 에이전트 생성
research_agent = Agent(
name="Research Agent",
model=OpenAIChat(id="gpt-4o-mini"),
tools=[
DuckDuckGoTools(),
YFinanceTools(stock_price=True, company_info=True),
],
instructions=[
"Search for current information and financial data",
"Always include sources",
"Use tables to display financial data"
],
show_tool_calls=True,
markdown=True,
)
# 에이전트 사용 - Weave가 도구 Call을 트레이스합니다
research_agent.print_response(
"Research Tesla's recent performance and news. Include stock price and any recent developments.",
stream=True
)
```
## OTEL로 멀티 에이전트 팀을 트레이스하세요
Agno의 멀티 에이전트 아키텍처를 사용하면 서로 협업하고 컨텍스트를 공유하는 에이전트 팀을 만들 수 있습니다. Weave는 이러한 팀 상호작용도 모두 트레이스합니다:
```python lines theme={null}
from agno.agent import Agent
from agno.models.openai import OpenAIChat
from agno.tools.duckduckgo import DuckDuckGoTools
from agno.tools.yfinance import YFinanceTools
from dotenv import load_dotenv
load_dotenv()
# tracing.py 파일에서 AgnoInstrumentor 로드
from tracing import AgnoInstrumentor
# Start instrumenting Agno
AgnoInstrumentor().instrument()
# Create specialized agents
web_agent = Agent(
name="Web Agent",
role="Search the web for information",
model=OpenAIChat(id="gpt-4o-mini"),
tools=[DuckDuckGoTools()],
instructions="Always include sources",
show_tool_calls=True,
markdown=True,
)
finance_agent = Agent(
name="Finance Agent",
role="Get financial data",
model=OpenAIChat(id="gpt-4o-mini"),
tools=[YFinanceTools(stock_price=True, analyst_recommendations=True)],
instructions="Use tables to display data",
show_tool_calls=True,
markdown=True,
)
# Create a team of agents
agent_team = Agent(
team=[web_agent, finance_agent],
model=OpenAIChat(id="gpt-4o"),
instructions=["Always include sources", "Use tables to display data"],
show_tool_calls=True,
markdown=True,
)
# 팀 사용 - Weave가 모든 에이전트 상호작용을 트레이스합니다
agent_team.print_response(
"What's the current market sentiment around NVIDIA? Include both news analysis and financial metrics.",
stream=True
)
```
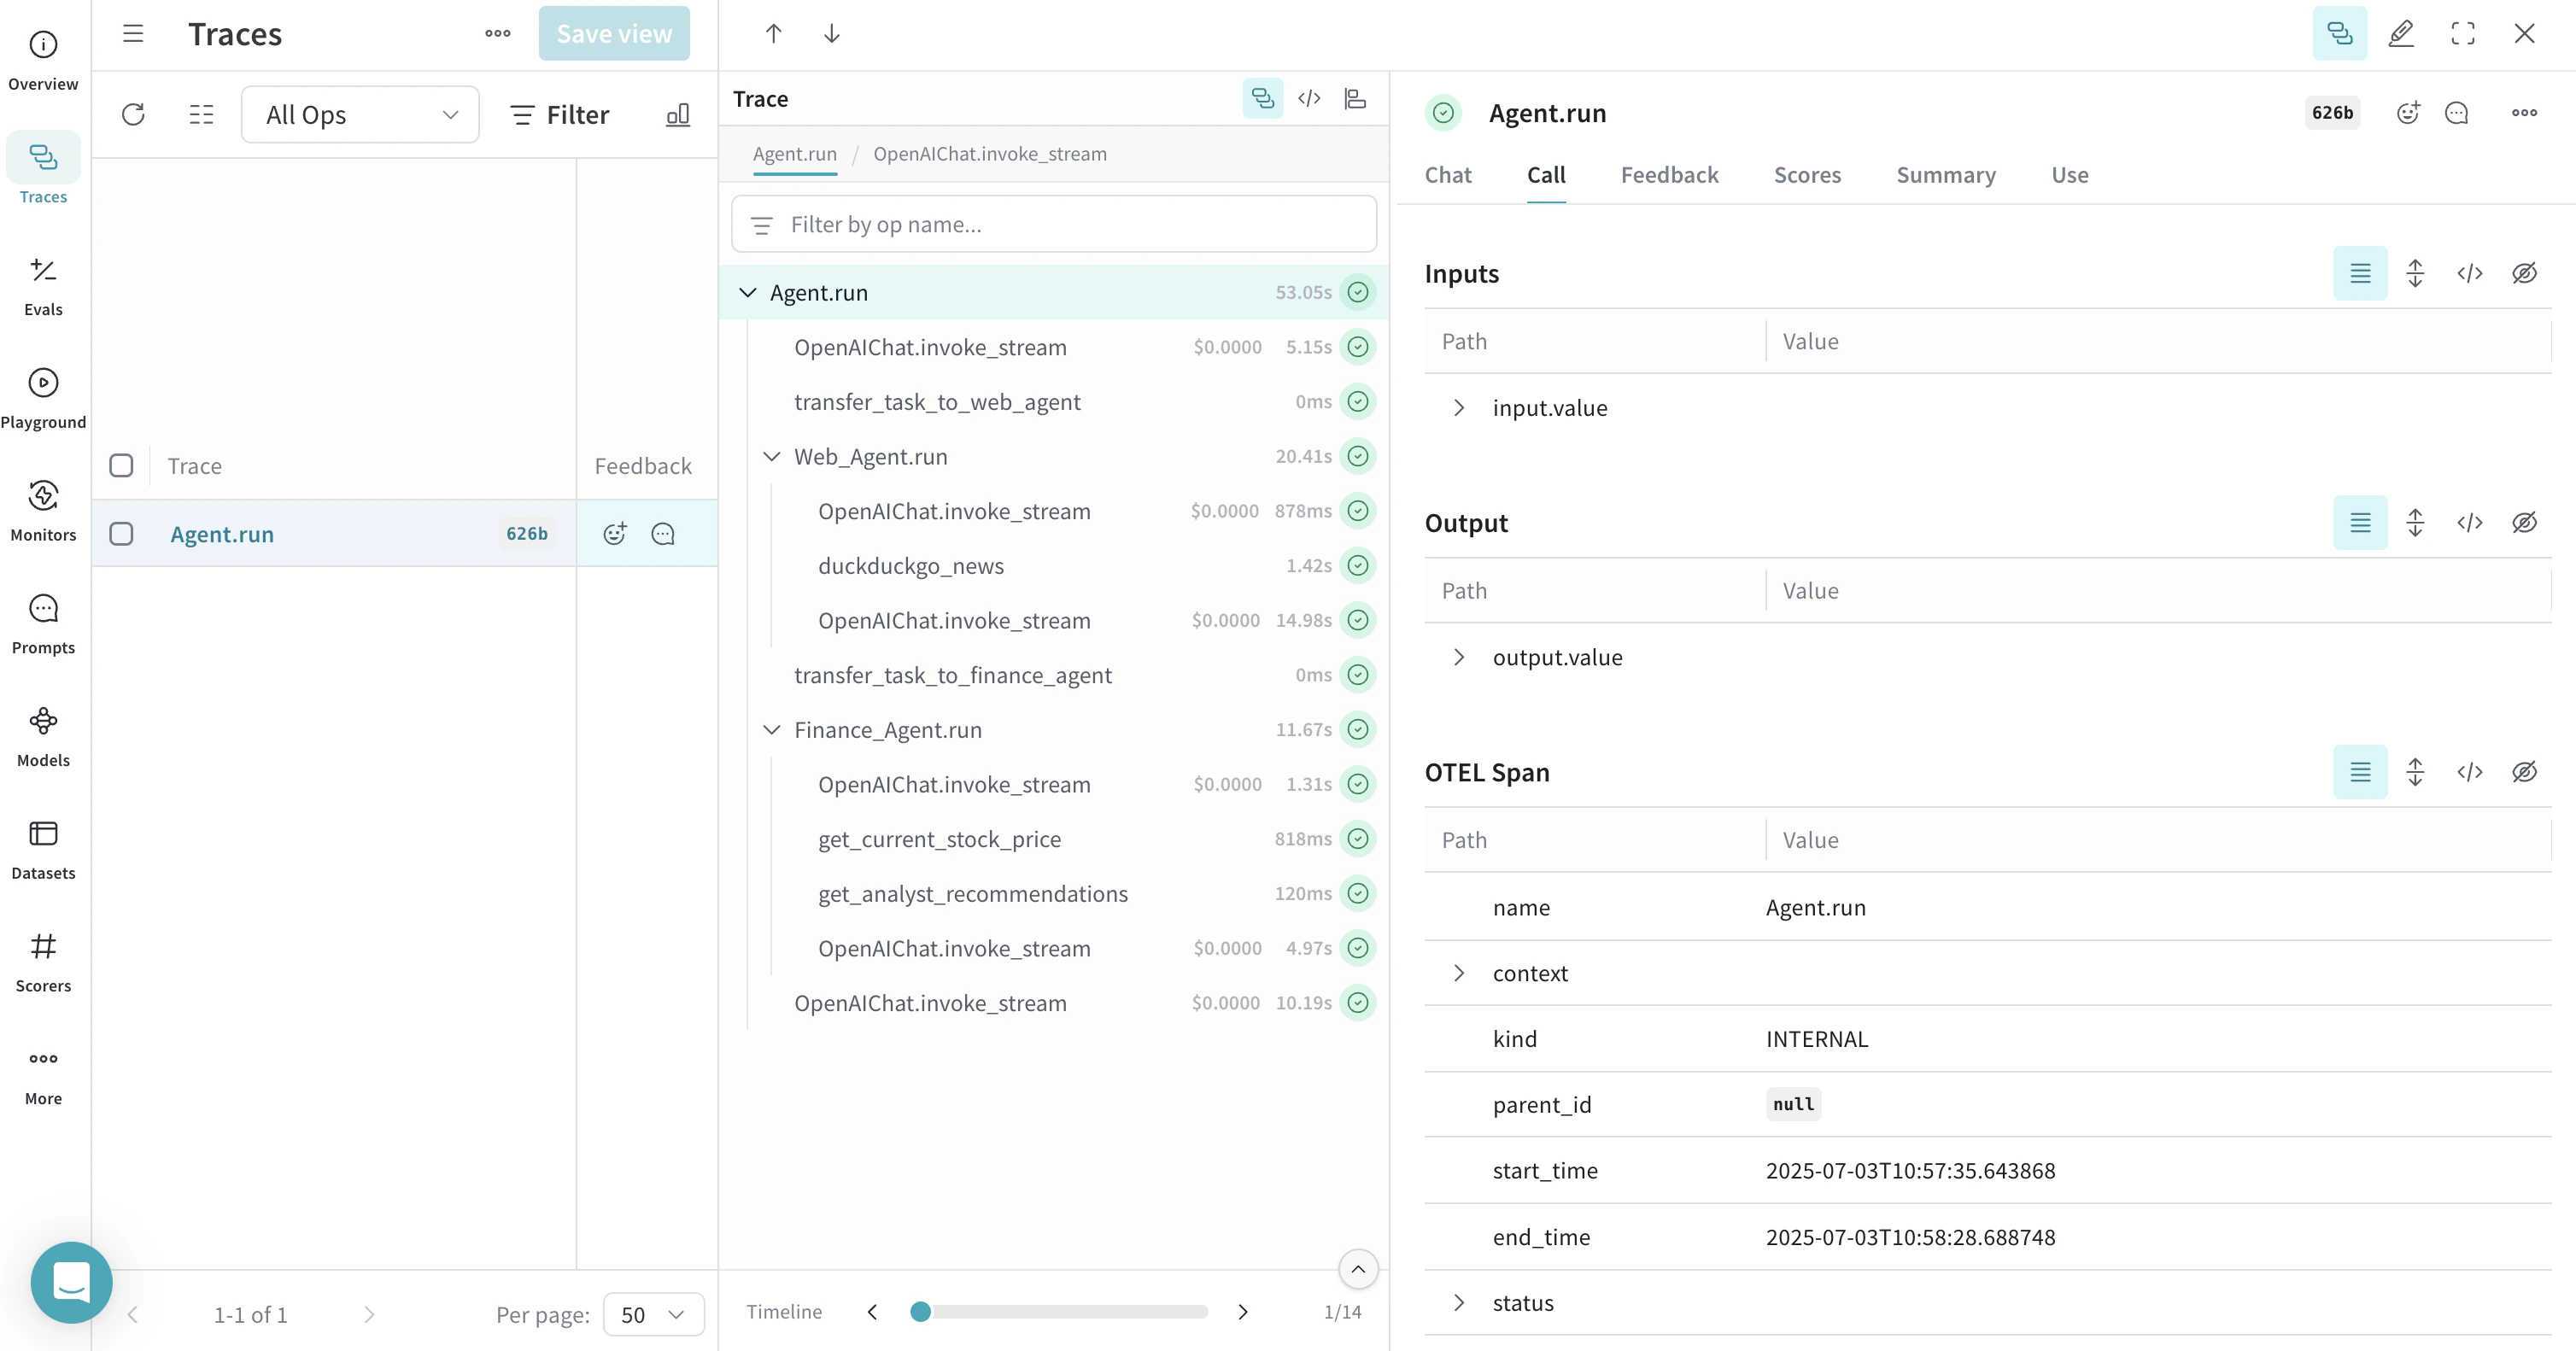
이 멀티 에이전트 트레이스는 Weave에서 여러 에이전트가 어떻게 협업하는지 보여주며, 작업이 에이전트 팀 전체에 어떻게 분배되고 실행되는지 파악할 수 있게 해줍니다.
## 추론 에이전트 사용하기
Agno는 에이전트가 문제를 단계별로 처리할 수 있도록 기본 제공 추론 기능을 제공합니다. 트레이스는 이러한 추론 과정도 캡처합니다:
```python lines theme={null}
from agno.agent import Agent
from agno.models.openai import OpenAIChat
from agno.tools.reasoning import ReasoningTools
from agno.tools.yfinance import YFinanceTools
from dotenv import load_dotenv
load_dotenv()
# tracing.py 파일에서 AgnoInstrumentor 로드
from tracing import AgnoInstrumentor
# Agno 계측 시작
AgnoInstrumentor().instrument()
# 추론 에이전트 생성
reasoning_agent = Agent(
name="Reasoning Finance Agent",
model=OpenAIChat(id="gpt-4o"),
tools=[
ReasoningTools(add_instructions=True),
YFinanceTools(
stock_price=True,
analyst_recommendations=True,
company_info=True,
company_news=True
),
],
instructions="Use tables to display data and show your reasoning process",
show_tool_calls=True,
markdown=True,
)
# 추론 에이전트 사용
reasoning_agent.print_response(
"Should I invest in Apple stock right now? Analyze the current situation and provide a reasoned recommendation.",
stream=True
)
```
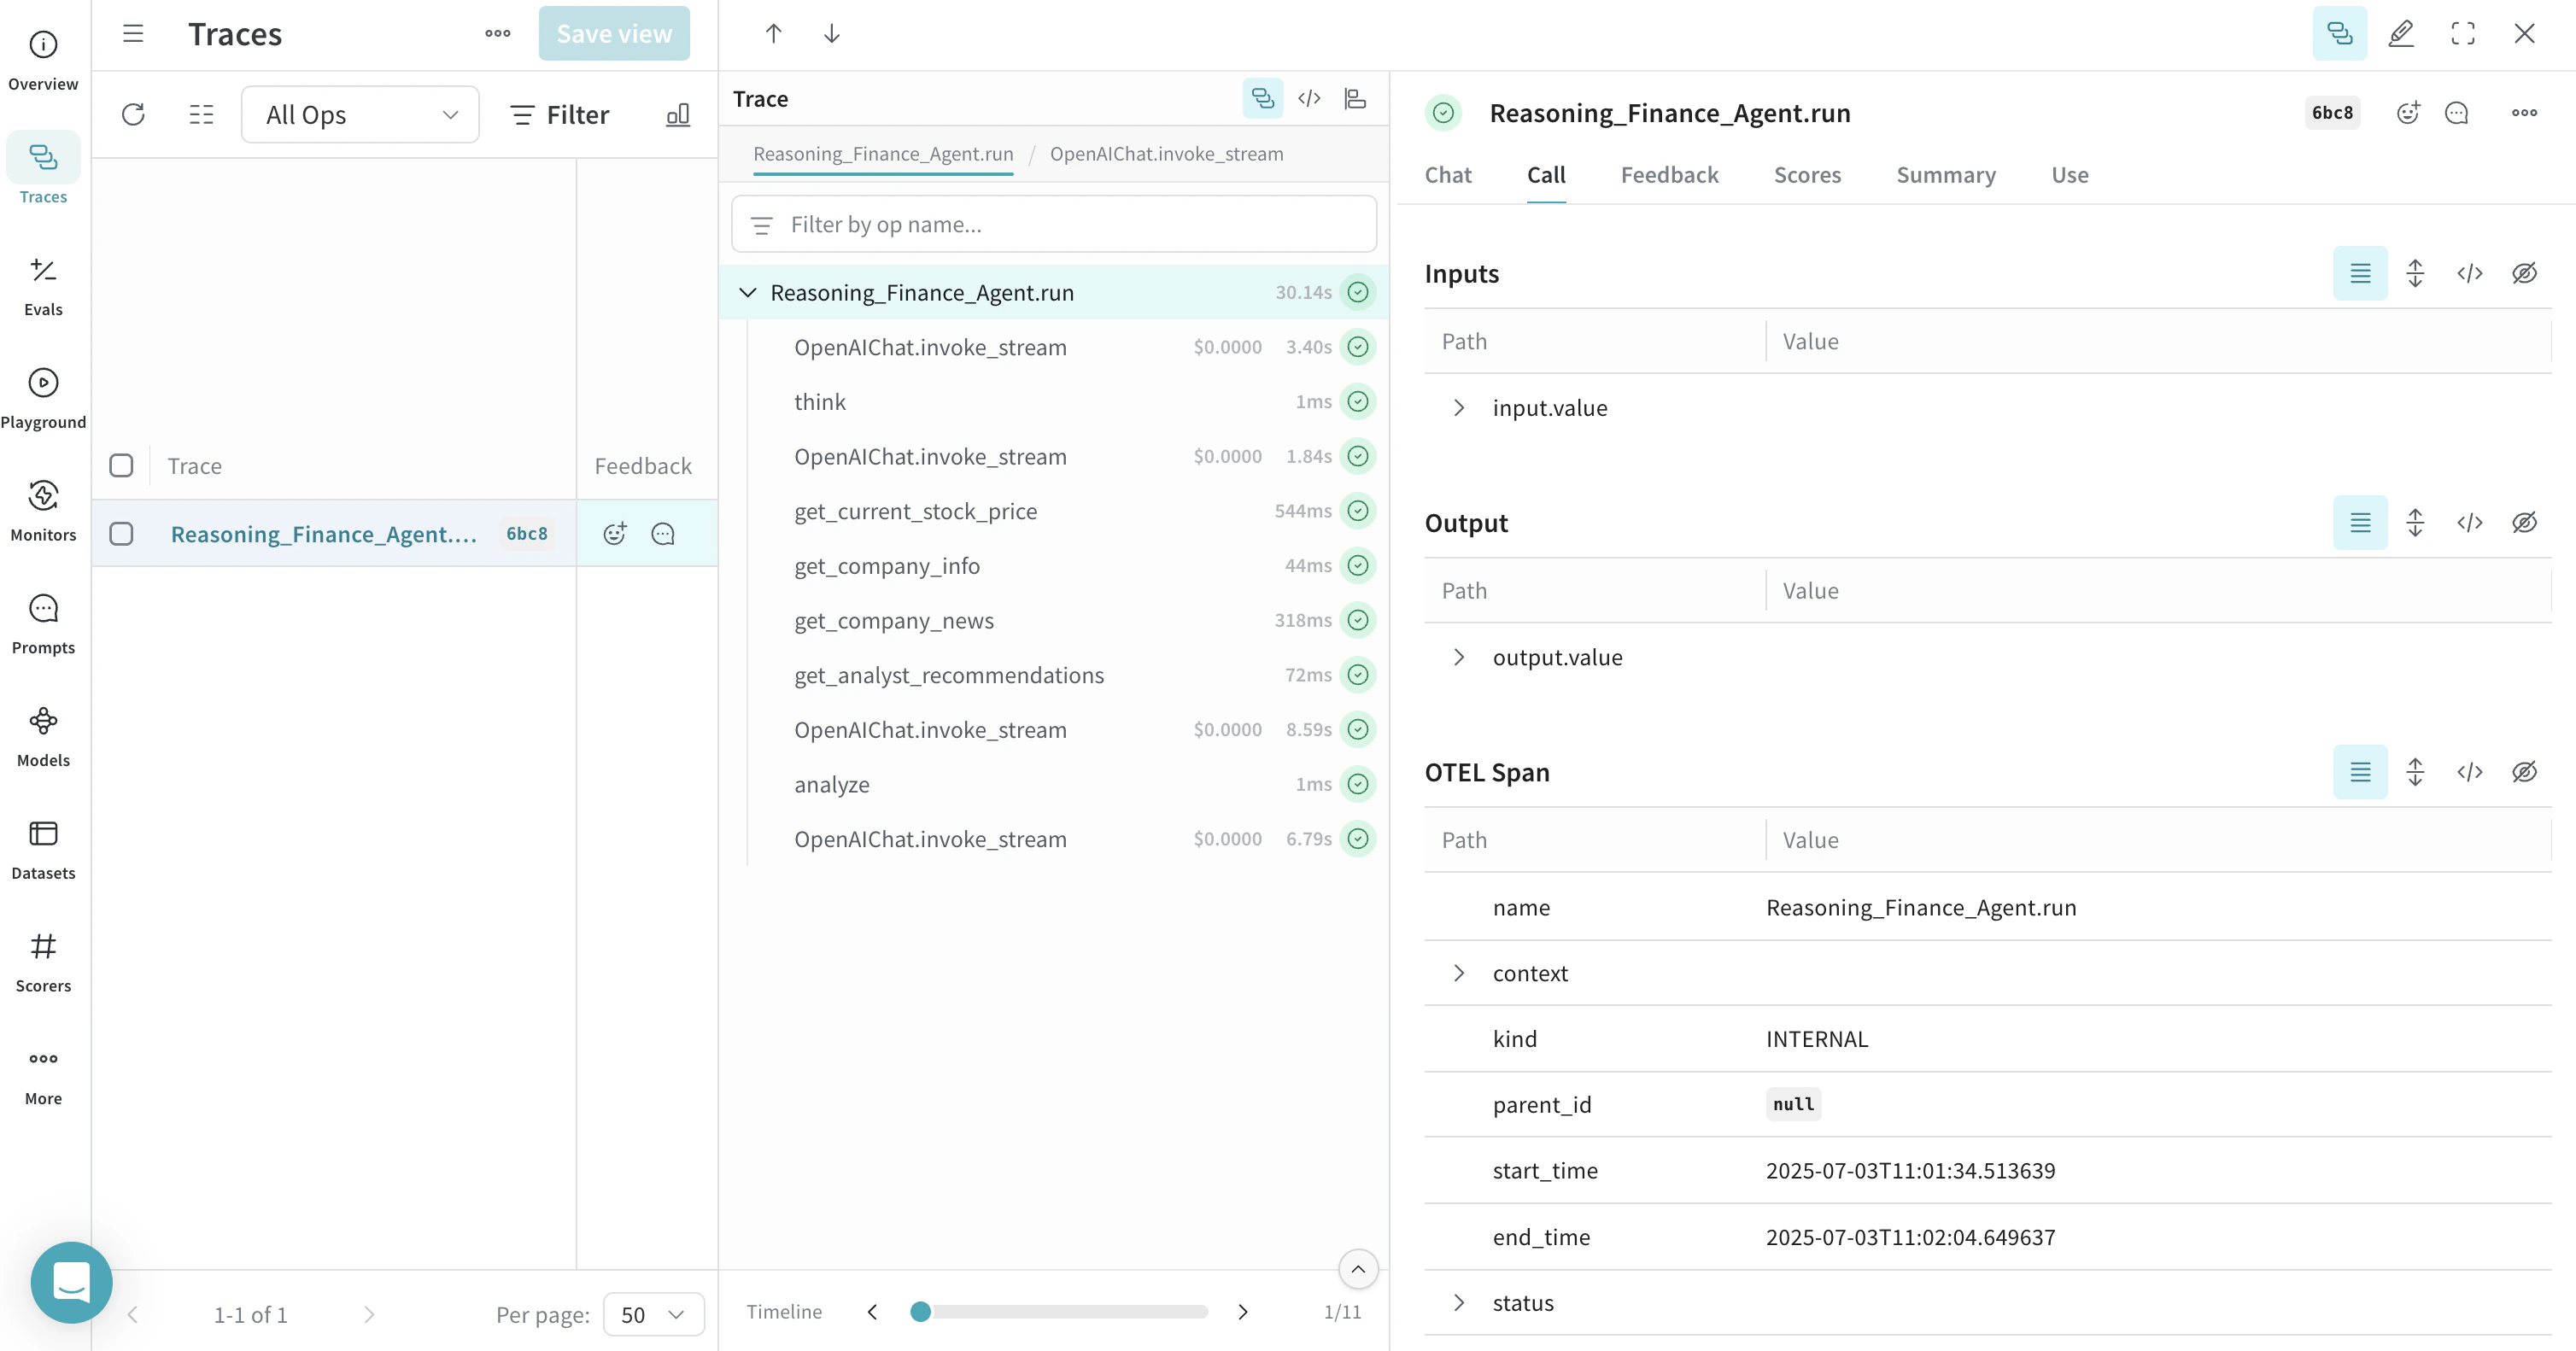
트레이스에는 에이전트가 복잡한 문제를 어떻게 세분화하고 결정을 내리는지 보여주는 추론 단계가 표시됩니다.
## 메모리와 지식 활용하기
Agno 에이전트는 메모리를 유지하고 지식 베이스에 액세스할 수 있으며, 이를 통해 상호작용 전반에 걸쳐 컨텍스트를 유지할 수 있습니다. Weave도 이러한 오퍼레이션을 트레이스로 기록합니다:
```python lines theme={null}
from agno.agent import Agent
from agno.models.openai import OpenAIChat
from agno.memory import AgentMemory
from agno.storage.sqlite import SqliteStorage
from dotenv import load_dotenv
load_dotenv()
# tracing.py 파일에서 AgnoInstrumentor 로드
from tracing import AgnoInstrumentor
# Agno 계측 시작
AgnoInstrumentor().instrument()
# 메모리가 있는 에이전트 생성
memory_agent = Agent(
name="Memory Agent",
model=OpenAIChat(id="gpt-4o-mini"),
memory=AgentMemory(),
storage=SqliteStorage(
table_name="agent_sessions",
db_file="agent_memory.db"
),
instructions="Remember our conversation history",
show_tool_calls=True,
markdown=True,
)
# 첫 번째 상호작용
memory_agent.print_response("My name is John and I'm interested in AI investing strategies.")
# 두 번째 상호작용 - 에이전트가 이전 컨텍스트를 기억함
memory_agent.print_response("What specific AI companies would you recommend for my portfolio?")
```
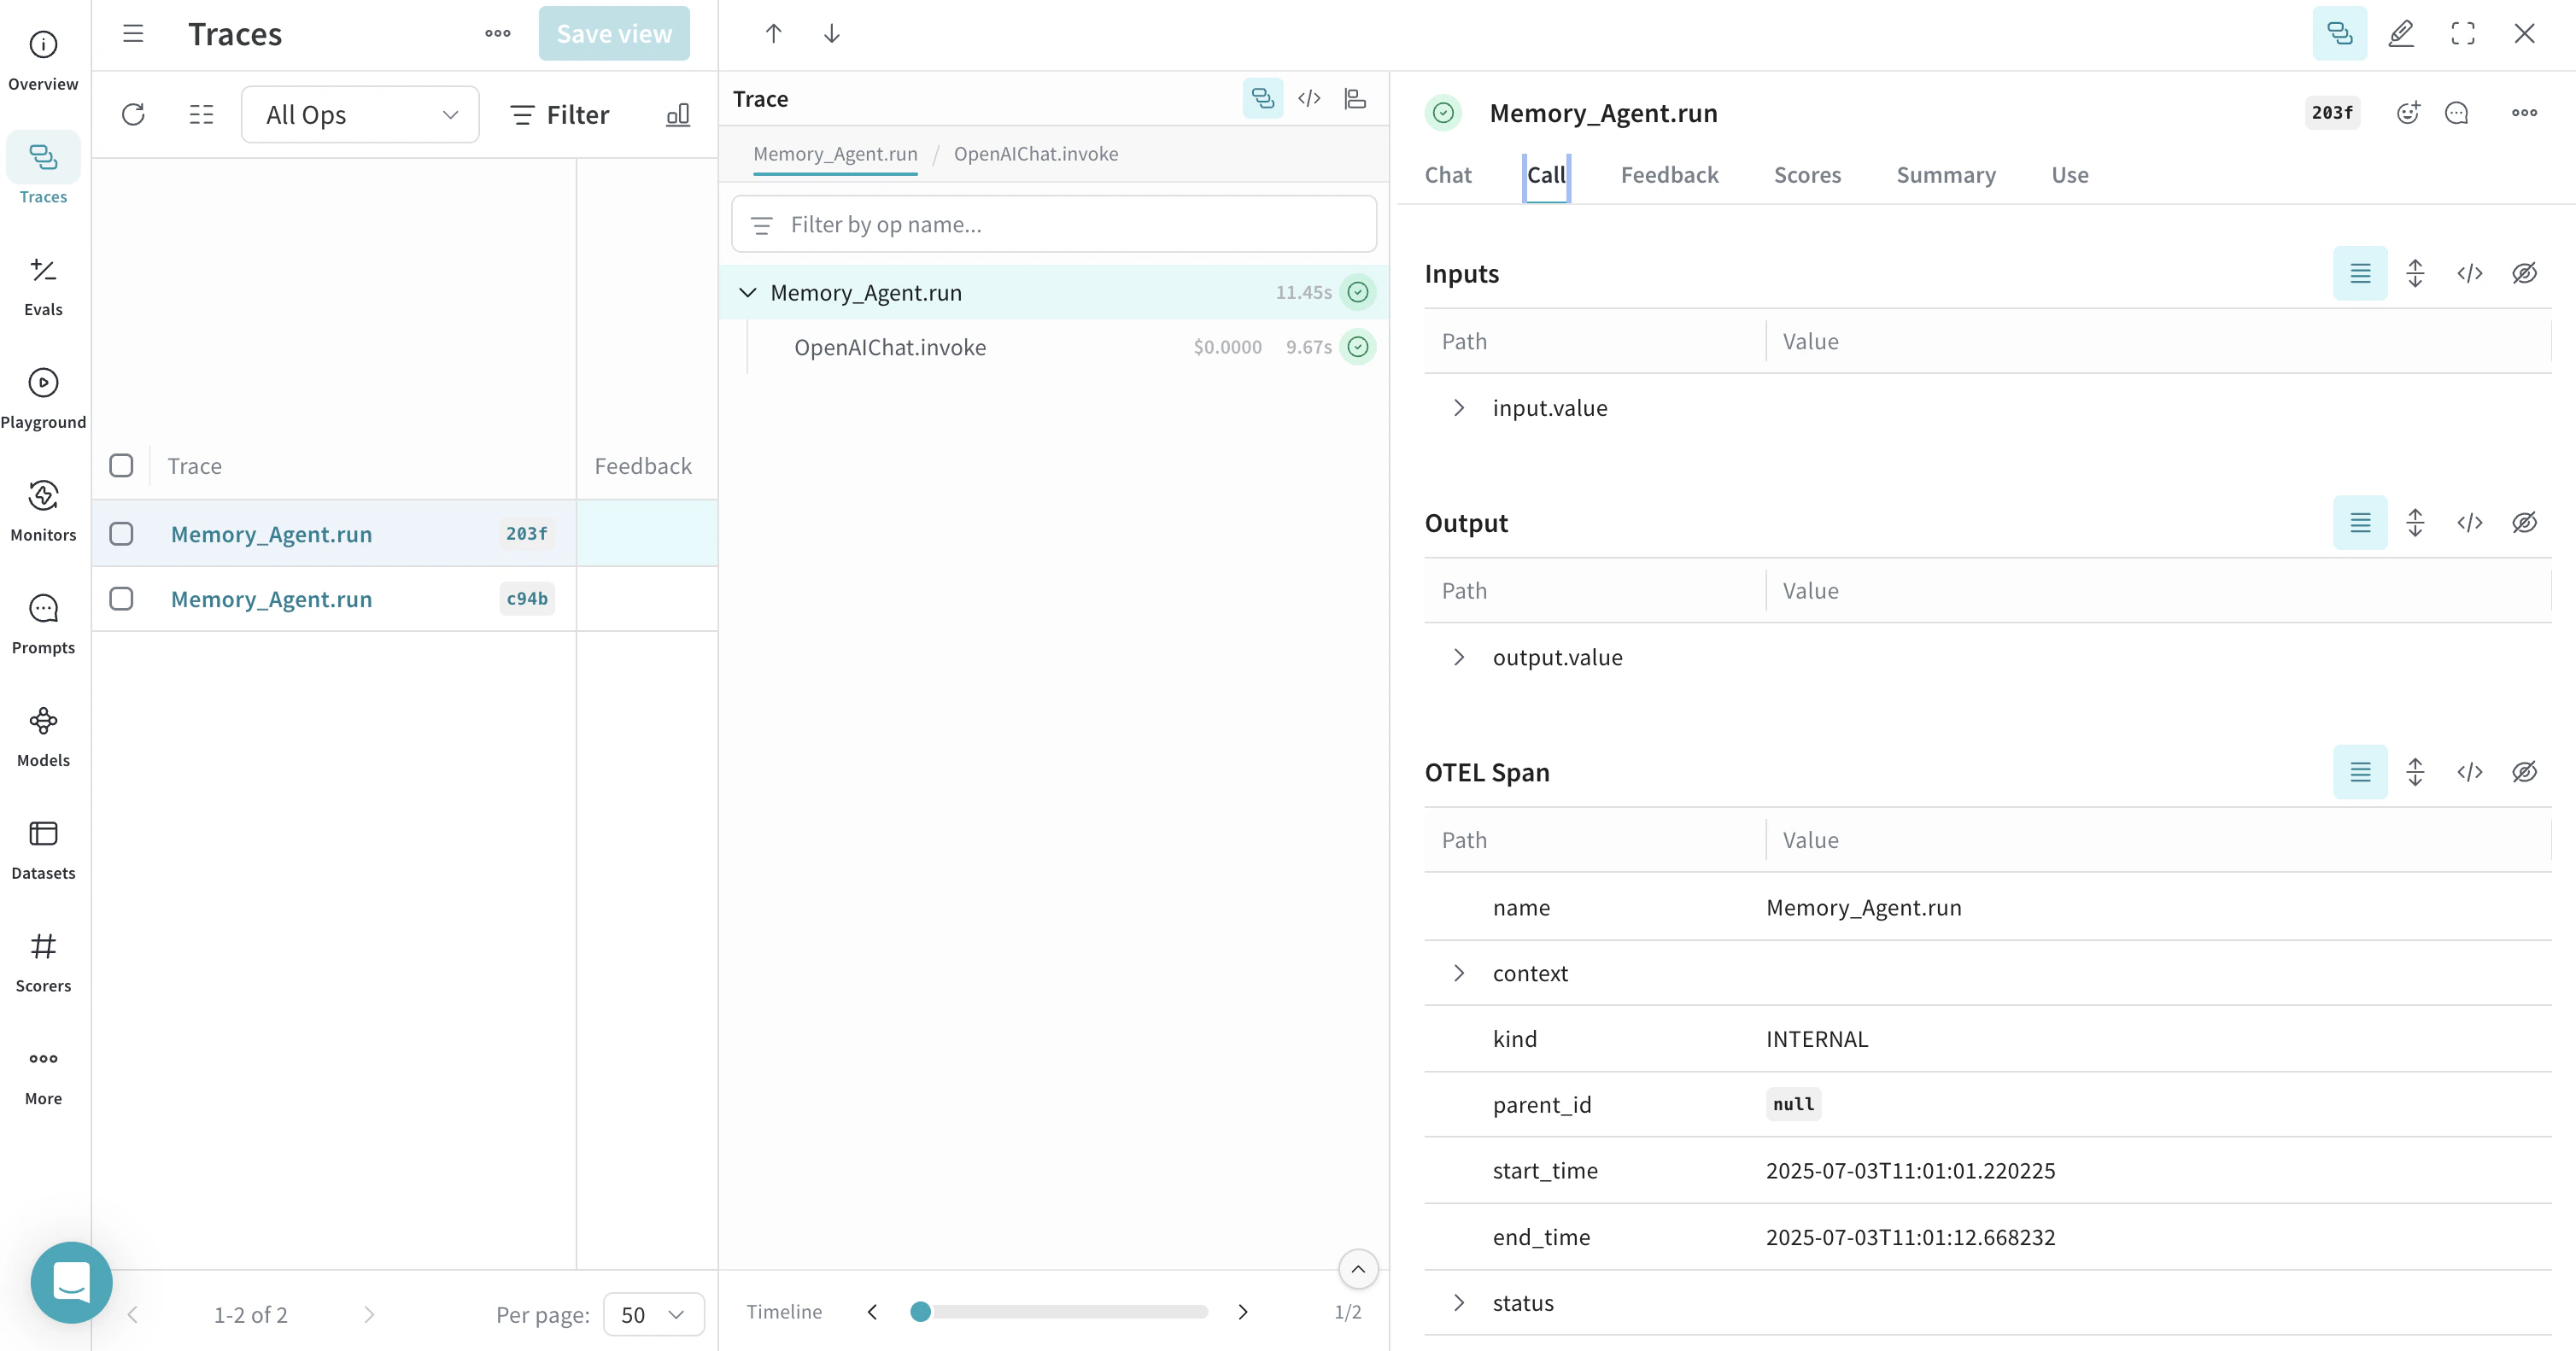 대화 이력을 저장하고 가져오는 것을 포함한 메모리 오퍼레이션이 트레이스에 표시됩니다.
## 더 알아보기
* [Agno 공식 문서](https://docs.agno.com/)
* [OTEL 공식 문서](https://opentelemetry.io/)
* [Agno GitHub 저장소](https://github.com/agno-agi/agno)
* [OpenInference Agno 계측](https://pypi.org/project/openinference-instrumentation-agno/)