> ## Documentation Index
> Fetch the complete documentation index at: https://docs.wandb.ai/llms.txt
> Use this file to discover all available pages before exploring further.
# Create a Slack automation
> Set up a Slack integration and create a W&B Automation that sends notifications to a Slack channel on specific events.
This page shows how to create a Slack [automation](/models/automations) so that your team receives notifications in a Slack channel when specific events occur in W\&B. Example events include a new model version or a run reaching a metric threshold. To create a webhook automation instead, refer to [Create a webhook automation](/models/automations/create-automations/webhook).
At a high level, to create a Slack automation, you take these steps:
1. [Add a Slack integration](#add-a-slack-integration), which authorizes W\&B to post to the Slack instance and channel.
2. [Create the automation](#create-an-automation), which defines the [event](/models/automations/automation-events) to watch for and the channel to notify.
## Add a Slack integration
A team admin can add a Slack integration to the team.
1. Log in to W\&B and go to **Team Settings**.
2. In the **Slack channel integrations** section, click **Connect Slack** to add a new Slack instance. To add a channel for an existing Slack instance, click **New integration**.
 3. If necessary, sign in to Slack in your browser. When prompted, grant W\&B permission to post to the Slack channel you select. Read the page, then click **Search for a channel** and begin typing the channel name. Select the channel from the list, then click **Allow**.
4. In Slack, go to the channel you selected. If you see a post like `[YOUR-SLACK-HANDLE] added an integration to this channel: Weights & Biases`, where `[YOUR-SLACK-HANDLE]` is your Slack username, the integration is configured correctly.
Now you can [create an automation](#create-an-automation) that notifies the Slack channel you configured.
## View and manage Slack integrations
A team admin can view and manage the team's Slack instances and channels.
1. Log in to W\&B and go to **Team Settings**.
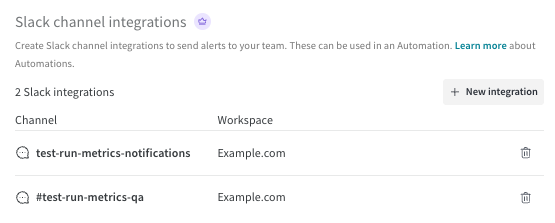
2. View each Slack destination in the **Slack channel integrations** section.
3. Delete a destination by clicking its trash icon.
## Create an automation
After you [add a Slack integration](#add-a-slack-integration), you can create an automation that uses it to send notifications. Select **Registry** or **Project** based on the scope you want the automation to apply to. Then follow these steps to create an automation that notifies the Slack channel.
A Registry admin can create automations in that registry.
1. Log in to W\&B.
2. Click the name of a registry to view its details.
3. To create an automation scoped to the registry, click the **Automations** tab, then click **Create automation**. An automation that is scoped to a registry is automatically applied to all of its collections (including those created in the future).
4. Choose the [event](/models/automations/automation-events/#registry-events) to watch for.
Fill in any additional fields that appear, which depend upon the event. For example, if you select **An artifact alias is added**, you must specify the **Alias regex**.
Click **Next step**.
5. Select the team that owns the [Slack integration](#add-a-slack-integration).
6. Set **Action type** to **Slack notification**. Select the Slack channel, then click **Next step**.
7. Provide a name for the automation. Optionally, provide a description.
8. Click **Create automation**.
The automation is now active and notifies the selected Slack channel whenever the chosen event occurs in the registry.
A W\&B admin can create automations in a project.
1. Log in to W\&B.
2. Go to the project page and click the **Automations** tab, then click **Create automation**.
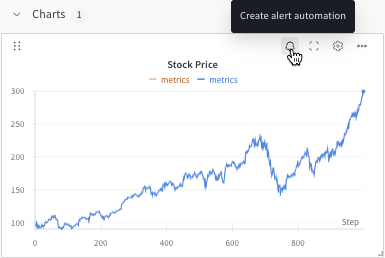
Or, directly from a line plot in the workspace, you can create a [run metric automation](/models/automations/automation-events/#run-events) for the metric it shows. Hover over the panel, then click the bell icon at the top of the panel.
3. If necessary, sign in to Slack in your browser. When prompted, grant W\&B permission to post to the Slack channel you select. Read the page, then click **Search for a channel** and begin typing the channel name. Select the channel from the list, then click **Allow**.
4. In Slack, go to the channel you selected. If you see a post like `[YOUR-SLACK-HANDLE] added an integration to this channel: Weights & Biases`, where `[YOUR-SLACK-HANDLE]` is your Slack username, the integration is configured correctly.
Now you can [create an automation](#create-an-automation) that notifies the Slack channel you configured.
## View and manage Slack integrations
A team admin can view and manage the team's Slack instances and channels.
1. Log in to W\&B and go to **Team Settings**.
2. View each Slack destination in the **Slack channel integrations** section.
3. Delete a destination by clicking its trash icon.
## Create an automation
After you [add a Slack integration](#add-a-slack-integration), you can create an automation that uses it to send notifications. Select **Registry** or **Project** based on the scope you want the automation to apply to. Then follow these steps to create an automation that notifies the Slack channel.
A Registry admin can create automations in that registry.
1. Log in to W\&B.
2. Click the name of a registry to view its details.
3. To create an automation scoped to the registry, click the **Automations** tab, then click **Create automation**. An automation that is scoped to a registry is automatically applied to all of its collections (including those created in the future).
4. Choose the [event](/models/automations/automation-events/#registry-events) to watch for.
Fill in any additional fields that appear, which depend upon the event. For example, if you select **An artifact alias is added**, you must specify the **Alias regex**.
Click **Next step**.
5. Select the team that owns the [Slack integration](#add-a-slack-integration).
6. Set **Action type** to **Slack notification**. Select the Slack channel, then click **Next step**.
7. Provide a name for the automation. Optionally, provide a description.
8. Click **Create automation**.
The automation is now active and notifies the selected Slack channel whenever the chosen event occurs in the registry.
A W\&B admin can create automations in a project.
1. Log in to W\&B.
2. Go to the project page and click the **Automations** tab, then click **Create automation**.
Or, directly from a line plot in the workspace, you can create a [run metric automation](/models/automations/automation-events/#run-events) for the metric it shows. Hover over the panel, then click the bell icon at the top of the panel.
 3. Choose the [event](/models/automations/automation-events/#project) to watch for.
1. Fill in any additional fields that appear. For example, if you select **An artifact alias is added**, you must specify the **Alias regex**.
1. For automations triggered by a run, optionally specify one or more run filters:
* **Filter to one user's runs**: Include only runs created by the specified user. Click the toggle to turn on the filter, then specify a username.
* **Filter on run name**: Include only runs whose names match the given regular expression. Click the toggle to turn on the filter, then specify a regular expression.
2. Click **Next step**.
4. Select the team that owns the [Slack integration](#add-a-slack-integration).
5. Set **Action type** to **Slack notification**. Select the Slack channel, then click **Next step**.
6. Provide a name for the automation. Optionally, provide a description.
7. Click **Create automation**.
The automation is now active and notifies the selected Slack channel whenever the chosen event occurs in the project.
## View and manage automations
Manage the registry's automations from the registry's **Automations** tab:
* To view an automation's details, click its name.
* To edit an automation, click its **action ()** menu, then click **Edit automation**.
* To delete an automation, click its **action ()** menu, then click **Delete automation**. Confirmation is required.
A W\&B admin can view and manage a project's automations from the project's **Automations** tab.
* To view an automation's details, click its name.
* To edit an automation, click its **action ()** menu, then click **Edit automation**.
* To delete an automation, click its **action ()** menu, then click **Delete automation**. Confirmation is required.
3. Choose the [event](/models/automations/automation-events/#project) to watch for.
1. Fill in any additional fields that appear. For example, if you select **An artifact alias is added**, you must specify the **Alias regex**.
1. For automations triggered by a run, optionally specify one or more run filters:
* **Filter to one user's runs**: Include only runs created by the specified user. Click the toggle to turn on the filter, then specify a username.
* **Filter on run name**: Include only runs whose names match the given regular expression. Click the toggle to turn on the filter, then specify a regular expression.
2. Click **Next step**.
4. Select the team that owns the [Slack integration](#add-a-slack-integration).
5. Set **Action type** to **Slack notification**. Select the Slack channel, then click **Next step**.
6. Provide a name for the automation. Optionally, provide a description.
7. Click **Create automation**.
The automation is now active and notifies the selected Slack channel whenever the chosen event occurs in the project.
## View and manage automations
Manage the registry's automations from the registry's **Automations** tab:
* To view an automation's details, click its name.
* To edit an automation, click its **action ()** menu, then click **Edit automation**.
* To delete an automation, click its **action ()** menu, then click **Delete automation**. Confirmation is required.
A W\&B admin can view and manage a project's automations from the project's **Automations** tab.
* To view an automation's details, click its name.
* To edit an automation, click its **action ()** menu, then click **Edit automation**.
* To delete an automation, click its **action ()** menu, then click **Delete automation**. Confirmation is required.