> ## Documentation Index
> Fetch the complete documentation index at: https://docs.wandb.ai/llms.txt
> Use this file to discover all available pages before exploring further.
> Evaluate a VLLM-compatible model checkpoint using infrastructure managed by CoreWeave
# Evaluate a model checkpoint
LLM Evaluation Jobs is in **Preview** for [W\&B Multi-tenant Cloud](/platform/hosting/hosting-options/multi_tenant_cloud). Compute is free during the preview period. [Learn more](/models/launch#pricing)
This page shows how to use [LLM Evaluation Jobs](/models/launch) to run a series of evaluation benchmarks on a fine-tuned model in W\&B Models, using infrastructure managed by CoreWeave. To evaluate a hosted API model served at a publicly accessible URL, see [Evaluate an API-hosted model](/models/launch/evaluate-hosted-model) instead, or run a small benchmark against a public OpenAI model endpoint with a streamlined [Quickstart](/models/launch#quickstart).
## Prerequisites
Before you evaluate a model checkpoint, complete the following:
1. Review the [requirements and limitations](/models/launch#more-details) for LLM Evaluation Jobs.
2. To run certain benchmarks, a team admin must add the required API keys as [team-scoped secrets](/platform/secrets#add-a-secret). Any team member can specify the secret when configuring an evaluation job. See [Evaluation model catalog](/models/launch/evaluations) for requirements.
* An **OpenAPI API key**: used by benchmarks that use OpenAI models for scoring. Required if the field **Scorer API key** appears after you select a benchmark. The secret must be named `OPENAI_API_KEY`.
* A **Hugging Face user access token**: required for certain benchmarks like `lingoly` and `lingoly2` that require access to one or more gated Hugging Face datasets. Required if the field **Hugging Face token** appears after selecting a benchmark. The API key must have access to the relevant dataset. See the Hugging Face documentation for [User access tokens](https://huggingface.co/docs/hub/en/security-tokens) and [accessing gated datasets](https://huggingface.co/docs/hub/en/datasets-gated#access-gated-datasets-as-a-user).
3. Create a new [W\&B project](/models/track/project-page) for the evaluation results. From the project sidebar, click **Create new project**.
4. Package the model in VLLM-compatible format and save it as an artifact in W\&B Models. An attempt to benchmark any other type of artifact fails. For one approach, see the following [Example: Prepare a model](#example-prepare-a-model) section.
5. Review the documentation for a given benchmark to understand how it works and learn about specific requirements. For convenience, the [Available evaluation benchmarks](/models/launch/evaluations) reference includes relevant links.
## Evaluate your model
After you complete the prerequisites, follow these steps to set up and launch an evaluation job:
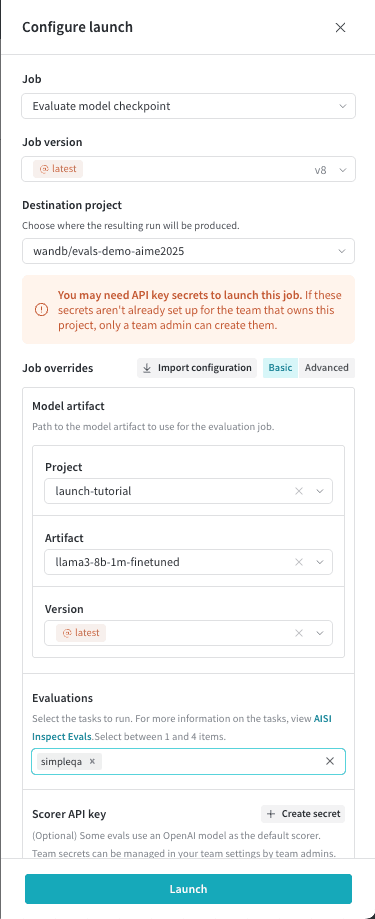
1. Log in to W\&B, then click **Launch** in the project sidebar. The **LLM Evaluation Jobs** page displays.
2. Click **Evaluate model checkpoint** to set up the evaluation job.
3. Select a destination project to save the evaluation results to.
4. In the **Model artifact** section, specify the project, artifact, and version of the prepared model to evaluate.
5. Click **Evaluations**, then select up to four benchmarks.
6. If you select benchmarks that use OpenAI models for scoring, the **Scorer API key** field displays. Click it, then select the `OPENAI_API_KEY` secret. For convenience, a team admin can create a secret from this drawer by clicking **Create secret**.
7. If you select benchmarks that require access to gated datasets in Hugging Face, a **Hugging Face token** field displays. [Request access to the relevant dataset](https://huggingface.co/docs/hub/en/datasets-gated#access-gated-datasets-as-a-user), then select the secret that contains the Hugging Face user access token.
8. Optional: Set **Sample limit** to a positive integer to limit the maximum number of benchmark samples to evaluate. Otherwise, the job includes all samples in the task.
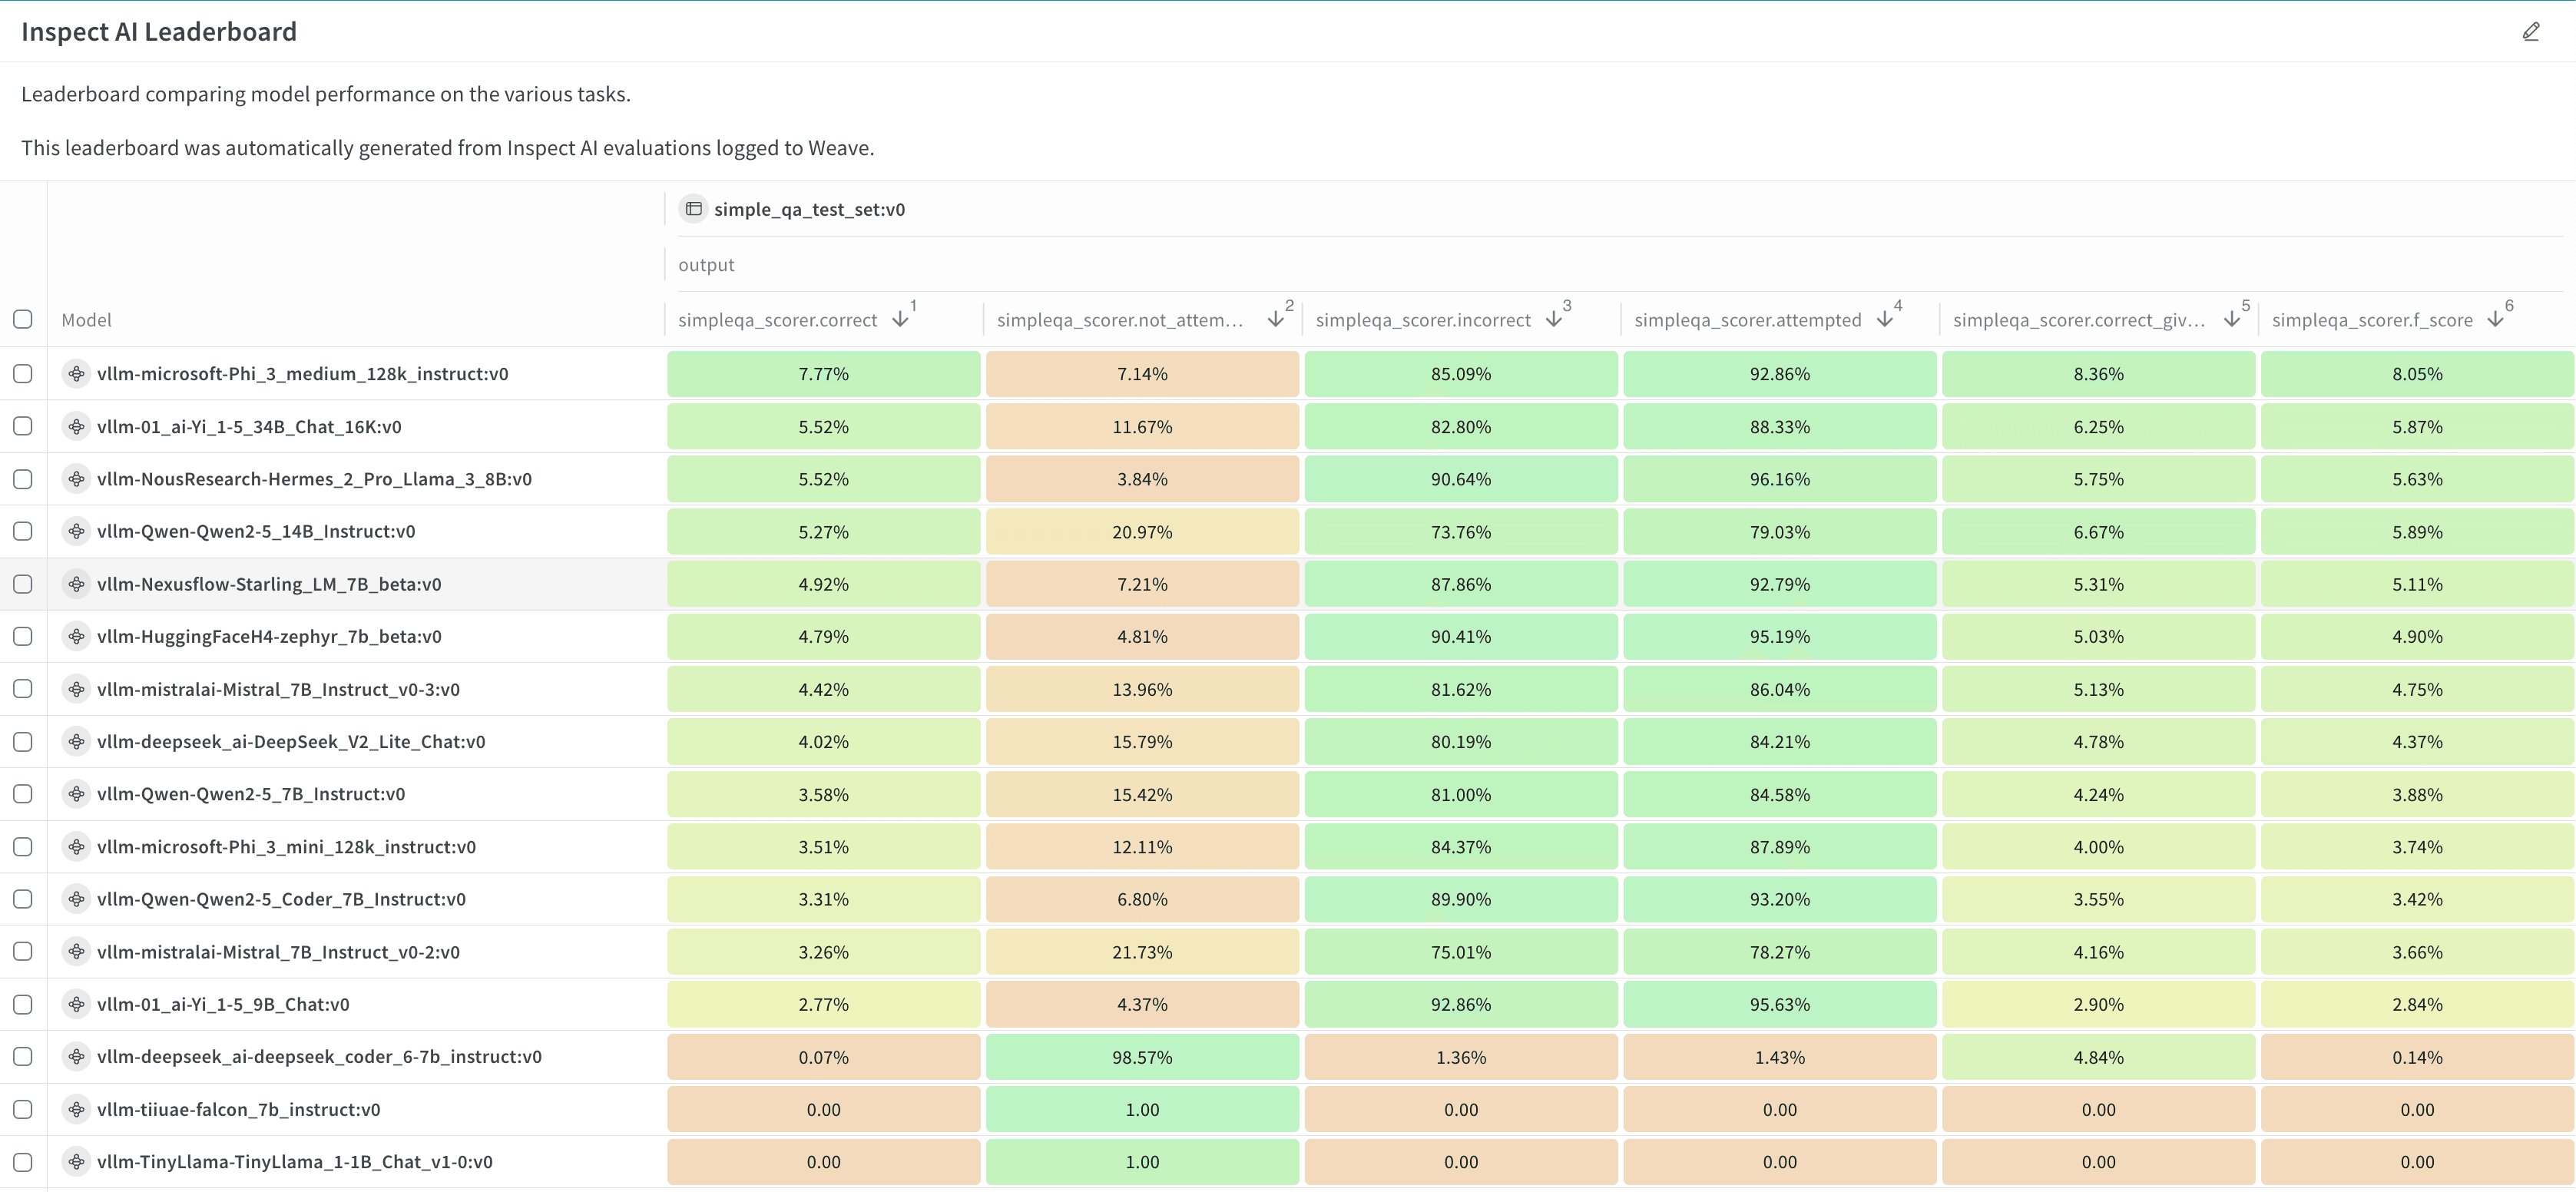
9. To create a leaderboard automatically, click **Publish results to leaderboard**. The leaderboard displays all evaluations together in a workspace panel, and you can also share it in a report.
10. Click **Launch** to launch the evaluation job.
11. Click the circular arrow icon at the top of the page to open the recent run modal. Evaluation jobs appear with your other recent runs. Click the name of a finished run to open it in single-run view, or click the **Leaderboard** link to open the leaderboard directly. For details, see [View the results](#view-the-results).
After you evaluate your first model, many fields are pre-filled with the most recent values when you configure your next evaluation job.
This example evaluation job runs two benchmarks against an artifact:
 This example leaderboard visualizes the performance of several models together:
 ## Review evaluation results
Review your evaluation job results in W\&B Models in the destination project's workspace.
1. Click the circular arrow icon at the top of the page to open the recent run modal, where evaluation jobs appear with other runs in the project. If the evaluation job has a leaderboard, click **Leaderboard** to open the leaderboard in full screen, or click a run name to open it in the project in single-run view.
2. View the evaluation job's traces in the **Evaluations** section of a workspace or in the **Traces** tab of the **Weave** sidebar panel.
3. Click the **Overview** tab to view detailed information about the evaluation job, including its configuration and summary metrics.
4. Click the **Logs** tab to view, search, or download the evaluation job's debug logs.
5. Click the **Files** tab to browse, view, or download the evaluation job's files, including code, log, configuration, and other output files.
## Customize a leaderboard
The leaderboard shows results for all evaluation jobs sent to a given project, with one row per benchmark per evaluation job. Columns display details like the trace, input values, and output values for the evaluation job. For more information about leaderboards, see [Leaderboards in Weave](/weave/guides/core-types/leaderboards).
To give feedback about a result from the leaderboard, click the emoji icon or the chat icon in the **Feedback** column.
* By default, all evaluation jobs are displayed. Filter or search for an evaluation job using the run selector at the left.
* By default, evaluation jobs are ungrouped. To group by one or more columns, click the **Group** icon. You can show or hide a group, or expand a group to view its runs.
* By default, all operations are displayed. To display only a single operation, click **All ops** and select an operation.
* To sort by a column, click the column heading. To customize the display of columns, click **Columns**.
* By default, headers are organized in a single level. You can increase the header depth to organize related headers together.
* Select or deselect individual columns to show or hide them, or show or hide all columns with a click.
* Pin columns to display them before unpinned columns.
## Export a leaderboard
To export a leaderboard:
1. Click the download icon, located near the **Columns** button.
2. To optimize the export size, only the trace roots are exported by default. To export full traces, turn off **Trace roots only**.
3. To optimize the export size, feedback and costs are not exported by default. To include them in the export, toggle **Feedback** or **Costs**.
4. By default, the export is in JSONL format. To customize the format, click **Export to file** and select a format.
5. To export the leaderboard in your browser, click **Export**.
6. To export the leaderboard programmatically, select **Python** or **cURL**, then click **Copy** and run the script or command.
## Re-run an evaluation job
Depending on your situation, there are multiple ways to re-run an evaluation job or view its configuration.
* To re-run the last evaluation job again, follow the steps in [Evaluate your model](#evaluate-your-model). Select the destination project, then the model artifact details and the selected benchmarks you selected last time are populated automatically. Optionally, make adjustments, then launch the evaluation job.
* To re-run an evaluation job from the project's **Runs** tab or run selector, hover over the run name and click the play icon. The job configuration drawer displays with the settings pre-populated. Optionally adjust the settings, then click **Launch**.
* To re-run an evaluation job from a different project, import its configuration:
1. Follow the steps in [Evaluate your model](#evaluate-your-model). After you select the destination project, click **Import configuration**.
2. Select the project that contains the evaluation job to import, then select the evaluation job run. The job configuration drawer displays with the settings pre-populated.
3. Optionally adjust the configuration.
4. Click **Launch**.
## Export an evaluation job configuration
Export an evaluation job's configuration from the run's **Files** tab.
1. Open the run in single-run view.
2. Click the **Files** tab.
3. Click the download button next to `config.yaml` to download it locally.
## Example: Prepare a model
Before you can evaluate a model checkpoint, you must package it in VLLM-compatible format and save it as an artifact in W\&B Models. This example shows one way to do this:
```python lines theme={null}
import os
from transformers import AutoTokenizer, AutoModelForCausalLM
# Load your model
model_name = "your-model-name"
tokenizer = AutoTokenizer.from_pretrained(model_name)
model = AutoModelForCausalLM.from_pretrained(model_name)
# Save in vLLM-compatible format
save_dir = "path/to/save"
tokenizer.save_pretrained(save_dir)
model.save_pretrained(save_dir)
# Save to W&B Models
import wandb
wandb_run = wandb.init(entity="your-entity-name", project="your-project-name")
artifact = wandb.Artifact(name="your-artifact-name")
artifact.add_dir(save_dir)
logged_artifact = wandb_run.log_artifact(artifact)
logged_artifact.wait()
wandb.finish()
```
## Review evaluation results
Review your evaluation job results in W\&B Models in the destination project's workspace.
1. Click the circular arrow icon at the top of the page to open the recent run modal, where evaluation jobs appear with other runs in the project. If the evaluation job has a leaderboard, click **Leaderboard** to open the leaderboard in full screen, or click a run name to open it in the project in single-run view.
2. View the evaluation job's traces in the **Evaluations** section of a workspace or in the **Traces** tab of the **Weave** sidebar panel.
3. Click the **Overview** tab to view detailed information about the evaluation job, including its configuration and summary metrics.
4. Click the **Logs** tab to view, search, or download the evaluation job's debug logs.
5. Click the **Files** tab to browse, view, or download the evaluation job's files, including code, log, configuration, and other output files.
## Customize a leaderboard
The leaderboard shows results for all evaluation jobs sent to a given project, with one row per benchmark per evaluation job. Columns display details like the trace, input values, and output values for the evaluation job. For more information about leaderboards, see [Leaderboards in Weave](/weave/guides/core-types/leaderboards).
To give feedback about a result from the leaderboard, click the emoji icon or the chat icon in the **Feedback** column.
* By default, all evaluation jobs are displayed. Filter or search for an evaluation job using the run selector at the left.
* By default, evaluation jobs are ungrouped. To group by one or more columns, click the **Group** icon. You can show or hide a group, or expand a group to view its runs.
* By default, all operations are displayed. To display only a single operation, click **All ops** and select an operation.
* To sort by a column, click the column heading. To customize the display of columns, click **Columns**.
* By default, headers are organized in a single level. You can increase the header depth to organize related headers together.
* Select or deselect individual columns to show or hide them, or show or hide all columns with a click.
* Pin columns to display them before unpinned columns.
## Export a leaderboard
To export a leaderboard:
1. Click the download icon, located near the **Columns** button.
2. To optimize the export size, only the trace roots are exported by default. To export full traces, turn off **Trace roots only**.
3. To optimize the export size, feedback and costs are not exported by default. To include them in the export, toggle **Feedback** or **Costs**.
4. By default, the export is in JSONL format. To customize the format, click **Export to file** and select a format.
5. To export the leaderboard in your browser, click **Export**.
6. To export the leaderboard programmatically, select **Python** or **cURL**, then click **Copy** and run the script or command.
## Re-run an evaluation job
Depending on your situation, there are multiple ways to re-run an evaluation job or view its configuration.
* To re-run the last evaluation job again, follow the steps in [Evaluate your model](#evaluate-your-model). Select the destination project, then the model artifact details and the selected benchmarks you selected last time are populated automatically. Optionally, make adjustments, then launch the evaluation job.
* To re-run an evaluation job from the project's **Runs** tab or run selector, hover over the run name and click the play icon. The job configuration drawer displays with the settings pre-populated. Optionally adjust the settings, then click **Launch**.
* To re-run an evaluation job from a different project, import its configuration:
1. Follow the steps in [Evaluate your model](#evaluate-your-model). After you select the destination project, click **Import configuration**.
2. Select the project that contains the evaluation job to import, then select the evaluation job run. The job configuration drawer displays with the settings pre-populated.
3. Optionally adjust the configuration.
4. Click **Launch**.
## Export an evaluation job configuration
Export an evaluation job's configuration from the run's **Files** tab.
1. Open the run in single-run view.
2. Click the **Files** tab.
3. Click the download button next to `config.yaml` to download it locally.
## Example: Prepare a model
Before you can evaluate a model checkpoint, you must package it in VLLM-compatible format and save it as an artifact in W\&B Models. This example shows one way to do this:
```python lines theme={null}
import os
from transformers import AutoTokenizer, AutoModelForCausalLM
# Load your model
model_name = "your-model-name"
tokenizer = AutoTokenizer.from_pretrained(model_name)
model = AutoModelForCausalLM.from_pretrained(model_name)
# Save in vLLM-compatible format
save_dir = "path/to/save"
tokenizer.save_pretrained(save_dir)
model.save_pretrained(save_dir)
# Save to W&B Models
import wandb
wandb_run = wandb.init(entity="your-entity-name", project="your-project-name")
artifact = wandb.Artifact(name="your-artifact-name")
artifact.add_dir(save_dir)
logged_artifact = wandb_run.log_artifact(artifact)
logged_artifact.wait()
wandb.finish()
```