W&B Platform
W&B Platform is the foundational infrastructure, tooling and governance scaffolding which supports the W&B products like Core, Models and Prompts.
W&B Platform is available in three different deployment options:
The following responsibility matrix outlines some of the key differences between the different options:
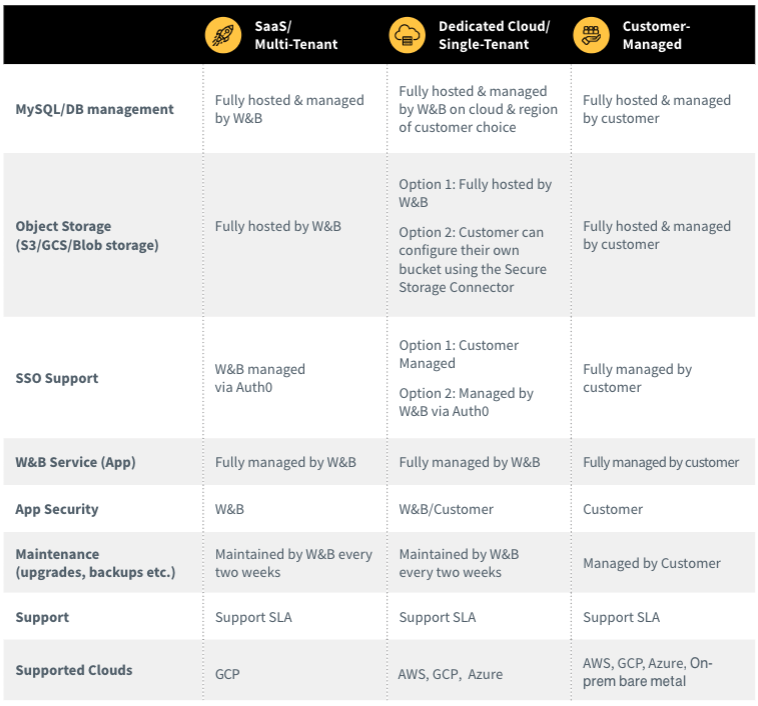
Deployment options
The following sections provide an overview of each deployment type.
W&B SaaS Cloud
W&B SaaS Cloud is a multi-tenant, fully-managed service deployed in W&B's cloud infrastructure, where you can seamlessly access the W&B products at the desired scale, with cost-efficient options for pricing, and with continuous updates for the latest features and functionalities. W&B recommends to use the SaaS Cloud for your product trial, or to manage your production AI workflows if you do not need the security of a private deployment, self-service onboarding is important, and cost efficiency is critical.
See W&B SaaS Cloud for more information.
W&B Dedicated Cloud
W&B Dedicated Cloud is a single-tenant, fully-managed service deployed in W&B's cloud infrastructure. It is the best place to onboard W&B if your organization requires conformance to strict governance controls including data residency, have need of advanced security capabilities, and are looking to optimize their AI operating costs by not having to build & manage the required infrastructure with security, scale & performance characteristics.
See W&B Dedicated Cloud for more information.
W&B Customer-Managed
With this option, you can deploy and manage W&B Server on your own managed infrastructure. W&B Server is a self-contained packaged mechanism to run the W&B Platform & its supported W&B products. W&B recommends this option if all your existing infrastructure is on-prem, or your organization has strict regulatory needs that are not satisfied by W&B Dedicated Cloud. With this option, you are fully responsible to manage the provisioning, and continuous maintenance & upgrades of the infrastructure required to support W&B Server.
See W&B Self Managed for more information.
Next steps
If you're looking to try any of the W&B products, W&B recommends using the SaaS Cloud. If you're looking for an enterprise-friendly setup, choose the appropriate deployment type for your trial here.