> ## Documentation Index
> Fetch the complete documentation index at: https://docs.wandb.ai/llms.txt
> Use this file to discover all available pages before exploring further.
# Set up annotation queues
> Create annotation queues, route traces to domain experts, and export structured feedback.
export const GitHubLink = ({url}) =>
GitHub source
;
export const ColabLink = ({url}) =>
Try in Colab
;
## Overview
Annotation queues let you route selected traces to domain experts for structured review without requiring them to navigate the full Weave UI. You define what feedback is collected, select which traces require review, and later can export completed annotations for analysis or dataset creation. Use cases can include:
* **Manual trace scoring**: Have SMEs rate model outputs on correctness, quality, or style.
* **Failure analysis**: Annotate failure modes (hallucinations, refusals, loops) to understand where your model breaks.
* **Domain expert review**: Enable medical, legal, or safety experts to review content with a task-focused interface.
* **Dataset creation**: Turn annotated traces into evaluation or training datasets.
## End-to-end workflow
The following workflow summarizes how to use annotation queues to obtain reviews:
1. Define annotation fields.
2. Create an annotation queue.
3. Load traces into the queue for review.
4. Monitor progress while domain experts complete reviews.
5. Filter and export completed annotations.
## Define annotation fields
To start creating an annotation queue, you must define your annotation fields first so that they can be selected during queue setup. Annotation fields define the feedback that the annotator provides for each trace item. Fields are reusable across queues and projects.
Field types include:
* Boolean judgments such as correctness or acceptability.
* Numeric or integer values such as quality or confidence.
* Categorical labels such as failure mode or intent.
* Free-form text for qualitative feedback.
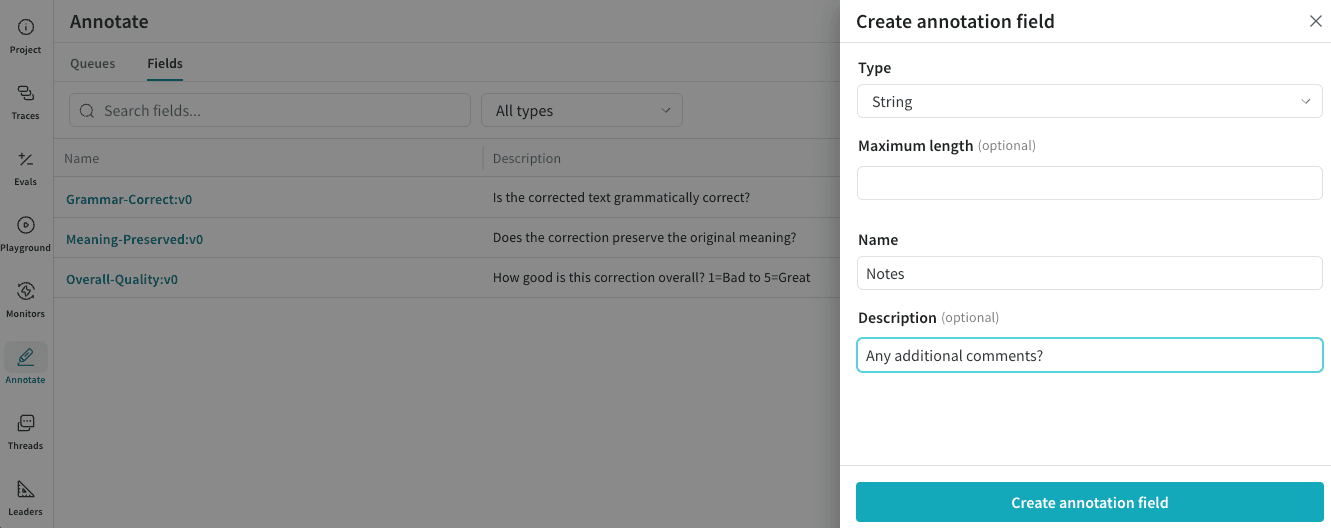
To create an annotation field:
1. Navigate to [wandb.ai](https://wandb.ai) and select your project.
2. In the Weave project sidebar, click **Annotate**. If you don't see **Annotate**, it might be nested in the menu under **More**.
3. In the tab bar, click the **Fields** tab.
4. In the Fields table toolbar, click **New Field**.
5. In the **Create annotation field** modal dialog, configure:
* **Type**: Boolean, Integer, Number, String, or categorical options.
* **Name**: Name of field to be displayed to the annotator.
* **Description** (Optional): Details for evaluating this field to be displayed to the annotator.
6. Click **Create annotation field** to save the field.
Fields cannot be edited after creation to ensure annotation consistency.
## Create an annotation queue
An annotation queue consists of:
* A set of annotation fields.
* Guidelines that provide task instructions for annotators.
* A collection of trace items awaiting review.
To create an annotation queue:
1. In the Weave project sidebar, click **Annotate**.
2. In the tab bar, click the **Queues** tab.
3. In the Queues table toolbar, click **Create Queue**.
4. In the **Create Annotation Queue** modal dialog, configure:
* **Queue name**: This is the queue name the annotator selects to complete their work.
* **Guidelines** (Optional): Any additional instructions for the annotator.
5. Click **Next**.
6. Click **Manage fields** and choose what Annotation Fields to include in this review work. All existing Annotation Fields for the Project are available for selection.
7. After you have selected all the Fields for the queue, click **Create Queue** to save the queue.
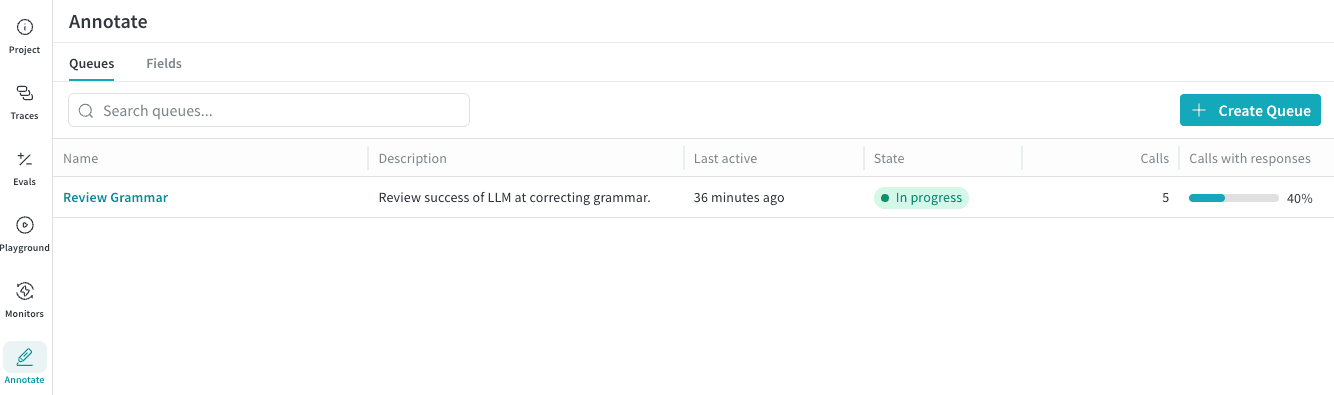
All annotation queues for the project are listed in the Annotation Queues page.
Creating an annotation queue defines the fields and guidelines for evaluation, but you still need to add traces to the queue to identify what data should be evaluated.
### Add traces to a queue
Add traces to an annotation queue directly from the **Traces** page.
To add traces to an annotation queue:
1. In the Weave project sidebar, click **Traces**.
2. In the Traces table toolbar, filter traces as needed (such as by hallucination scores, failure modes, or specific ops).
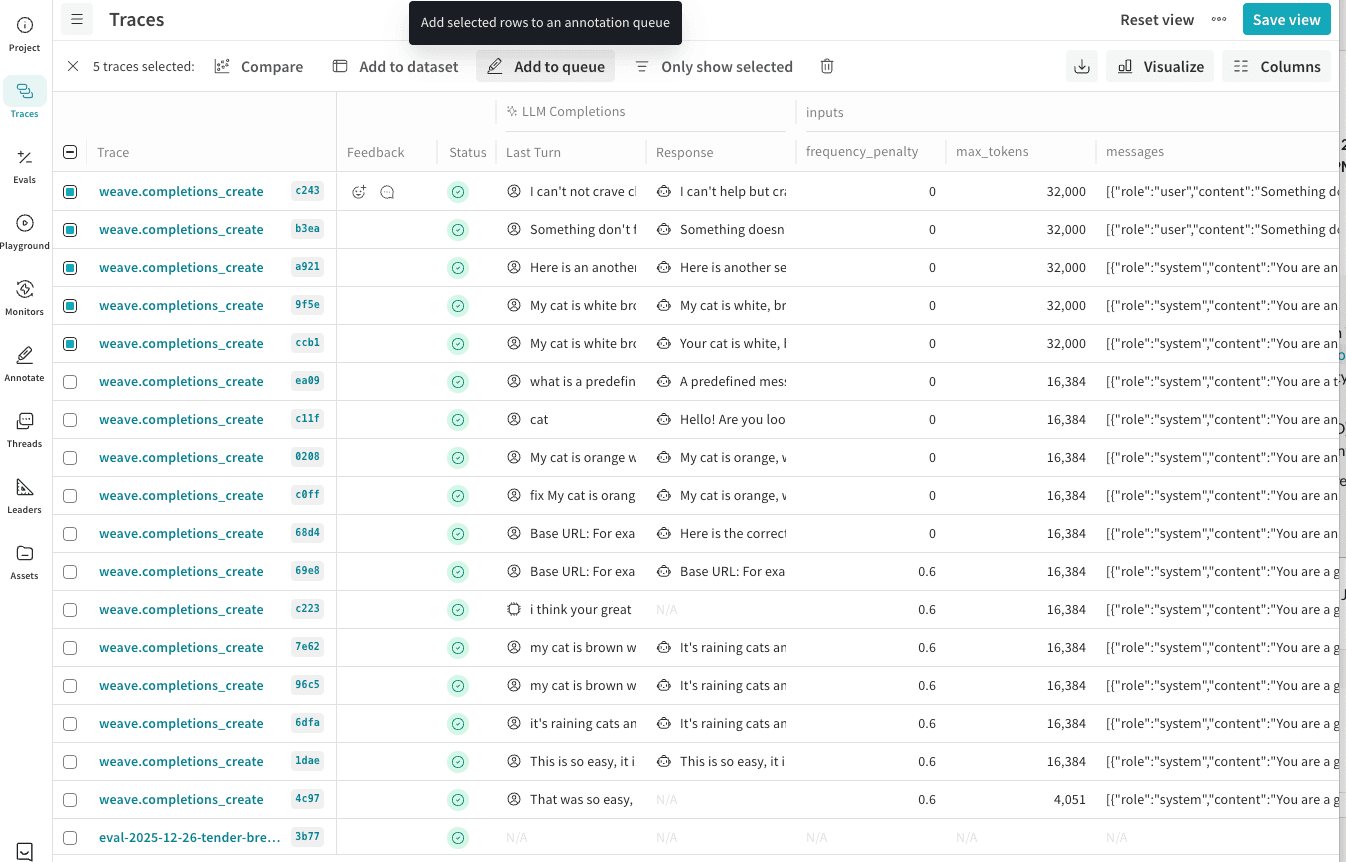
3. In the table, select the traces you want annotated.
4. In the table's action bar, click **Add to queue** to add the selected rows to an annotation queue.
5. In the **Add to annotation queue** modal dialog, configure:
* **Queue Name**: In the list, select the name of the existing queue to add these traces to.
* **Select trace data to display**: Select the Weave trace data elements to display to the annotator as they are evaluating the results.
* **Inputs**: Select which trace input fields to show during annotation.
* **Outputs**: Select which trace output fields to show during annoation.
6. Click **Add ***\[Count]*** traces to annotation queue** to assign these traces as a part of the annotation queue review.
When adding traces, you control which trace inputs and which outputs or model responses are reviewed. This way you can present annotators with only the context needed to make accurate judgments.
## Monitor review progress
Once you have created the annotation queue and added traces to it, share the queue name with your annotator for them to begin their review. See [Review items in an annotation queue](/weave/guides/tracking/annotation-review) for details on the review process.
To share a direct link to the annotation queue with an annotator:
1. In the Weave project sidebar, click **Annotate**.
2. In the tab bar, click the **Queues** tab.
3. In the Annotation Queues table, click the name of your queue to open the queue items.
4. In the Queue header bar, click the link button to copy a direct link to this queue. You can also copy the URL from the browser address bar.
In the Annotation Queues table, the **State** column indicates reviewing progress:
* **Not started**: Queue has items but no annotations have been submitted.
* **In progress**: At least one item has been reviewed.
* **Completed**: All items have been reviewed.
In the Annotation Queues table, the **Calls with responses** column indicates the percent of items (out of the total number of **Calls**) that have at least one submitted review.
## Filter and export annotations
Weave stores completed annotations as structured metadata on traces.
You can:
* Filter traces by queue assignment and annotation completion.
* Save filtered views for reuse.
* Export annotated traces to datasets for evaluation or training workflows.
This connects expert human feedback directly to model evaluation and iteration.
### Filter annotated traces
You can use the filter controls of the **Traces** page to display only traces with annotations.
To view only traces with annotations:
1. In the Weave project sidebar, click **Traces**.
2. In the Traces table toolbar, click **Filter**.
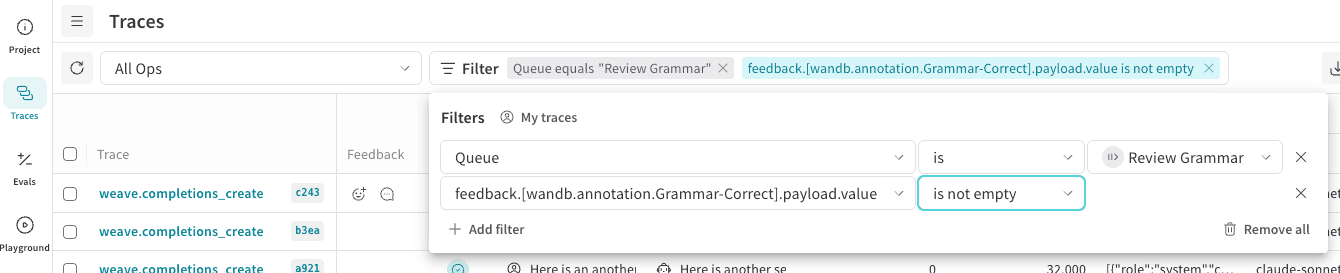
3. Add three values to a filter row:
* For **Column**, type "Queue", then press **Enter**.
* For the second list, choose **Text: "is"**.
* For **Select a queue**, choose your annotation queue name.
4. To also filter on 'completed' queue items only, click **+ Add Filter**:
* For **Column**, type "feedback". A dialog will populate with Annotations and includes your Annotation Field names. Choose a required Field from your queue.
* For the second list, choose **Other: "is not empty"**.
4. Filter rows are automatically applied; click elsewhere in the page for the filter entry to close.
5. (Optional) Save as a view for quick access. In the Traces table header, click **Save View**.
### Export annotated traces to datasets
You can export annotated traces either through the UI or programmatically, depending on how you plan to use the data.
#### Add annotated traces to a dataset
Select annotated traces and click **Add to Dataset** to include expert labels in your eval or training data.
To add annotated traces to a dataset:
1. In the Weave project sidebar, click **Traces**.
2. In the Traces table, select the traces that you want to export.
3. In the table toolbar, click **Add to dataset**. Follow the on-screen prompts to complete the addition.
To learn more about using datasets, see [Collect and track datasets](/weave/guides/core-types/datasets).
## Access annotations programmatically
If you want to integrate annotations programmatically, you must know your project name and queue ID:
* **Project**: The W\&B project name (can be project or team/project). If you don’t specify a W\&B team (such as "team/project"), your default team is used.
* **Queue ID**: The annotation queue's unique identifier.
To find the queue ID:
1. In the **Annotation Queues** table, select the name of the queue to open its items.
2. Copy the ID from the end of the page URL.
**Example**
```
https://wandb.ai/.../annotation-queues/019c0f63-7acb-7497-8f87-08873368fcd4
```
In this example, the queue ID is:
019c0f63-7acb-7497-8f87-08873368fcd4
You can iterate through the traces (calls) in your queue using the following code.
```python lines theme={null}
import weave
from weave.trace_server.trace_server_interface import AnnotationQueueItemsQueryReq
# Update project and queue identifiers to your own values.
PROJECT = "your-team-name/your-project-name"
QUEUE_ID = "019c0f63-7acb-7497-8f87-08873368fcd4"
# Initialize Weave.
client = weave.init(PROJECT)
# Get call IDs from calls in a queue.
calls = client.server.annotation_queue_items_query(
AnnotationQueueItemsQueryReq(
project_id=PROJECT,
queue_id=QUEUE_ID,
)
)
# Iterate through calls and get feedback.
for i, item in enumerate(calls.items):
call = client.get_call(call_id=item.call_id, include_feedback=True)
feedback = call.feedback or {}
# Count total feedback items for call.
total_feedback_items = len(feedback)
print(f"\nItem {i} — call_id: {item.call_id} — total feedback items: {total_feedback_items}")
if not feedback:
print("No feedback for item")
continue
# Get the first annotation value.
# Field annotations are not added in repeatable order - thus the first field will vary.
field_name = next(iter(feedback))
field_value = feedback[0]
print(f" {field_name}: {field_value}")
```
The following Google Colab notebook provides an in-depth example of programmatically accessing annotation data and collecting an analytics report:
 Fields cannot be edited after creation to ensure annotation consistency.
## Create an annotation queue
An annotation queue consists of:
* A set of annotation fields.
* Guidelines that provide task instructions for annotators.
* A collection of trace items awaiting review.
To create an annotation queue:
1. In the Weave project sidebar, click **Annotate**.
2. In the tab bar, click the **Queues** tab.
3. In the Queues table toolbar, click **Create Queue**.
4. In the **Create Annotation Queue** modal dialog, configure:
* **Queue name**: This is the queue name the annotator selects to complete their work.
* **Guidelines** (Optional): Any additional instructions for the annotator.
5. Click **Next**.
6. Click **Manage fields** and choose what Annotation Fields to include in this review work. All existing Annotation Fields for the Project are available for selection.
7. After you have selected all the Fields for the queue, click **Create Queue** to save the queue.
All annotation queues for the project are listed in the Annotation Queues page.
Fields cannot be edited after creation to ensure annotation consistency.
## Create an annotation queue
An annotation queue consists of:
* A set of annotation fields.
* Guidelines that provide task instructions for annotators.
* A collection of trace items awaiting review.
To create an annotation queue:
1. In the Weave project sidebar, click **Annotate**.
2. In the tab bar, click the **Queues** tab.
3. In the Queues table toolbar, click **Create Queue**.
4. In the **Create Annotation Queue** modal dialog, configure:
* **Queue name**: This is the queue name the annotator selects to complete their work.
* **Guidelines** (Optional): Any additional instructions for the annotator.
5. Click **Next**.
6. Click **Manage fields** and choose what Annotation Fields to include in this review work. All existing Annotation Fields for the Project are available for selection.
7. After you have selected all the Fields for the queue, click **Create Queue** to save the queue.
All annotation queues for the project are listed in the Annotation Queues page.
 Creating an annotation queue defines the fields and guidelines for evaluation, but you still need to add traces to the queue to identify what data should be evaluated.
### Add traces to a queue
Add traces to an annotation queue directly from the **Traces** page.
To add traces to an annotation queue:
1. In the Weave project sidebar, click **Traces**.
2. In the Traces table toolbar, filter traces as needed (such as by hallucination scores, failure modes, or specific ops).
3. In the table, select the traces you want annotated.
4. In the table's action bar, click **Add to queue** to add the selected rows to an annotation queue.
Creating an annotation queue defines the fields and guidelines for evaluation, but you still need to add traces to the queue to identify what data should be evaluated.
### Add traces to a queue
Add traces to an annotation queue directly from the **Traces** page.
To add traces to an annotation queue:
1. In the Weave project sidebar, click **Traces**.
2. In the Traces table toolbar, filter traces as needed (such as by hallucination scores, failure modes, or specific ops).
3. In the table, select the traces you want annotated.
4. In the table's action bar, click **Add to queue** to add the selected rows to an annotation queue.
 5. In the **Add to annotation queue** modal dialog, configure:
* **Queue Name**: In the list, select the name of the existing queue to add these traces to.
* **Select trace data to display**: Select the Weave trace data elements to display to the annotator as they are evaluating the results.
* **Inputs**: Select which trace input fields to show during annotation.
* **Outputs**: Select which trace output fields to show during annoation.
6. Click **Add ***\[Count]*** traces to annotation queue** to assign these traces as a part of the annotation queue review.
When adding traces, you control which trace inputs and which outputs or model responses are reviewed. This way you can present annotators with only the context needed to make accurate judgments.
## Monitor review progress
Once you have created the annotation queue and added traces to it, share the queue name with your annotator for them to begin their review. See [Review items in an annotation queue](/weave/guides/tracking/annotation-review) for details on the review process.
To share a direct link to the annotation queue with an annotator:
1. In the Weave project sidebar, click **Annotate**.
2. In the tab bar, click the **Queues** tab.
3. In the Annotation Queues table, click the name of your queue to open the queue items.
4. In the Queue header bar, click the link button to copy a direct link to this queue. You can also copy the URL from the browser address bar.
5. In the **Add to annotation queue** modal dialog, configure:
* **Queue Name**: In the list, select the name of the existing queue to add these traces to.
* **Select trace data to display**: Select the Weave trace data elements to display to the annotator as they are evaluating the results.
* **Inputs**: Select which trace input fields to show during annotation.
* **Outputs**: Select which trace output fields to show during annoation.
6. Click **Add ***\[Count]*** traces to annotation queue** to assign these traces as a part of the annotation queue review.
When adding traces, you control which trace inputs and which outputs or model responses are reviewed. This way you can present annotators with only the context needed to make accurate judgments.
## Monitor review progress
Once you have created the annotation queue and added traces to it, share the queue name with your annotator for them to begin their review. See [Review items in an annotation queue](/weave/guides/tracking/annotation-review) for details on the review process.
To share a direct link to the annotation queue with an annotator:
1. In the Weave project sidebar, click **Annotate**.
2. In the tab bar, click the **Queues** tab.
3. In the Annotation Queues table, click the name of your queue to open the queue items.
4. In the Queue header bar, click the link button to copy a direct link to this queue. You can also copy the URL from the browser address bar.
 In the Annotation Queues table, the **State** column indicates reviewing progress:
* **Not started**: Queue has items but no annotations have been submitted.
* **In progress**: At least one item has been reviewed.
* **Completed**: All items have been reviewed.
In the Annotation Queues table, the **Calls with responses** column indicates the percent of items (out of the total number of **Calls**) that have at least one submitted review.
## Filter and export annotations
Weave stores completed annotations as structured metadata on traces.
You can:
* Filter traces by queue assignment and annotation completion.
* Save filtered views for reuse.
* Export annotated traces to datasets for evaluation or training workflows.
This connects expert human feedback directly to model evaluation and iteration.
### Filter annotated traces
You can use the filter controls of the **Traces** page to display only traces with annotations.
To view only traces with annotations:
1. In the Weave project sidebar, click **Traces**.
2. In the Traces table toolbar, click **Filter**.
3. Add three values to a filter row:
* For **Column**, type "Queue", then press **Enter**.
* For the second list, choose **Text: "is"**.
* For **Select a queue**, choose your annotation queue name.
4. To also filter on 'completed' queue items only, click **+ Add Filter**:
* For **Column**, type "feedback". A dialog will populate with Annotations and includes your Annotation Field names. Choose a required Field from your queue.
* For the second list, choose **Other: "is not empty"**.
In the Annotation Queues table, the **State** column indicates reviewing progress:
* **Not started**: Queue has items but no annotations have been submitted.
* **In progress**: At least one item has been reviewed.
* **Completed**: All items have been reviewed.
In the Annotation Queues table, the **Calls with responses** column indicates the percent of items (out of the total number of **Calls**) that have at least one submitted review.
## Filter and export annotations
Weave stores completed annotations as structured metadata on traces.
You can:
* Filter traces by queue assignment and annotation completion.
* Save filtered views for reuse.
* Export annotated traces to datasets for evaluation or training workflows.
This connects expert human feedback directly to model evaluation and iteration.
### Filter annotated traces
You can use the filter controls of the **Traces** page to display only traces with annotations.
To view only traces with annotations:
1. In the Weave project sidebar, click **Traces**.
2. In the Traces table toolbar, click **Filter**.
3. Add three values to a filter row:
* For **Column**, type "Queue", then press **Enter**.
* For the second list, choose **Text: "is"**.
* For **Select a queue**, choose your annotation queue name.
4. To also filter on 'completed' queue items only, click **+ Add Filter**:
* For **Column**, type "feedback". A dialog will populate with Annotations and includes your Annotation Field names. Choose a required Field from your queue.
* For the second list, choose **Other: "is not empty"**.
 4. Filter rows are automatically applied; click elsewhere in the page for the filter entry to close.
5. (Optional) Save as a view for quick access. In the Traces table header, click **Save View**.
### Export annotated traces to datasets
You can export annotated traces either through the UI or programmatically, depending on how you plan to use the data.
#### Add annotated traces to a dataset
Select annotated traces and click **Add to Dataset** to include expert labels in your eval or training data.
To add annotated traces to a dataset:
1. In the Weave project sidebar, click **Traces**.
2. In the Traces table, select the traces that you want to export.
3. In the table toolbar, click **Add to dataset**. Follow the on-screen prompts to complete the addition.
To learn more about using datasets, see [Collect and track datasets](/weave/guides/core-types/datasets).
## Access annotations programmatically
If you want to integrate annotations programmatically, you must know your project name and queue ID:
* **Project**: The W\&B project name (can be project or team/project). If you don’t specify a W\&B team (such as "team/project"), your default team is used.
* **Queue ID**: The annotation queue's unique identifier.
To find the queue ID:
1. In the **Annotation Queues** table, select the name of the queue to open its items.
2. Copy the ID from the end of the page URL.
**Example**
```
https://wandb.ai/.../annotation-queues/019c0f63-7acb-7497-8f87-08873368fcd4
```
In this example, the queue ID is:
019c0f63-7acb-7497-8f87-08873368fcd4
You can iterate through the traces (calls) in your queue using the following code.
```python lines theme={null}
import weave
from weave.trace_server.trace_server_interface import AnnotationQueueItemsQueryReq
# Update project and queue identifiers to your own values.
PROJECT = "your-team-name/your-project-name"
QUEUE_ID = "019c0f63-7acb-7497-8f87-08873368fcd4"
# Initialize Weave.
client = weave.init(PROJECT)
# Get call IDs from calls in a queue.
calls = client.server.annotation_queue_items_query(
AnnotationQueueItemsQueryReq(
project_id=PROJECT,
queue_id=QUEUE_ID,
)
)
# Iterate through calls and get feedback.
for i, item in enumerate(calls.items):
call = client.get_call(call_id=item.call_id, include_feedback=True)
feedback = call.feedback or {}
# Count total feedback items for call.
total_feedback_items = len(feedback)
print(f"\nItem {i} — call_id: {item.call_id} — total feedback items: {total_feedback_items}")
if not feedback:
print("No feedback for item")
continue
# Get the first annotation value.
# Field annotations are not added in repeatable order - thus the first field will vary.
field_name = next(iter(feedback))
field_value = feedback[0]
print(f" {field_name}: {field_value}")
```
The following Google Colab notebook provides an in-depth example of programmatically accessing annotation data and collecting an analytics report:
4. Filter rows are automatically applied; click elsewhere in the page for the filter entry to close.
5. (Optional) Save as a view for quick access. In the Traces table header, click **Save View**.
### Export annotated traces to datasets
You can export annotated traces either through the UI or programmatically, depending on how you plan to use the data.
#### Add annotated traces to a dataset
Select annotated traces and click **Add to Dataset** to include expert labels in your eval or training data.
To add annotated traces to a dataset:
1. In the Weave project sidebar, click **Traces**.
2. In the Traces table, select the traces that you want to export.
3. In the table toolbar, click **Add to dataset**. Follow the on-screen prompts to complete the addition.
To learn more about using datasets, see [Collect and track datasets](/weave/guides/core-types/datasets).
## Access annotations programmatically
If you want to integrate annotations programmatically, you must know your project name and queue ID:
* **Project**: The W\&B project name (can be project or team/project). If you don’t specify a W\&B team (such as "team/project"), your default team is used.
* **Queue ID**: The annotation queue's unique identifier.
To find the queue ID:
1. In the **Annotation Queues** table, select the name of the queue to open its items.
2. Copy the ID from the end of the page URL.
**Example**
```
https://wandb.ai/.../annotation-queues/019c0f63-7acb-7497-8f87-08873368fcd4
```
In this example, the queue ID is:
019c0f63-7acb-7497-8f87-08873368fcd4
You can iterate through the traces (calls) in your queue using the following code.
```python lines theme={null}
import weave
from weave.trace_server.trace_server_interface import AnnotationQueueItemsQueryReq
# Update project and queue identifiers to your own values.
PROJECT = "your-team-name/your-project-name"
QUEUE_ID = "019c0f63-7acb-7497-8f87-08873368fcd4"
# Initialize Weave.
client = weave.init(PROJECT)
# Get call IDs from calls in a queue.
calls = client.server.annotation_queue_items_query(
AnnotationQueueItemsQueryReq(
project_id=PROJECT,
queue_id=QUEUE_ID,
)
)
# Iterate through calls and get feedback.
for i, item in enumerate(calls.items):
call = client.get_call(call_id=item.call_id, include_feedback=True)
feedback = call.feedback or {}
# Count total feedback items for call.
total_feedback_items = len(feedback)
print(f"\nItem {i} — call_id: {item.call_id} — total feedback items: {total_feedback_items}")
if not feedback:
print("No feedback for item")
continue
# Get the first annotation value.
# Field annotations are not added in repeatable order - thus the first field will vary.
field_name = next(iter(feedback))
field_value = feedback[0]
print(f" {field_name}: {field_value}")
```
The following Google Colab notebook provides an in-depth example of programmatically accessing annotation data and collecting an analytics report: