Before you start
Running any application in production comes with its own set of challenges, and W&B is no exception. Although W&B aims to streamline the process, complexities may arise depending on your architecture and design decisions. Typically, managing a production deployment involves overseeing components including hardware, operating systems, networking, storage, security, the W&B platform itself, and other dependencies. This responsibility extends to both the initial setup of the environment and its ongoing maintenance. Consider carefully whether a Self-Managed approach with W&B is suitable for your team and your requirements. A strong understanding of how to run and maintain production-grade application is an important prerequisite before you deploy Self-Managed W&B. If your team needs assistance, the W&B Professional Services team and partners offer support for implementation and optimization. To learn more about managed solutions for running W&B instead of managing it yourself, refer to W&B Multi-tenant Cloud and W&B Dedicated Cloud.Infrastructure
A W&B deployment consists of an application layer and a storage layer. The following diagram shows how these layers fit together, and the subsections that follow describe each one.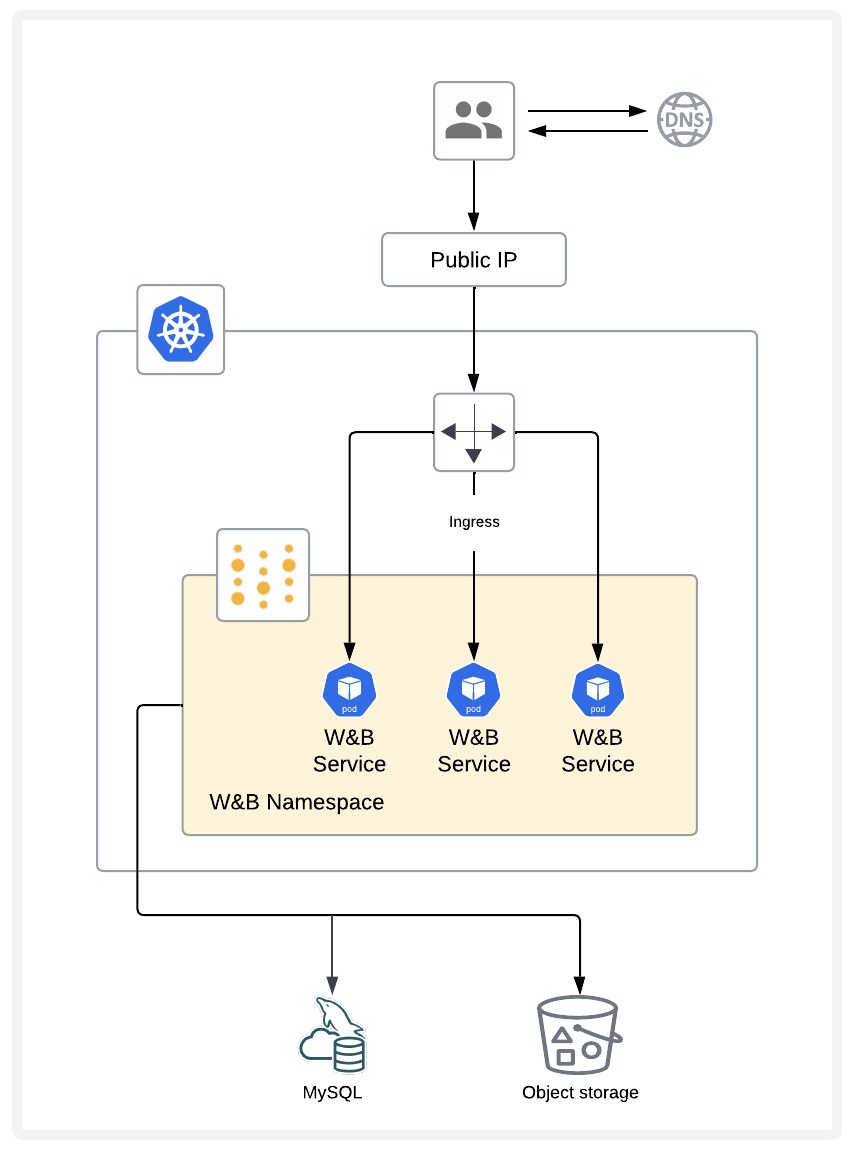
Application layer
The application layer consists of a multi-node Kubernetes cluster, with resilience against node failures. The Kubernetes cluster runs and maintains the W&B pods.Storage layer
The storage layer consists of a MySQL database and object storage. The MySQL database stores metadata and the object storage stores artifacts such as models and datasets.Infrastructure requirements
The following sections detail requirements for a W&B deployment, including Kubernetes cluster details, MySQL, Redis, object storage, software versions, networking, DNS, load balancer and ingress, SSL/TLS, and supported CPU architectures. Confirm that your environment meets each of these requirements before you begin a deployment.Kubernetes
W&B deploys the W&B Server application as a Kubernetes Operator that deploys multiple pods. For this reason, W&B requires a Kubernetes cluster with:- A fully configured and functioning ingress controller.
- The capability to provision Persistent Volumes.
MySQL
W&B stores metadata in a MySQL database. The database’s performance and storage requirements depend on the shapes of the model parameters and related metadata. For example, the database grows in size as you track more training runs, and load on the database increases based on queries in run tables, user workspaces, and reports. W&B strongly recommends using managed database services (such as AWS RDS Aurora MySQL, Google Cloud SQL for MySQL, or Azure Database for MySQL) for production deployments. Managed services provide automated backups, monitoring, high availability, and patching, and reduce operational complexity. See the Cloud provider instance recommendations section for specific service recommendations. If you choose to deploy a self-managed MySQL database, consider the following:- Backups: Periodically back up the database to a separate facility. W&B recommends daily backups with at least 1 week of retention.
- Performance: The database requires fast storage hardware, such as SSD or accelerated NAS.
- Monitoring: The database requires adequate CPU resources. Monitor the database server’s CPU load. If CPU usage is sustained at > 90% of the system for more than 5 minutes, consider adding CPU capacity.
- Availability: To meet your availability and durability requirements, W&B recommends configuring a hot standby deployment on a separate machine. The standby streams all updates in real time from the primary deployment and is ready to fail over if the primary server crashes, becomes corrupted, or experiences sustained downtime.
MySQL topology
For production, a managed MySQL service is the simplest path to high availability because the cloud provider handles failover, backups, and patching. Use the provider’s high availability option, for example, Aurora Multi-AZ on AWS. If you run self-managed MySQL, use a primary database with a hot standby that receives a real-time replication stream and can take over on failure. W&B doesn’t support a multi-primary topology or read-only replicas for the application database.MySQL database creation
For instructions to manually create the MySQL database and user, see the bare-metal guide MySQL database section.MySQL configuration parameters
These parameters tune MySQL for the write patterns and schema changes that W&B performs at scale. If you’re running your own MySQL instance, configure MySQL with these settings:Redis
W&B depends on a single-node Redis 7.x deployment that W&B components use for job queuing and data caching. For convenience during testing and development of proofs of concept, W&B Self-Managed includes a local Redis deployment that isn’t appropriate for production deployments. W&B can connect to a Redis instance in the following environments:- AWS Elasticache.
- Google Cloud Memory Store.
- Azure Cache for Redis.
- Redis deployment hosted in your cloud or on-premises infrastructure.
Object storage
W&B requires object storage with pre-signed URL and CORS support, deployed in one of:- CoreWeave AI Object Storage is an S3-compatible object storage service optimized for AI workloads.
- Amazon S3 is an object storage service that provides scalability, data availability, security, and performance.
- Google Cloud Storage is a managed service for storing unstructured data at scale.
- Azure Blob Storage is a cloud-based object storage solution for storing unstructured data like text, binary data, images, videos, and logs.
- S3-compatible storage such as MinIO Enterprise (AIStor), NetApp StorageGRID, or other enterprise-grade solutions hosted in your cloud or on-premises infrastructure.
Versions
Networking
For a networked deployment, allow egress to these endpoints during both installation and runtime:https://deploy.wandb.aihttps://charts.wandb.aihttps://quay.io(used for Prometheus images)
Additional container registries might be required depending on your deployment configuration:
https://gcr.iowhen you deploy Bufstream and etcd for Weave online evaluations.
DNS
The fully qualified domain name (FQDN) of the W&B deployment must resolve to the IP address of the ingress or load balancer using anA record.
Load balancer and ingress
The W&B Kubernetes Operator can expose services using a Kubernetes ingress controller, which routes to service endpoints based on URL paths with different ports. The ingress controller must be accessible by all machines that execute machine learning payloads or access the service through web browsers.Ingress controller requirements
Your Kubernetes cluster must have anIngressClass available. Common ingress controller options include:
- Nginx Ingress Controller.
- Istio.
- Traefik.
- Cloud provider ingress controllers (AWS ALB, GCP Ingress, and Azure Application Gateway).
W&B service routing
The W&B Operator routes requests automatically to multiple backend services based on path:Example ingress configuration
The following shows an example ingress resource created by the W&B Operator:The W&B Operator creates and manages the ingress configuration automatically. You typically don’t need to create ingress resources manually. Make sure your cluster has a functioning ingress controller and the appropriate
IngressClass configured.SSL/TLS
W&B requires a valid signed SSL/TLS certificate for secure communication between clients and the server. SSL/TLS termination must occur on the ingress or load balancer. The W&B Server application doesn’t terminate SSL or TLS connections. If possible, use a service like Let’s Encrypt to provide trusted certificates to your load balancer. Services like Caddy and Cloudflare manage SSL for you. If your security policies require SSL communication within your trusted networks, consider using a tool like Istio and sidecar containers.Supported CPU architectures
W&B runs on Intel and AMD 64-bit architecture. ARM isn’t supported.Deployment method
After your infrastructure meets the preceding requirements, choose how to install W&B and provision the underlying resources. The following sections describe the recommended deployment method and the recommended approach for infrastructure provisioning.W&B Kubernetes Operator with Helm
The recommended installation method for W&B Self-Managed uses the W&B Kubernetes Operator, deployed through Helm. This approach provides:- Automated updates and management of W&B components.
- Simplified configuration and deployment.
- Support for all deployment scenarios (cloud, on-premises, and air-gapped).
- Deploy W&B Platform On-premises - Primary installation guide.
- Kubernetes operator for air-gapped instances - For disconnected environments.
Infrastructure provisioning
Terraform is the recommended way to provision infrastructure for W&B production deployments. With Terraform, you define the required resources, their references to other resources, and their dependencies. W&B provides Terraform modules for the major cloud providers. For details, refer to Deploy W&B Server within Self-Managed cloud accounts.Sizing
Use the following guidelines as a starting point when planning a deployment. W&B recommends that you monitor all components of a deployment closely and that you make adjustments based on observed usage patterns. Continue to monitor production deployments over time and make adjustments as needed to maintain performance. When you plan capacity, you size two core components: a Kubernetes cluster for the W&B Operator workload and a MySQL database for metadata. Recommendations vary by environment (Test/Dev or Production) and, for Kubernetes only, by product mix (Models only, Weave only, or Models and Weave). W&B recommends starting with a minimum of 3 worker nodes for both Test/Dev and Production, and enabling cluster autoscaling in Production. The following sections give per-node sizing recommendations for the Kubernetes cluster and the MySQL database.Kubernetes sizing
- Models only
- Weave only
- Models and Weave
Numbers are per Kubernetes worker node.
MySQL sizing
These recommendations don’t vary by product mix. For topology and availability guidance, see MySQL topology under MySQL.
Numbers are per MySQL node.
Cloud provider instance recommendations
After you determine the per-node CPU, memory, and disk requirements from the preceding sizing tables, use the following recommendations to pick specific cloud provider instance types and managed services that meet those requirements. These recommendations apply to each node of a Self-Managed deployment of W&B in cloud infrastructure.- AWS
- Google Cloud
- Azure
Recommended managed services
- Kubernetes: Amazon EKS
- MySQL: Amazon RDS Aurora
- Object storage: Amazon S3