This is the multi-page printable view of this section. Click here to print.

Return to the regular view of this page.

Registry

W&B Registry is a curated central repository of artifact versions within your organization. Users who have permission within your organization can download, share, and collaboratively manage the lifecycle of all artifacts, regardless of the team that user belongs to.

You can use the Registry to track artifact versions, audit the history of an artifact’s usage and changes, ensure governance and compliance of your artifacts, and automate downstream processes such as model CI/CD.

In summary, use W&B Registry to:

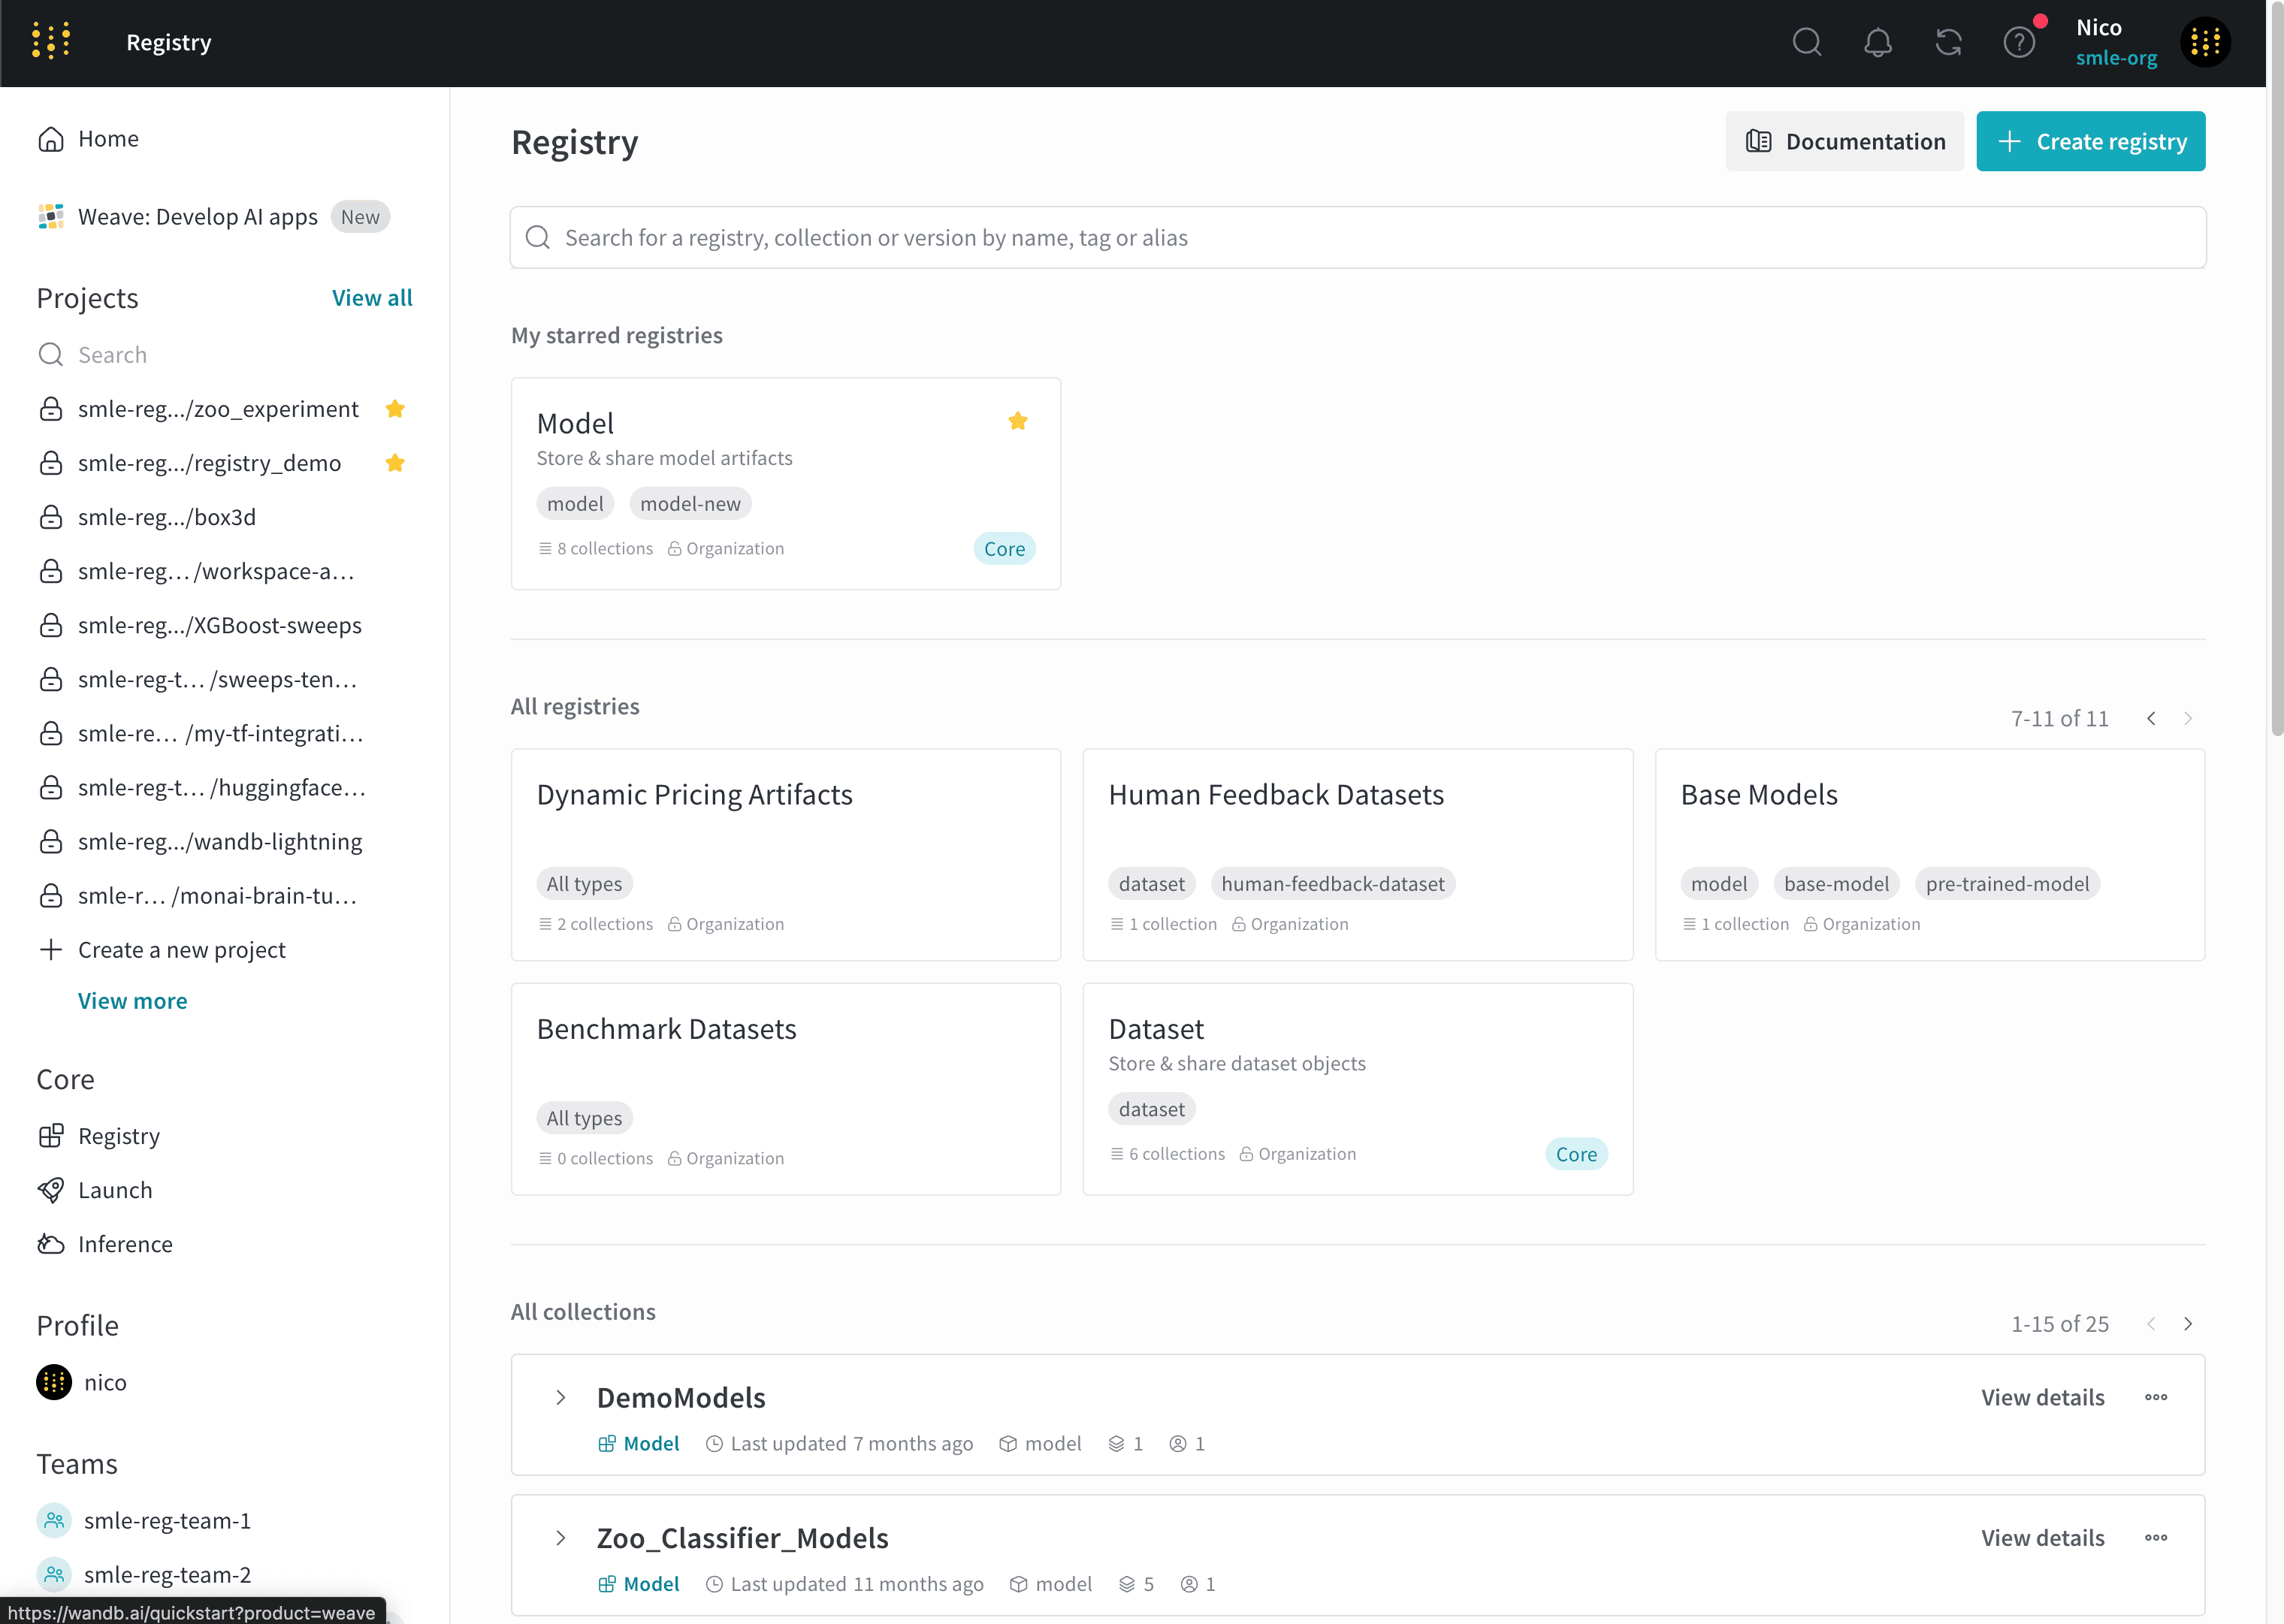
The preceding image shows the Registry App with “Model” and “Dataset” core registries along with custom registries.

Learn the basics

Each organization initially contains two registries that you can use to organize your model and dataset artifacts called Models and Datasets, respectively. You can create additional registries to organize other artifact types based on your organization’s needs.

Each registry consists of one or more collections. Each collection represents a distinct task or use case.

To add an artifact to a registry, you first log a specific artifact version to W&B. Each time you log an artifact, W&B automatically assigns a version to that artifact. Artifact versions use 0 indexing, so the first version is v0, the second version is v1, and so on.

Once you log an artifact to W&B, you can then link that specific artifact version to a collection in the registry.

As an example, the proceeding code example shows how to log and link a fake model artifact called “my_model.txt” to a collection named “first-collection” in the core Model registry. More specifically, the code accomplishes the following:

  1. Initialize a W&B run.
  2. Log the artifact to W&B.
  3. Specify the name of the collection and registry you want to link your artifact version to.
  4. Link the artifact to the collection.

Copy and paste the proceeding code snippet into a Python script and run it. Ensure that you have W&B Python SDK version 0.18.6 or greater.

import wandb
import random

# Initialize a W&B run to track the artifact
run = wandb.init(project="registry_quickstart") 

# Create a simulated model file so that you can log it
with open("my_model.txt", "w") as f:
   f.write("Model: " + str(random.random()))

# Log the artifact to W&B
logged_artifact = run.log_artifact(
    artifact_or_path="./my_model.txt", 
    name="gemma-finetuned", 
    type="model" # Specifies artifact type
)

# Specify the name of the collection and registry
# you want to publish the artifact to
COLLECTION_NAME = "first-collection"
REGISTRY_NAME = "model"

# Link the artifact to the registry
run.link_artifact(
    artifact=logged_artifact, 
    target_path=f"wandb-registry-{REGISTRY_NAME}/{COLLECTION_NAME}"
)

W&B automatically creates a collection for you if the collection you specify in the returned run object’s link_artifact(target_path = "") method does not exist within the registry you specify.

Navigate to the Registry App to view artifact versions that you and other members of your organization publish. To do so, first navigate to W&B. Select Registry in the left sidebar below Applications. Select the “Model” registry. Within the registry, you should see the “first-collection” collection with your linked artifact version.

Once you link an artifact version to a collection within a registry, members of your organization can view, download, and manage your artifact versions, create downstream automations, and more if they have the proper permissions.

Enable W&B Registry

Based on your deployment type, satisfy the following conditions to enable W&B Registry:

Deployment type How to enable
Multi-tenant Cloud No action required. W&B Registry is available on the W&B App.
Dedicated Cloud Contact your account team. The Solutions Architect (SA) Team enables W&B Registry within your instance’s operator console. Ensure your instance is on server release version 0.59.2 or newer.
Self-Managed Enable the environment variable called ENABLE_REGISTRY_UI. To learn more about enabling environment variables in server, visit these docs. In self-managed instances, your infrastructure administrator should enable this environment variable and set it to true. Ensure your instance is on server release version 0.59.2 or newer.

Resources to get started

Depending on your use case, explore the following resources to get started with the W&B Registry:

  • Check out the tutorial video:
  • Take the W&B Model CI/CD course and learn how to:
    • Use W&B Registry to manage and version your artifacts, track lineage, and promote models through different lifecycle stages.
    • Automate your model management workflows using webhooks.
    • Integrate the registry with external ML systems and tools for model evaluation, monitoring, and deployment.

Migrate from the legacy Model Registry to W&B Registry

The legacy Model Registry is scheduled for deprecation with the exact date not yet decided. Before deprecating the legacy Model Registry, W&B will migrate the contents of the legacy Model Registry to the W&B Registry.

See Migrating from legacy Model Registry for more information about the migration process from the legacy Model Registry to W&B Registry.

Until the migration occurs, W&B supports both the legacy Model Registry and the new Registry.

Reach out to support@wandb.com with any questions or to speak to the W&B Product Team about any concerns about the migration.

1 - Registry types

W&B supports two types of registries: Core registries and Custom registries.

Core registry

A core registry is a template for specific use cases: Models and Datasets.

By default, the Models registry is configured to accept "model" artifact types and the Dataset registry is configured to accept "dataset" artifact types. An admin can add additional accepted artifact types.

The preceding image shows the Models and the Dataset core registry along with a custom registry called Fine_Tuned_Models in the W&B Registry App UI.

A core registry has organization visibility. A registry admin can not change the visibility of a core registry.

Custom registry

Custom registries are not restricted to "model" artifact types or "dataset" artifact types.

You can create a custom registry for each step in your machine learning pipeline, from initial data collection to final model deployment.

For example, you might create a registry called “Benchmark_Datasets” for organizing curated datasets to evaluate the performance of trained models. Within this registry, you might have a collection called “User_Query_Insurance_Answer_Test_Data” that contains a set of user questions and corresponding expert-validated answers that the model has never seen during training.

A custom registry can have either organization or restricted visibility. A registry admin can change the visibility of a custom registry from organization to restricted. However, the registry admin can not change a custom registry’s visibility from restricted to organizational visibility.

For information on how to create a custom registry, see Create a custom registry.

Summary

The proceeding table summarizes the differences between core and custom registries:

Core Custom
Visibility Organizational visibility only. Visibility can not be altered. Either organization or restricted. Visibility can be altered from organization to restricted visibility.
Metadata Preconfigured and not editable by users. Users can edit.
Artifact types Preconfigured and accepted artifact types cannot be removed. Users can add additional accepted artifact types. Admin can define accepted types.
Customization Can add additional types to the existing list. Edit registry name, description, visibility, and accepted artifact types.

2 - Create a custom registry

Create a custom registry for each step of your ML workflow.

Custom registries are particularly useful for organizing project-specific requirements that differ from the default, core registry.

The following procedure describes how to interactively create a registry:

  1. Navigate to the Registry App in the W&B App UI.
  2. Within Custom registry, click on the Create registry button.
  3. Provide a name for your registry in the Name field.
  4. Optionally provide a description about the registry.
  5. Select who can view the registry from the Registry visibility dropdown. See Registry visibility types for more information on registry visibility options.
  6. Select either All types or Specify types from the Accepted artifacts type dropdown.
  7. (If you select Specify types) Add one or more artifact types that your registry accepts.
8. Click on the **Create registry** button.

For example, the preceding image shows a custom registry called “Fine_Tuned_Models” that a user is about to create. The registry is set to Restricted which means that only members that are manually added to the “Fine_Tuned_Models” registry will have access to this registry.

3 - Configure registry access

Registry admins can limit who can access a registry by navigating to a registry’s settings and assigning a user’s role to Admin, Member, or Viewer. Users can have different roles in different registries. For example, a user can have a view role in “Registry A” and a member role in the “Registry B”.

Registry roles permissions

A user within an organization can have different roles, and therefore permissions, for each registry in their organization.

The proceeding table lists the different roles a user can have and their permissions:

Permission Permission Group Viewer Member Admin Owner
View a collection’s details Read X X X X
View a linked artifact’s details Read X X X X
Usage: Consume an artifact in a registry with use_artifact Read X X X X
Download a linked artifact Read X X X X
Download files from an artifact’s file viewer Read X X X X
Search a registry Read X X X X
View a registry’s settings and user list Read X X X X
Create a new automation for a collection Create X X X
Turn on Slack notifications for new version being added Create X X X
Create a new collection Create X X X
Create a new custom registry Create X X X
Edit collection card (description) Update X X X
Edit linked artifact description Update X X X
Add or delete a collection’s tag Update X X X
Add or delete an alias from a linked artifact Update X X X
Link a new artifact Update X X X
Edit allowed types list for a registry Update X X X
Edit custom registry name Update X X X
Delete a collection Delete X X X
Delete an automation Delete X X X
Unlink an artifact from a registry Delete X X X
Edit accepted artifact types for a registry Admin X X
Change registry visibility (Organization or Restricted) Admin X X
Add users to a registry Admin X X
Assign or change a user’s role in a registry Admin X X

Configure user roles in a registry

  1. Navigate to the Registry App in the W&B App UI.
  2. Select the registry you want to configure.
  3. Click on the gear icon on the upper right hand corner.
  4. Scroll to the Registry members and roles section.
  5. Within the Member field, search for the user you want to edit permissions for.
  6. Click on the user’s role within the Registry role column.
  7. From the dropdown, select the role you want to assign to the user.

Remove a user from a registry

  1. Navigate to the Registry App in the W&B App UI.
  2. Select a core or custom registry.
  3. Click on the gear icon on the upper right hand corner.
  4. Scroll to the Registry members and roles section and type in the username of the member you want to remove.
  5. Click the Delete button.

Registry visibility types

There are two registry visibility types: restricted or organization visibility. The following table describes who has access to the registry by default:

Visibility Description Default role Example
Organization Everyone in the org can access the registry. By default, organization administrators are an admin for the registry. All other users are a viewer in the registry by default. Core registry
Restricted Only invited org members can access the registry. The user who created the restricted registry is the only user in the registry by default, and is the organization’s owner. Custom registry or core registry

Restrict visibility to a registry

Restrict who can view and access a custom registry. You can restrict visibility to a registry when you create a custom registry or after you create a custom registry. A custom registry can have either restricted or organization visibility. For more information on registry visibilities, see Registry visibility types.

The following steps describe how to restrict the visibility of a custom registry that already exists:

  1. Navigate to the Registry App in the W&B App UI.
  2. Select a registry.
  3. Click on the gear icon on the upper right hand corner.
  4. From the Registry visibility dropdown, select the desired registry visibility.

Continue if you select Restricted visibility:

  1. Add members of your organization that you want to have access to this registry. Scroll to the Registry members and roles section and click on the Add member button.
  2. Within the Member field, add the email or username of the member you want to add.
  3. Click Add new member.

4 - Create a collection

A collection is a set of linked artifact versions within a registry. Each collection represents a distinct task or use case.

For example, within the core Dataset registry you might have multiple collections. Each collection contains a different dataset such as MNIST, CIFAR-10, or ImageNet.

As another example, you might have a registry called “chatbot” that contains a collection for model artifacts, another collection for dataset artifacts, and another collection for fine-tuned model artifacts.

How you organize a registry and their collections is up to you.

Collection types

Each collection accepts one, and only one, type of artifact. The type you specify restricts what sort of artifacts you, and other members of your organization, can link to that collection.

For example, suppose you create a collection that accepts “dataset” artifact types. This means that you can only link future artifact versions that have the type “dataset” to this collection. Similarly, you can only link artifacts of type “model” to a collection that accepts only model artifact types.

When you create a collection, you can select from a list of predefined artifact types. The artifact types available to you depend on the registry that the collection belongs to. .

Before you link an artifact to a collection or create a new collection, investigate the types of artifacts that collection accepts.

Check the types of artifact that a collection accepts

Before you link to a collection, inspect the artifact type that the collection accepts. You can inspect the artifact types that collection accepts programmatically with the W&B Python SDK or interactively with the W&B App

You can find the accepted artifact types on the registry card on the homepage or within a registry’s settings page.

For both methods, first navigate to your W&B Registry App.

Within the homepage of the Registry App, you can view the accepted artifact types by scrolling to the registry card of that registry. The gray horizontal ovals within the registry card lists the artifact types that registry accepts.

For example, the preceding image shows multiple registry cards on the Registry App homepage. Within the Model registry card, you can see two artifact types: model and model-new.

To view accepted artifact types within a registry’s settings page:

  1. Click on the registry card you want to view the settings for.
  2. Click on the gear icon in the upper right corner.
  3. Scroll to the Accepted artifact types field.

Programmatically view the artifact types that a registry accepts with the W&B Python SDK:

import wandb

registry_name = "<registry_name>"
artifact_types = wandb.Api().project(name=f"wandb-registry-{registry_name}").artifact_types()
print(artifact_type.name for artifact_type in artifact_types)

Once you know what type of artifact a collection accepts, you can create a collection.

Create a collection

Interactively or programmatically create a collection within a registry. You can not change the type of artifact that a collection accepts after you create it.

Programmatically create a collection

Use the wandb.init.link_artifact() method to link an artifact to a collection. Specify both the collection and the registry to the target_path field as a path that takes the form of:

f"wandb-registry-{registry_name}/{collection_name}"

Where registry_name is the name of the registry and collection_name is the name of the collection. Ensure to append the prefix wandb-registry- to the registry name.

The proceeding code snippet shows how to programmatically create a collection. Ensure to replace other the values enclosed in <> with your own:

import wandb

# Initialize a run
run = wandb.init(entity = "<team_entity>", project = "<project>")

# Create an artifact object
artifact = wandb.Artifact(
  name = "<artifact_name>",
  type = "<artifact_type>"
  )

registry_name = "<registry_name>"
collection_name = "<collection_name>"
target_path = f"wandb-registry-{registry_name}/{collection_name}"

# Link the artifact to a collection
run.link_artifact(artifact = artifact, target_path = target_path)

run.finish()

Interactively create a collection

The following steps describe how to create a collection within a registry using the W&B Registry App UI:

  1. Navigate to the Registry App in the W&B App UI.
  2. Select a registry.
  3. Click on the Create collection button in the upper right hand corner.
  4. Provide a name for your collection in the Name field.
  5. Select a type from the Type dropdown. Or, if the registry enables custom artifact types, provide one or more artifact types that this collection accepts.
  6. Optionally provide a description of your collection in the Description field.
  7. Optionally add one or more tags in the Tags field.
  8. Click Link version.
  9. From the Project dropdown, select the project where your artifact is stored.
  10. From the Artifact collection dropdown, select your artifact.
  11. From the Version dropdown, select the artifact version you want to link to your collection.
  12. Click on the Create collection button.

5 - Link an artifact version to a registry

Link artifact versions to a collection to make them available to other members in your organization.

When you link an artifact to a registry, this “publishes” that artifact to that registry. Any user that has access to that registry can access the linked artifact versions in the collection.

In other words, linking an artifact to a registry collection brings that artifact version from a private, project-level scope, to a shared organization level scope.

Link an artifact version to a collection interactively or programmatically.

Based on your use case, follow the instructions described in the tabs below to link an artifact version.

Programmatically link an artifact version to a collection with wandb.init.Run.link_artifact().

Use the target_path parameter to specify the collection and registry you want to link the artifact version to. The target path consists of the prefix “wandb-registry”, the name of the registry, and the name of the collection separated by a forward slashes:

wandb-registry-{REGISTRY_NAME}/{COLLECTION_NAME}

Copy and paste the code snippet below to link an artifact version to a collection within an existing registry. Replace values enclosed in <> with your own:

import wandb

# Initialize a run
run = wandb.init(
  entity = "<team_entity>",
  project = "<project_name>"
)

# Create an artifact object
# The type parameter specifies both the type of the 
# artifact object and the collection type
artifact = wandb.Artifact(name = "<name>", type = "<type>")

# Add the file to the artifact object. 
# Specify the path to the file on your local machine.
artifact.add_file(local_path = "<local_path_to_artifact>")

# Specify the collection and registry to link the artifact to
REGISTRY_NAME = "<registry_name>"  
COLLECTION_NAME = "<collection_name>"
target_path=f"wandb-registry-{REGISTRY_NAME}/{COLLECTION_NAME}"

# Link the artifact to the collection
run.link_artifact(artifact = artifact, target_path = target_path)
  1. Navigate to the Registry App.
  2. Hover your mouse next to the name of the collection you want to link an artifact version to.
  3. Select the meatball menu icon (three horizontal dots) next to View details.
  4. From the dropdown, select Link new version.
  5. From the sidebar that appears, select the name of a team from the Team dropdown.
  6. From the Project dropdown, select the name of the project that contains your artifact.
  7. From the Artifact dropdown, select the name of the artifact.
  8. From the Version dropdown, select the artifact version you want to link to the collection.
  1. Navigate to your project’s artifact browser on the W&B App at: https://wandb.ai/<entity>/<project>/artifacts
  2. Select the Artifacts icon on the left sidebar.
  3. Click on the artifact version you want to link to your registry.
  4. Within the Version overview section, click the Link to registry button.
  5. From the modal that appears on the right of the screen, select an artifact from the Select a register model menu dropdown.
  6. Click Next step.
  7. (Optional) Select an alias from the Aliases dropdown.
  8. Click Link to registry.

View a linked artifact’s metadata, version data, usage, lineage information and more in the Registry App.

View linked artifacts in a registry

View information about linked artifacts such as metadata, lineage, and usage information in the Registry App.

  1. Navigate to the Registry App.
  2. Select the name of the registry that you linked the artifact to.
  3. Select the name of the collection.
  4. From the list of artifact versions, select the version you want to access. Version numbers are incrementally assigned to each linked artifact version starting with v0.

Once you select an artifact version, you can view that version’s metadata, lineage, and usage information.

Make note of the Full Name field within the Version tab. The full name of a linked artifact consists of the registry, collection name, and the alias or index of the artifact version.

wandb-registry-{REGISTRY_NAME}/{COLLECTION_NAME}:v{INTEGER}

You need the full name of a linked artifact to access the artifact version programmatically.

Troubleshooting

Below are some common things to double check if you are not able to link an artifact.

Logging artifacts from a personal account

Artifacts logged to W&B with a personal entity can not be linked to the registry. Make sure that you log artifacts using a team entity within your organization. Only artifacts logged within an organization’s team can be linked to the organization’s registry.

Find your team entity

W&B uses the name of your team as the team’s entity. For example, if your team is called team-awesome, your team entity is team-awesome.

You can confirm the name of your team by:

  1. Navigate to your team’s W&B profile page.
  2. Copy the site’s URL. It has the form of https://wandb.ai/<team>. Where <team> is the both the name of your team and the team’s entity.

Log from a team entity

  1. Specify the team as the entity when you initialize a run with wandb.init(). If you do not specify the entity when you initialize a run, the run uses your default entity which may or may not be your team entity.
import wandb   

run = wandb.init(
  entity='<team_entity>', 
  project='<project_name>'
  )
  1. Log the artifact to the run either with run.log_artifact or by creating an Artifact object and then adding files to it with :

    artifact = wandb.Artifact(name="<artifact_name>", type="<type>")
    

    For more information on how to log artifacts, see Construct artifacts.

  2. If an artifact is logged to your personal entity, you will need to re-log it to an entity within your organization.

Confirm the path of a registry in the W&B App UI

There are two ways to confirm the path of a registry with the UI: create an empty collection and view the collection details or copy and paste the autogenerated code on the collection’s home page.

Copy and paste autogenerated code

  1. Navigate to the Registry app at https://wandb.ai/registry/.
  2. Click the registry you want to link an artifact to.
  3. At the top of the page, you will see an autogenerated code block.
  4. Copy and paste this into your code, ensure to replace the last part of the path with the name of your collection.

Create an empty collection

  1. Navigate to the Registry app at https://wandb.ai/registry/.
  2. Click the registry you want to link an artifact to.
  3. Click on the empty collection. If an empty collection does not exist, create a new collection.
  4. Within the code snippet that appears, identify the target_path field within .link_artifact().
  5. (Optional) Delete the collection.

For example, after completing the steps outlined, you find the code block with the target_path parameter:

target_path = 
      "smle-registries-bug-bash/wandb-registry-Golden Datasets/raw_images"

Breaking this down into its components, you can see what you will need to use to create the path to link your artifact programmatically:

ORG_ENTITY_NAME = "smle-registries-bug-bash"
REGISTRY_NAME = "Golden Datasets"
COLLECTION_NAME = "raw_images"

6 - Download an artifact from a registry

Use the W&B Python SDK to download an artifact linked to a registry. To download and use an artifact, you need to know the name of the registry, the name of the collection, and the alias or index of the artifact version you want to download.

Once you know the properties of the artifact, you can construct the path to the linked artifact and download the artifact. Alternatively, you can copy and paste a pre-generated code snippet from the W&B App UI to download an artifact linked to a registry.

Construct path to linked artifact

To download an artifact linked to a registry, you must know the path of that linked artifact. The path consists of the registry name, collection name, and the alias or index of the artifact version you want to access.

Once you have the registry, collection, and alias or index of the artifact version, you can construct the path to the linked artifact using the proceeding string template:

# Artifact name with version index specified
f"wandb-registry-{REGISTRY}/{COLLECTION}:v{INDEX}"

# Artifact name with alias specified
f"wandb-registry-{REGISTRY}/{COLLECTION}:{ALIAS}"

Replace the values within the curly braces {} with the name of the registry, collection, and the alias or index of the artifact version you want to access.

Use the wandb.init.use_artifact method to access the artifact and download its contents once you have the path of the linked artifact. The proceeding code snippet shows how to use and download an artifact linked to the W&B Registry. Ensure to replace values within <> with your own:

import wandb

REGISTRY = '<registry_name>'
COLLECTION = '<collection_name>'
ALIAS = '<artifact_alias>'

run = wandb.init(
   entity = '<team_name>',
   project = '<project_name>'
   )  

artifact_name = f"wandb-registry-{REGISTRY}/{COLLECTION}:{ALIAS}"
# artifact_name = '<artifact_name>' # Copy and paste Full name specified on the Registry App
fetched_artifact = run.use_artifact(artifact_or_name = artifact_name)  
download_path = fetched_artifact.download()  

The .use_artifact() method both creates a run and marks the artifact you download as the input to that run. Marking an artifact as the input to a run enables W&B to track the lineage of that artifact.

If you do not want to create a run, you can use the wandb.Api() object to access the artifact:

import wandb

REGISTRY = "<registry_name>"
COLLECTION = "<collection_name>"
VERSION = "<version>"

api = wandb.Api()
artifact_name = f"wandb-registry-{REGISTRY}/{COLLECTION}:{VERSION}"
artifact = api.artifact(name = artifact_name)
Example: Use and download an artifact linked to the W&B Registry

The proceeding code example shows how a user can download an artifact linked to a collection called phi3-finetuned in the Fine-tuned Models registry. The alias of the artifact version is set to production.

import wandb

TEAM_ENTITY = "product-team-applications"
PROJECT_NAME = "user-stories"

REGISTRY = "Fine-tuned Models"
COLLECTION = "phi3-finetuned"
ALIAS = 'production'

# Initialize a run inside the specified team and project
run = wandb.init(entity=TEAM_ENTITY, project = PROJECT_NAME)

artifact_name = f"wandb-registry-{REGISTRY}/{COLLECTION}:{ALIAS}"

# Access an artifact and mark it as input to your run for lineage tracking
fetched_artifact = run.use_artifact(artifact_or_name = name)  

# Download artifact. Returns path to downloaded contents
downloaded_path = fetched_artifact.download()  

See use_artifact and Artifact.download() in the API Reference guide for more information on possible parameters and return type.

Copy and paste pre-generated code snippet

W&B creates a code snippet that you can copy and paste into your Python script, notebook, or terminal to download an artifact linked to a registry.

  1. Navigate to the Registry App.
  2. Select the name of the registry that contains your artifact.
  3. Select the name of the collection.
  4. From the list of artifact versions, select the version you want to access.
  5. Select the Usage tab.
  6. Copy the code snippet shown in the Usage API section.
  7. Paste the code snippet into your Python script, notebook, or terminal.

7 - Organize versions with tags

Use tags to organize collections or artifact versions within collections. You can add, remove, edit tags with the Python SDK or W&B App UI.

Create and add tags to organize your collections or artifact versions within your registry. Add, modify, view, or remove tags to a collection or artifact version with the W&B App UI or the W&B Python SDK.

Add a tag to a collection

Use the W&B App UI or Python SDK to add a tag to a collection:

Use the W&B App UI to add a tag to a collection:

  1. Navigate to the W&B Registry at https://wandb.ai/registry
  2. Click on a registry card
  3. Click View details next to the name of a collection
  4. Within the collection card, click on the plus icon (+) next to the Tags field and type in the name of the tag
  5. Press Enter on your keyboard
import wandb

COLLECTION_TYPE = "<collection_type>"
ORG_NAME = "<org_name>"
REGISTRY_NAME = "<registry_name>"
COLLECTION_NAME = "<collection_name>"

full_name = f"{ORG_NAME}/wandb-registry-{REGISTRY_NAME}/{COLLECTION_NAME}"

collection = wandb.Api().artifact_collection(
  type_name = COLLECTION_TYPE, 
  name = full_name
  )

collection.tags = ["your-tag"]
collection.save()

Update tags that belong to a collection

Update a tag programmatically by reassigning or by mutating the tags attribute. W&B recommends, and it is good Python practice, that you reassign the tags attribute instead of in-place mutation.

For example, the proceeding code snippet shows common ways to update a list with reassignment. For brevity, we continue the code example from the Add a tag to a collection section:

collection.tags = [*collection.tags, "new-tag", "other-tag"]
collection.tags = collection.tags + ["new-tag", "other-tag"]

collection.tags = set(collection.tags) - set(tags_to_delete)
collection.tags = []  # deletes all tags

The following code snippet shows how you can use in-place mutation to update tags that belong to an artifact version:

collection.tags += ["new-tag", "other-tag"]
collection.tags.append("new-tag")

collection.tags.extend(["new-tag", "other-tag"])
collection.tags[:] = ["new-tag", "other-tag"]
collection.tags.remove("existing-tag")
collection.tags.pop()
collection.tags.clear()

View tags that belong to a collection

Use the W&B App UI to view tags added to a collection:

  1. Navigate to the W&B Registry at https://wandb.ai/registry
  2. Click on a registry card
  3. Click View details next to the name of a collection

If a collection has one or more tags, you can view those tags within the collection card next to the Tags field.

Tags added to a collection also appear next to the name of that collection.

For example, in the proceeding image, a tag called “tag1” was added to the “zoo-dataset-tensors” collection.

Remove a tag from a collection

Use the W&B App UI to remove a tag from a collection:

  1. Navigate to the W&B Registry at https://wandb.ai/registry
  2. Click on a registry card
  3. Click View details next to the name of a collection
  4. Within the collection card, hover your mouse over the name of the tag you want to remove
  5. Click on the cancel button (X icon)

Add a tag to an artifact version

Add a tag to an artifact version linked to a collection with the W&B App UI or with the Python SDK.

  1. Navigate to the W&B Registry at https://wandb.ai/registry
  2. Click on a registry card
  3. Click View details next to the name of the collection you want to add a tag to
  4. Scroll down to Versions
  5. Click View next to an artifact version
  6. Within the Version tab, click on the plus icon (+) next to the Tags field and type in the name of the tag
  7. Press Enter on your keyboard

Fetch the artifact version you want to add or update a tag to. Once you have the artifact version, you can access the artifact object’s tag attribute to add or modify tags to that artifact. Pass in one or more tags as list to the artifacts tag attribute.

Like other artifacts, you can fetch an artifact from W&B without creating a run or you can create a run and fetch the artifact within that run. In either case, ensure to call the artifact object’s save method to update the artifact on the W&B servers.

Copy and paste an appropriate code cells below to add or modify an artifact version’s tag. Replace the values in <> with your own.

The proceeding code snippet shows how to fetch an artifact and add a tag without creating a new run:

import wandb

ARTIFACT_TYPE = "<TYPE>"
ORG_NAME = "<org_name>"
REGISTRY_NAME = "<registry_name>"
COLLECTION_NAME = "<collection_name>"
VERSION = "<artifact_version>"

artifact_name = f"{ORG_NAME}/wandb-registry-{REGISTRY_NAME}/{COLLECTION_NAME}:v{VERSION}"

artifact = wandb.Api().artifact(name = artifact_name, type = ARTIFACT_TYPE)
artifact.tags = ["tag2"] # Provide one or more tags in a list
artifact.save()

The proceeding code snippet shows how to fetch an artifact and add a tag by creating a new run:

import wandb

ORG_NAME = "<org_name>"
REGISTRY_NAME = "<registry_name>"
COLLECTION_NAME = "<collection_name>"
VERSION = "<artifact_version>"

run = wandb.init(entity = "<entity>", project="<project>")

artifact_name = f"{ORG_NAME}/wandb-registry-{REGISTRY_NAME}/{COLLECTION_NAME}:v{VERSION}"

artifact = run.use_artifact(artifact_or_name = artifact_name)
artifact.tags = ["tag2"] # Provide one or more tags in a list
artifact.save()

Update tags that belong to an artifact version

Update a tag programmatically by reassigning or by mutating the tags attribute. W&B recommends, and it is good Python practice, that you reassign the tags attribute instead of in-place mutation.

For example, the proceeding code snippet shows common ways to update a list with reassignment. For brevity, we continue the code example from the Add a tag to an artifact version section:

artifact.tags = [*artifact.tags, "new-tag", "other-tag"]
artifact.tags = artifact.tags + ["new-tag", "other-tag"]

artifact.tags = set(artifact.tags) - set(tags_to_delete)
artifact.tags = []  # deletes all tags

The following code snippet shows how you can use in-place mutation to update tags that belong to an artifact version:

artifact.tags += ["new-tag", "other-tag"]
artifact.tags.append("new-tag")

artifact.tags.extend(["new-tag", "other-tag"])
artifact.tags[:] = ["new-tag", "other-tag"]
artifact.tags.remove("existing-tag")
artifact.tags.pop()
artifact.tags.clear()

View tags that belong to an artifact version

View tags that belong to an artifact version that is linked to a registry with the W&B App UI or with the Python SDK.

  1. Navigate to the W&B Registry at https://wandb.ai/registry
  2. Click on a registry card
  3. Click View details next to the name of the collection you want to add a tag to
  4. Scroll down to Versions section

If an artifact version has one or more tags, you can view those tags within the Tags column.

Fetch the artifact version to view its tags. Once you have the artifact version, you can view tags that belong to that artifact by viewing the artifact object’s tag attribute.

Like other artifacts, you can fetch an artifact from W&B without creating a run or you can create a run and fetch the artifact within that run.

Copy and paste an appropriate code cells below to add or modify an artifact version’s tag. Replace the values in <> with your own.

The proceeding code snippet shows how to fetch and view an artifact version’s tags without creating a new run:

import wandb

ARTIFACT_TYPE = "<TYPE>"
ORG_NAME = "<org_name>"
REGISTRY_NAME = "<registry_name>"
COLLECTION_NAME = "<collection_name>"
VERSION = "<artifact_version>"

artifact_name = f"{ORG_NAME}/wandb-registry-{REGISTRY_NAME}/{COLLECTION_NAME}:v{VERSION}"

artifact = wandb.Api().artifact(name = artifact_name, type = artifact_type)
print(artifact.tags)

The proceeding code snippet shows how to fetch and view artifact version’s tags by creating a new run:

import wandb

ORG_NAME = "<org_name>"
REGISTRY_NAME = "<registry_name>"
COLLECTION_NAME = "<collection_name>"
VERSION = "<artifact_version>"

run = wandb.init(entity = "<entity>", project="<project>")

artifact_name = f"{ORG_NAME}/wandb-registry-{REGISTRY_NAME}/{COLLECTION_NAME}:v{VERSION}"

artifact = run.use_artifact(artifact_or_name = artifact_name)
print(artifact.tags)

Remove a tag from an artifact version

  1. Navigate to the W&B Registry at https://wandb.ai/registry
  2. Click on a registry card
  3. Click View details next to the name of the collection you want to add a tag to
  4. Scroll down to Versions
  5. Click View next to an artifact version
  6. Within the Version tab, hover your mouse over the name of the tag
  7. Click on the cancel button (X icon)

Search existing tags

Use the W&B App UI to search existing tags in collections and artifact versions:

  1. Navigate to the W&B Registry at https://wandb.ai/registry
  2. Click on a registry card
  3. Within the search bar, type in the name of a tag

Find artifact versions with a specific tag

Use the W&B Python SDK to find artifact versions that have a set of tags:

import wandb

api = wandb.Api()
tagged_artifact_versions = api.artifacts(
    type_name = "<artifact_type>",
    name = "<artifact_name>",
    tags = ["<tag_1>", "<tag_2>"]
)

for artifact_version in tagged_artifact_versions:
    print(artifact_version.tags)

8 - Migrate from legacy Model Registry

W&B will transition assets from the legacy W&B Model Registry to the new W&B Registry. This migration will be fully managed and triggered by W&B, requiring no intervention from users. The process is designed to be as seamless as possible, with minimal disruption to existing workflows.

The transition will take place once the new W&B Registry includes all the functionalities currently available in the Model Registry. W&B will attempt to preserve current workflows, codebases, and references.

This guide is a living document and will be updated regularly as more information becomes available. For any questions or support, contact support@wandb.com.

How W&B Registry differs from the legacy Model Registry

W&B Registry introduces a range of new features and enhancements designed to provide a more robust and flexible environment for managing models, datasets, and other artifacts.

Organizational visibility

Artifacts linked to the legacy Model Registry have team level visibility. This means that only members of your team can view your artifacts in the legacy W&B Model Registry. W&B Registry has organization level visibility. This means that members across an organization, with correct permissions, can view artifacts linked to a registry.

Restrict visibility to a registry

Restrict who can view and access a custom registry. You can restrict visibility to a registry when you create a custom registry or after you create a custom registry. In a Restricted registry, only selected members can access the content, maintaining privacy and control. For more information about registry visibility, see Registry visibility types.

Create custom registries

Unlike the legacy Model Registry, W&B Registry is not limited to models or dataset registries. You can create custom registries tailored to specific workflows or project needs, capable of holding any arbitrary object type. This flexibility allows teams to organize and manage artifacts according to their unique requirements. For more information on how to create a custom registry, see Create a custom registry.

Custom access control

Each registry supports detailed access control, where members can be assigned specific roles such as Admin, Member, or Viewer. Admins can manage registry settings, including adding or removing members, setting roles, and configuring visibility. This ensures that teams have the necessary control over who can view, manage, and interact with the artifacts in their registries.

Terminology update

Registered models are now referred to as collections.

Summary of changes

Legacy W&B Model Registry W&B Registry
Artifact visibility Only members of team can view or access artifacts Members in your organization, with correct permissions, can view or access artifacts linked to a registry
Custom access control Not available Available
Custom registry Not available Available
Terminology update A set of pointers (links) to model versions are called registered models. A set of pointers (links) to artifact versions are called collections.
wandb.init.link_model Model Registry specific API Currently only compatible with legacy model registry

Preparing for the migration

W&B will migrate registered models (now called collections) and associated artifact versions from the legacy Model Registry to the W&B Registry. This process will be conducted automatically, with no action required from users.

Team visibility to organization visibility

After the migration, your model registry will have organization level visibility. You can restrict who has access to a registry by assigning roles. This helps ensure that only specific members have access to specific registries.

The migration will preserve existing permission boundaries of your current team-level registered models (soon to be called collections) in the legacy W&B Model Registry. Permissions currently defined in the legacy Model Registry will be preserved in the new Registry. This means that collections currently restricted to specific team members will remain protected during and after the migration.

Artifact path continuity

No action is currently required.

During the migration

W&B will initiate the migration process. The migration will occur during a time window that minimizes disruption to W&B services. The legacy Model Registry will transition to a read-only state once the migration begins and will remain accessible for reference.

After the migration

Post-migration, collections, artifact versions, and associated attributes will be fully accessible within the new W&B Registry. The focus is on ensuring that current workflows remain intact, with ongoing support available to help navigate any changes.

Using the new registry

Users are encouraged to explore the new features and capabilities available in the W&B Registry. The Registry will not only support the functionalities currently relied upon but also introduces enhancements such as custom registries, improved visibility, and flexible access controls.

Support is available if you are interested in trying the W&B Registry early, or for new users that prefer to start with Registry and not the legacy W&B Model Registry. Contact support@wandb.com or your Sales MLE to enable this functionality. Note that any early migration will be into a BETA version. The BETA version of W&B Registry might not have all the functionality or features of the legacy Model Registry.

For more details and to learn about the full range of features in the W&B Registry, visit the W&B Registry Guide.

FAQs

Why is W&B migrating assets from Model Registry to W&B Registry?

W&B is evolving its platform to offer more advanced features and capabilities with the new Registry. This migration is a step towards providing a more integrated and powerful toolset for managing models, datasets, and other artifacts.

What needs to be done before the migration?

No action is required from users before the migration. W&B will handle the transition, ensuring that workflows and references are preserved.

Will access to model artifacts be lost?

No, access to model artifacts will be retained after the migration. The legacy Model Registry will remain in a read-only state, and all relevant data will be migrated to the new Registry.

Yes, important metadata related to artifact creation, lineage, and other attributes will be preserved during the migration. Users will continue to have access to all relevant metadata after the migration, ensuring that the integrity and traceability of their artifacts remain intact.

Who do I contact if I need help?

Support is available for any questions or concerns. Reach out to support@wandb.com for assistance.

9 - Model registry

Model registry to manage the model lifecycle from training to production

The W&B Model Registry houses a team’s trained models where ML Practitioners can publish candidates for production to be consumed by downstream teams and stakeholders. It is used to house staged/candidate models and manage workflows associated with staging.

With W&B Model Registry, you can:

How it works

Track and manage your staged models with a few simple steps.

  1. Log a model version: In your training script, add a few lines of code to save the model files as an artifact to W&B.
  2. Compare performance: Check live charts to compare the metrics and sample predictions from model training and validation. Identify which model version performed the best.
  3. Link to registry: Bookmark the best model version by linking it to a registered model, either programmatically in Python or interactively in the W&B UI.

The following code snippet demonstrates how to log and link a model to the Model Registry:

import wandb
import random

# Start a new W&B run
run = wandb.init(project="models_quickstart")

# Simulate logging model metrics
run.log({"acc": random.random()})

# Create a simulated model file
with open("my_model.h5", "w") as f:
    f.write("Model: " + str(random.random()))

# Log and link the model to the Model Registry
run.link_model(path="./my_model.h5", registered_model_name="MNIST")

run.finish()
  1. Connect model transitions to CI/DC workflows: transition candidate models through workflow stages and automate downstream actions with webhooks or jobs.

How to get started

Depending on your use case, explore the following resources to get started with W&B Models:

9.1 - Tutorial: Use W&B for model management

Learn how to use W&B for Model Management

The following walkthrough shows you how to log a model to W&B. By the end of the walkthrough you will:

  • Create and train a model with the MNIST dataset and the Keras framework.
  • Log the model that you trained to a W&B project
  • Mark the dataset used as a dependency to the model you created
  • Link the model to the W&B Registry.
  • Evaluate the performance of the model you link to the registry
  • Mark a model version ready for production.

Setting up

Before you get started, import the Python dependencies required for this walkthrough:

import wandb
import numpy as np
from tensorflow import keras
from tensorflow.keras import layers
from wandb.integration.keras import WandbMetricsLogger
from sklearn.model_selection import train_test_split

Provide your W&B entity to the entity variable:

entity = "<entity>"

Create a dataset artifact

First, create a dataset. The proceeding code snippet creates a function that downloads the MNIST dataset:

def generate_raw_data(train_size=6000):
    eval_size = int(train_size / 6)
    (x_train, y_train), (x_eval, y_eval) = keras.datasets.mnist.load_data()

    x_train = x_train.astype("float32") / 255
    x_eval = x_eval.astype("float32") / 255
    x_train = np.expand_dims(x_train, -1)
    x_eval = np.expand_dims(x_eval, -1)

    print("Generated {} rows of training data.".format(train_size))
    print("Generated {} rows of eval data.".format(eval_size))

    return (x_train[:train_size], y_train[:train_size]), (
        x_eval[:eval_size],
        y_eval[:eval_size],
    )

# Create dataset
(x_train, y_train), (x_eval, y_eval) = generate_raw_data()

Next, upload the dataset to W&B. To do this, create an artifact object and add the dataset to that artifact.

project = "model-registry-dev"

model_use_case_id = "mnist"
job_type = "build_dataset"

# Initialize a W&B run
run = wandb.init(entity=entity, project=project, job_type=job_type)

# Create W&B Table for training data
train_table = wandb.Table(data=[], columns=[])
train_table.add_column("x_train", x_train)
train_table.add_column("y_train", y_train)
train_table.add_computed_columns(lambda ndx, row: {"img": wandb.Image(row["x_train"])})

# Create W&B Table for eval data
eval_table = wandb.Table(data=[], columns=[])
eval_table.add_column("x_eval", x_eval)
eval_table.add_column("y_eval", y_eval)
eval_table.add_computed_columns(lambda ndx, row: {"img": wandb.Image(row["x_eval"])})

# Create an artifact object
artifact_name = "{}_dataset".format(model_use_case_id)
artifact = wandb.Artifact(name=artifact_name, type="dataset")

# Add wandb.WBValue obj to the artifact.
artifact.add(train_table, "train_table")
artifact.add(eval_table, "eval_table")

# Persist any changes made to the artifact.
artifact.save()

# Tell W&B this run is finished.
run.finish()

Train a model

Train a model with the artifact dataset you created in the previous step.

Declare dataset artifact as an input to the run

Declare the dataset artifact you created in a previous step as the input to the W&B run. This is particularly useful in the context of logging models because declaring an artifact as an input to a run lets you track the dataset (and the version of the dataset) used to train a specific model. W&B uses the information collected to create a lineage map.

Use the use_artifact API to both declare the dataset artifact as the input of the run and to retrieve the artifact itself.

job_type = "train_model"
config = {
    "optimizer": "adam",
    "batch_size": 128,
    "epochs": 5,
    "validation_split": 0.1,
}

# Initialize a W&B run
run = wandb.init(project=project, job_type=job_type, config=config)

# Retrieve the dataset artifact
version = "latest"
name = "{}:{}".format("{}_dataset".format(model_use_case_id), version)
artifact = run.use_artifact(artifact_or_name=name)

# Get specific content from the dataframe
train_table = artifact.get("train_table")
x_train = train_table.get_column("x_train", convert_to="numpy")
y_train = train_table.get_column("y_train", convert_to="numpy")

For more information about tracking the inputs and output of a model, see Create model lineage map.

Define and train model

For this walkthrough, define a 2D Convolutional Neural Network (CNN) with Keras to classify images from the MNIST dataset.

Train CNN on MNIST data
# Store values from our config dictionary into variables for easy accessing
num_classes = 10
input_shape = (28, 28, 1)
loss = "categorical_crossentropy"
optimizer = run.config["optimizer"]
metrics = ["accuracy"]
batch_size = run.config["batch_size"]
epochs = run.config["epochs"]
validation_split = run.config["validation_split"]

# Create model architecture
model = keras.Sequential(
    [
        layers.Input(shape=input_shape),
        layers.Conv2D(32, kernel_size=(3, 3), activation="relu"),
        layers.MaxPooling2D(pool_size=(2, 2)),
        layers.Conv2D(64, kernel_size=(3, 3), activation="relu"),
        layers.MaxPooling2D(pool_size=(2, 2)),
        layers.Flatten(),
        layers.Dropout(0.5),
        layers.Dense(num_classes, activation="softmax"),
    ]
)
model.compile(loss=loss, optimizer=optimizer, metrics=metrics)

# Generate labels for training data
y_train = keras.utils.to_categorical(y_train, num_classes)

# Create training and test set
x_t, x_v, y_t, y_v = train_test_split(x_train, y_train, test_size=0.33)

Next, train the model:

# Train the model
model.fit(
    x=x_t,
    y=y_t,
    batch_size=batch_size,
    epochs=epochs,
    validation_data=(x_v, y_v),
    callbacks=[WandbCallback(log_weights=True, log_evaluation=True)],
)

Finally, save the model locally on your machine:

# Save model locally
path = "model.h5"
model.save(path)

Use the link_model API to log model one ore more files to a W&B run and link it to the W&B Model Registry.

path = "./model.h5"
registered_model_name = "MNIST-dev"

run.link_model(path=path, registered_model_name=registered_model_name)
run.finish()

W&B creates a registered model for you if the name you specify for registered-model-name does not already exist.

See link_model in the API Reference guide for more information on optional parameters.

Evaluate the performance of a model

It is common practice to evaluate the performance of a one or more models.

First, get the evaluation dataset artifact stored in W&B in a previous step.

job_type = "evaluate_model"

# Initialize a run
run = wandb.init(project=project, entity=entity, job_type=job_type)

model_use_case_id = "mnist"
version = "latest"

# Get dataset artifact, mark it as a dependency
artifact = run.use_artifact(
    "{}:{}".format("{}_dataset".format(model_use_case_id), version)
)

# Get desired dataframe
eval_table = artifact.get("eval_table")
x_eval = eval_table.get_column("x_eval", convert_to="numpy")
y_eval = eval_table.get_column("y_eval", convert_to="numpy")

Download the model version from W&B that you want to evaluate. Use the use_model API to access and download your model.

alias = "latest"  # alias
name = "mnist_model"  # name of the model artifact

# Access and download model. Returns path to downloaded artifact
downloaded_model_path = run.use_model(name=f"{name}:{alias}")

Load the Keras model and compute the loss:

model = keras.models.load_model(downloaded_model_path)

y_eval = keras.utils.to_categorical(y_eval, 10)
(loss, _) = model.evaluate(x_eval, y_eval)
score = (loss, _)

Finally, log the loss metric to the W&B run:

# # Log metrics, images, tables, or any data useful for evaluation.
run.log(data={"loss": (loss, _)})

Promote a model version

Mark a model version ready for the next stage of your machine learning workflow with a model alias. Each registered model can have one or more model aliases. A model alias can only belong to a single model version at a time.

For example, suppose that after evaluating a model’s performance, you are confident that the model is ready for production. To promote that model version, add the production alias to that specific model version.

You can add an alias to a model version interactively with the W&B App UI or programmatically with the Python SDK. The following steps show how to add an alias with the W&B Model Registry App:

  1. Navigate to the Model Registry App at https://wandb.ai/registry/model.
  2. Click View details next to the name of your registered model.
  3. Within the Versions section, click the View button next to the name of the model version you want to promote.
  4. Next to the Aliases field, click the plus icon (+).
  5. Type in production into the field that appears.
  6. Press Enter on your keyboard.

9.2 - Model Registry Terms and Concepts

Model Registry terms and concepts

The following terms describe key components of the W&B Model Registry: model version, model artifact, and registered model.

Model version

A model version represents a single model checkpoint. Model versions are a snapshot at a point in time of a model and its files within an experiment.

A model version is an immutable directory of data and metadata that describes a trained model. W&B suggests that you add files to your model version that let you store (and restore) your model architecture and learned parameters at a later date.

A model version belongs to one, and only one, model artifact. A model version can belong to zero or more, registered models. Model versions are stored in a model artifact in the order they are logged to the model artifact. W&B automatically creates a new model version if it detects that a model you log (to the same model artifact) has different contents than a previous model version.

Store files within model versions that are produced from the serialization process provided by your modeling library (for example, PyTorch and Keras).

Model alias

Model aliases are mutable strings that allow you to uniquely identify or reference a model version in your registered model with a semantically related identifier. You can only assign an alias to one version of a registered model. This is because an alias should refer to a unique version when used programmatically. It also allows aliases to be used to capture a model’s state (champion, candidate, production).

It is common practice to use aliases such as "best", "latest", "production", or "staging" to mark model versions with special purposes.

For example, suppose you create a model and assign it a "best" alias. You can refer to that specific model with run.use_model

import wandb
run = wandb.init()
name = f"{entity/project/model_artifact_name}:{alias}"
run.use_model(name=name)

Model tags

Model tags are keywords or labels that belong to one or more registered models.

Use model tags to organize registered models into categories and to search over those categories in the Model Registry’s search bar. Model tags appear at the top of the Registered Model Card. You might choose to use them to group your registered models by ML task, owning team, or priority. The same model tag can be added to multiple registered models to allow for grouping.

Model artifact

A model artifact is a collection of logged model versions. Model versions are stored in a model artifact in the order they are logged to the model artifact.

A model artifact can contain one or more model versions. A model artifact can be empty if no model versions are logged to it.

For example, suppose you create a model artifact. During model training, you periodically save your model during checkpoints. Each checkpoint corresponds to its own model version. All of the model versions created during your model training and checkpoint saving are stored in the same model artifact you created at the beginning of your training script.

The proceeding image shows a model artifact that contains three model versions: v0, v1, and v2.

View an example model artifact here.

Registered model

A registered model is a collection of pointers (links) to model versions. You can think of a registered model as a folder of “bookmarks” of candidate models for the same ML task. Each “bookmark” of a registered model is a pointer to a model version that belongs to a model artifact. You can use model tags to group your registered models.

Registered models often represent candidate models for a single modeling use case or task. For example, you might create registered model for different image classification task based on the model you use: ImageClassifier-ResNet50, ImageClassifier-VGG16, DogBreedClassifier-MobileNetV2 and so on. Model versions are assigned version numbers in the order in which they were linked to the registered model.

View an example Registered Model here.

9.3 - Track a model

Track a model, the model’s dependencies, and other information relevant to that model with the W&B Python SDK.

Track a model, the model’s dependencies, and other information relevant to that model with the W&B Python SDK.

Under the hood, W&B creates a lineage of model artifact that you can view with the W&B App UI or programmatically with the W&B Python SDK. See the Create model lineage map for more information.

How to log a model

Use the run.log_model API to log a model. Provide the path where your model files are saved to the path parameter. The path can be a local file, directory, or reference URI to an external bucket such as s3://bucket/path.

Optionally provide a name for the model artifact for the name parameter. If name is not specified, W&B uses the basename of the input path prepended with the run ID.

Copy and paste the proceeding code snippet. Ensure to replace values enclosed in <> with your own.

import wandb

# Initialize a W&B run
run = wandb.init(project="<project>", entity="<entity>")

# Log the model
run.log_model(path="<path-to-model>", name="<name>")
Example: Log a Keras model to W&B

The proceeding code example shows how to log a convolutional neural network (CNN) model to W&B.

import os
import wandb
from tensorflow import keras
from tensorflow.keras import layers

config = {"optimizer": "adam", "loss": "categorical_crossentropy"}

# Initialize a W&B run
run = wandb.init(entity="charlie", project="mnist-project", config=config)

# Training algorithm
loss = run.config["loss"]
optimizer = run.config["optimizer"]
metrics = ["accuracy"]
num_classes = 10
input_shape = (28, 28, 1)

model = keras.Sequential(
    [
        layers.Input(shape=input_shape),
        layers.Conv2D(32, kernel_size=(3, 3), activation="relu"),
        layers.MaxPooling2D(pool_size=(2, 2)),
        layers.Conv2D(64, kernel_size=(3, 3), activation="relu"),
        layers.MaxPooling2D(pool_size=(2, 2)),
        layers.Flatten(),
        layers.Dropout(0.5),
        layers.Dense(num_classes, activation="softmax"),
    ]
)

model.compile(loss=loss, optimizer=optimizer, metrics=metrics)

# Save model
model_filename = "model.h5"
local_filepath = "./"
full_path = os.path.join(local_filepath, model_filename)
model.save(filepath=full_path)

# Log the model
# highlight-next-line
run.log_model(path=full_path, name="MNIST")

# Explicitly tell W&B to end the run.
run.finish()

9.4 - Create a registered model

Create a registered model to hold all the candidate models for your modeling tasks.

Create a registered model to hold all the candidate models for your modeling tasks. You can create a registered model interactively within the Model Registry or programmatically with the Python SDK.

Programmatically create registered a model

Programmatically register a model with the W&B Python SDK. W&B automatically creates a registered model for you if the registered model doesn’t exist.

Ensure to replace other the values enclosed in <> with your own:

import wandb

run = wandb.init(entity="<entity>", project="<project>")
run.link_model(path="<path-to-model>", registered_model_name="<registered-model-name>")
run.finish()

The name you provide for registered_model_name is the name that appears in the Model Registry App.

Interactively create a registered model

Interactively create a registered model within the Model Registry App.

  1. Navigate to the Model Registry App at https://wandb.ai/registry/model.
  2. Click the New registered model button located in the top right of the Model Registry page.
  3. From the panel that appears, select the entity you want the registered model to belong to from the Owning Entity dropdown.
  4. Provide a name for your model in the Name field.
  5. From the Type dropdown, select the type of artifacts to link to the registered model.
  6. (Optional) Add a description about your model in the Description field.
  7. (Optional) Within the Tags field, add one or more tags.
  8. Click Register model.

9.5 - Link a model version

Link a model version to a registered model with the W&B App or programmatically with the Python SDK.

Link a model version to a registered model with the W&B App or programmatically with the Python SDK.

Use the link_model method to programmatically log model files to a W&B run and link it to the W&B Model Registry.

Ensure to replace other the values enclosed in <> with your own:

import wandb

run = wandb.init(entity="<entity>", project="<project>")
run.link_model(path="<path-to-model>", registered_model_name="<registered-model-name>")
run.finish()

W&B creates a registered model for you if the name you specify for the registered-model-name parameter does not already exist.

For example, suppose you have an existing registered model named “Fine-Tuned-Review-Autocompletion”(registered-model-name="Fine-Tuned-Review-Autocompletion") in your Model Registry. And suppose that a few model versions are linked to it: v0, v1, v2. If you programmatically link a new model and use the same registered model name (registered-model-name="Fine-Tuned-Review-Autocompletion"), W&B links this model to the existing registered model and assigns it a model version v3. If no registered model with this name exists, a new one registered model is created and it will have a model version v0.

See an example “Fine-Tuned-Review-Autocompletion” registered model here.

Interactively link a model with the Model Registry or with the Artifact browser.

  1. Navigate to the Model Registry App at https://wandb.ai/registry/model.
  2. Hover your mouse next to the name of the registered model you want to link a new model to.
  3. Select the meatball menu icon (three horizontal dots) next to View details.
  4. From the dropdown, select Link new version.
  5. From the Project dropdown, select the name of the project that contains your model.
  6. From the Model Artifact dropdown, select the name of the model artifact.
  7. From the Version dropdown, select the model version you want to link to the registered model.
  1. Navigate to your project’s artifact browser on the W&B App at: https://wandb.ai/<entity>/<project>/artifacts
  2. Select the Artifacts icon on the left sidebar.
  3. Click on the model version you want to link to your registry.
  4. Within the Version overview section, click the Link to registry button.
  5. From the modal that appears on the right of the screen, select a registered model from the Select a register model menu dropdown.
  6. Click Next step.
  7. (Optional) Select an alias from the Aliases dropdown.
  8. Click Link to registry.

View the source of linked models

There are two ways to view the source of linked models: The artifact browser within the project that the model is logged to and the W&B Model Registry.

A pointer connects a specific model version in the model registry to the source model artifact (located within the project the model is logged to). The source model artifact also has a pointer to the model registry.

  1. Navigate to your model registry at https://wandb.ai/registry/model.
  2. Select View details next the name of your registered model.
  3. Within the Versions section, select View next to the model version you want to investigate.
  4. Click on the Version tab within the right panel.
  5. Within the Version overview section there is a row that contains a Source Version field. The Source Version field shows both the name of the model and the model’s version.

For example, the following image shows a v0 model version called mnist_model (see Source version field mnist_model:v0), linked to a registered model called MNIST-dev.

  1. Navigate to your project’s artifact browser on the W&B App at: https://wandb.ai/<entity>/<project>/artifacts
  2. Select the Artifacts icon on the left sidebar.
  3. Expand the model dropdown menu from the Artifacts panel.
  4. Select the name and version of the model linked to the model registry.
  5. Click on the Version tab within the right panel.
  6. Within the Version overview section there is a row that contains a Linked To field. The Linked To field shows both the name of the registered model and the version it possesses(registered-model-name:version).

For example, in the following image, there is a registered model called MNIST-dev (see the Linked To field). A model version called mnist_model with a version v0(mnist_model:v0) points to the MNIST-dev registered model.

9.6 - Organize models

Use model tags to organize registered models into categories and to search over those categories.

  1. Navigate to the W&B Model Registry app at https://wandb.ai/registry/model.

  2. Select View details next to the name of the registered model you want to add a model tag to.

  3. Scroll to the Model card section.

  4. Click the plus button (+) next to the Tags field.

  5. Type in the name for your tag or search for a pre-existing model tag. For example. the following image shows multiple model tags added to a registered model called FineTuned-Review-Autocompletion:

9.7 - Create model lineage map

A useful feature of logging model artifacts to W&B are lineage graphs. Lineage graphs show artifacts logged by a run as well as artifacts used by specific run.

This means that, when you log a model artifact, you at a minimum have access to view the W&B run that used or produced the model artifact. If you track a dependency, you also see the inputs used by the model artifact.

For example, the proceeding image shows artifacts created and used throughout an ML experiment:

From left to right, the image shows:

  1. The jumping-monkey-1 W&B run created the mnist_dataset:v0 dataset artifact.
  2. The vague-morning-5 W&B run trained a model using the mnist_dataset:v0 dataset artifact. The output of this W&B run was a model artifact called mnist_model:v0.
  3. A run called serene-haze-6 used the model artifact (mnist_model:v0) to evaluate the model.

Track an artifact dependency

Declare an dataset artifact as an input to a W&B run with the use_artifact API to track a dependency.

The proceeding code snippet shows how to use the use_artifact API:

# Initialize a run
run = wandb.init(project=project, entity=entity)

# Get artifact, mark it as a dependency
artifact = run.use_artifact(artifact_or_name="name", aliases="<alias>")

Once you have retrieved your artifact, you can use that artifact to (for example), evaluate the performance of a model.

Example: Train a model and track a dataset as the input of a model
job_type = "train_model"

config = {
    "optimizer": "adam",
    "batch_size": 128,
    "epochs": 5,
    "validation_split": 0.1,
}

run = wandb.init(project=project, job_type=job_type, config=config)

version = "latest"
name = "{}:{}".format("{}_dataset".format(model_use_case_id), version)

# highlight-start
artifact = run.use_artifact(name)
# highlight-end

train_table = artifact.get("train_table")
x_train = train_table.get_column("x_train", convert_to="numpy")
y_train = train_table.get_column("y_train", convert_to="numpy")

# Store values from our config dictionary into variables for easy accessing
num_classes = 10
input_shape = (28, 28, 1)
loss = "categorical_crossentropy"
optimizer = run.config["optimizer"]
metrics = ["accuracy"]
batch_size = run.config["batch_size"]
epochs = run.config["epochs"]
validation_split = run.config["validation_split"]

# Create model architecture
model = keras.Sequential(
    [
        layers.Input(shape=input_shape),
        layers.Conv2D(32, kernel_size=(3, 3), activation="relu"),
        layers.MaxPooling2D(pool_size=(2, 2)),
        layers.Conv2D(64, kernel_size=(3, 3), activation="relu"),
        layers.MaxPooling2D(pool_size=(2, 2)),
        layers.Flatten(),
        layers.Dropout(0.5),
        layers.Dense(num_classes, activation="softmax"),
    ]
)
model.compile(loss=loss, optimizer=optimizer, metrics=metrics)

# Generate labels for training data
y_train = keras.utils.to_categorical(y_train, num_classes)

# Create training and test set
x_t, x_v, y_t, y_v = train_test_split(x_train, y_train, test_size=0.33)

# Train the model
model.fit(
    x=x_t,
    y=y_t,
    batch_size=batch_size,
    epochs=epochs,
    validation_data=(x_v, y_v),
    callbacks=[WandbCallback(log_weights=True, log_evaluation=True)],
)

# Save model locally
path = "model.h5"
model.save(path)

path = "./model.h5"
registered_model_name = "MNIST-dev"
name = "mnist_model"

# highlight-start
run.link_model(path=path, registered_model_name=registered_model_name, name=name)
# highlight-end
run.finish()

9.8 - Document machine learning model

Add descriptions to model card to document your model

Add a description to the model card of your registered model to document aspects of your machine learning model. Some topics worth documenting include:

  • Summary: A summary of what the model is. The purpose of the model. The machine learning framework the model uses, and so forth.
  • Training data: Describe the training data used, processing done on the training data set, where is that data stored and so forth.
  • Architecture: Information about the model architecture, layers, and any specific design choices.
  • Deserialize the model: Provide information on how someone on your team can load the model into memory.
  • Task: The specific type of task or problem that the machine learning model is designed to perform. It’s a categorization of the model’s intended capability.
  • License: The legal terms and permissions associated with the use of the machine learning model. It helps model users understand the legal framework under which they can utilize the model.
  • References: Citations or references to relevant research papers, datasets, or external resources.
  • Deployment: Details on how and where the model is deployed and guidance on how the model is integrated into other enterprise systems, such as a workflow orchestration platforms.

Add a description to the model card

  1. Navigate to the W&B Model Registry app at https://wandb.ai/registry/model.
  2. Select View details next to the name of the registered model you want to create a model card for.
  3. Go to the Model card section.
  4. Within the Description field, provide information about your machine learning model. Format text within a model card with Markdown markup language.

For example, the following images shows the model card of a Credit-card Default Prediction registered model.

9.9 - Download a model version

How to download a model with W&B Python SDK

Use the W&B Python SDK to download a model artifact that you linked to the Model Registry.

Replace values within <> with your own:

import wandb

# Initialize a run
run = wandb.init(project="<project>", entity="<entity>")

# Access and download model. Returns path to downloaded artifact
downloaded_model_path = run.use_model(name="<your-model-name>")

Reference a model version with one of following formats listed:

  • latest - Use latest alias to specify the model version that is most recently linked.
  • v# - Use v0, v1, v2, and so on to fetch a specific version in the Registered Model
  • alias - Specify the custom alias that you and your team assigned to your model version

See use_model in the API Reference guide for more information on possible parameters and return type.

Example: Download and use a logged model

For example, in the proceeding code snippet a user called the use_model API. They specified the name of the model artifact they want to fetch and they also provided a version/alias. They then stored the path that returned from the API to the downloaded_model_path variable.

import wandb

entity = "luka"
project = "NLP_Experiments"
alias = "latest"  # semantic nickname or identifier for the model version
model_artifact_name = "fine-tuned-model"

# Initialize a run
run = wandb.init()
# Access and download model. Returns path to downloaded artifact

downloaded_model_path = run.use_model(name=f"{entity/project/model_artifact_name}:{alias}")

Replace values within <> with your own:

import wandb
# Initialize a run
run = wandb.init(project="<project>", entity="<entity>")
# Access and download model. Returns path to downloaded artifact
downloaded_model_path = run.use_model(name="<your-model-name>")

Reference a model version with one of following formats listed:

  • latest - Use latest alias to specify the model version that is most recently linked.
  • v# - Use v0, v1, v2, and so on to fetch a specific version in the Registered Model
  • alias - Specify the custom alias that you and your team assigned to your model version

See use_model in the API Reference guide for more information on possible parameters and return type.

  1. Navigate to the Model Registry App at https://wandb.ai/registry/model.
  2. Select View details next to the name of the registered model that contains the model you want to download.
  3. Within the Versions section, select the View button next to the model version you want to download.
  4. Select the Files tab.
  5. Click on the download button next to the model file you want to download.

9.10 - Create alerts and notifications

Get Slack notifications when a new model version is linked to the model registry.

Receive Slack notifications when a new model version is linked to the model registry.

  1. Navigate to the W&B Model Registry app at https://wandb.ai/registry/model.
  2. Select the registered model you want to receive notifications from.
  3. Click on the Connect Slack button.
  4. Follow the instructions to enable W&B in your Slack workspace that appear on the OAuth page.

Once you have configured Slack notifications for your team, you can pick and choose registered models to get notifications from.

The screenshot below shows a FMNIST classifier registered model that has Slack notifications.

A message is automatically posted to the connected Slack channel each time a new model version is linked to the FMNIST classifier registered model.

9.11 - Manage data governance and access control

Use model registry role based access controls (RBAC) to control who can update protected aliases.

Use protected aliases to represent key stages of your model development pipeline. Only Model Registry Administrators can add, modify, or remove protected aliases. Model registry admins can define and use protected aliases. W&B blocks non admin users from adding or removing protected aliases from model versions.

For example, suppose you set staging and production as protected aliases. Any member of your team can add new model versions. However, only admins can add a staging or production alias.

Set up access control

The following steps describe how to set up access controls for your team’s model registry.

  1. Navigate to the W&B Model Registry app at https://wandb.ai/registry/model.
  2. Select the gear button on the top right of the page.
  3. Select the Manage registry admins button.
  4. Within the Members tab, select the users you want to grant access to add and remove protected aliases from model versions.

Add protected aliases

  1. Navigate to the W&B Model Registry app at https://wandb.ai/registry/model.
  2. Select the gear button on the top right of the page.
  3. Scroll down to the Protected Aliases section.
  4. Click on the plus icon (+) icon to add new a new alias.