This is the multi-page printable view of this section. Click here to print.

Return to the regular view of this page.

Sweeps

Hyperparameter search and model optimization with W&B Sweeps

Use W&B Sweeps to automate hyperparameter search and visualize rich, interactive experiment tracking. Pick from popular search methods such as Bayesian, grid search, and random to search the hyperparameter space. Scale and parallelize sweep across one or more machines.

Draw insights from large hyperparameter tuning experiments with interactive dashboards.

How it works

Create a sweep with two W&B CLI commands:

  1. Initialize a sweep
wandb sweep --project <propject-name> <path-to-config file>
  1. Start the sweep agent
wandb agent <sweep-ID>

How to get started

Depending on your use case, explore the following resources to get started with W&B Sweeps:

For a step-by-step video, see: Tune Hyperparameters Easily with W&B Sweeps.

1 - Tutorial: Define, initialize, and run a sweep

Sweeps quickstart shows how to define, initialize, and run a sweep. There are four main steps

This page shows how to define, initialize, and run a sweep. There are four main steps:

  1. Set up your training code
  2. Define the search space with a sweep configuration
  3. Initialize the sweep
  4. Start the sweep agent

Copy and paste the following code into a Jupyter Notebook or Python script:

# Import the W&B Python Library and log into W&B
import wandb

wandb.login()

# 1: Define objective/training function
def objective(config):
    score = config.x**3 + config.y
    return score

def main():
    wandb.init(project="my-first-sweep")
    score = objective(wandb.config)
    wandb.log({"score": score})

# 2: Define the search space
sweep_configuration = {
    "method": "random",
    "metric": {"goal": "minimize", "name": "score"},
    "parameters": {
        "x": {"max": 0.1, "min": 0.01},
        "y": {"values": [1, 3, 7]},
    },
}

# 3: Start the sweep
sweep_id = wandb.sweep(sweep=sweep_configuration, project="my-first-sweep")

wandb.agent(sweep_id, function=main, count=10)

The following sections break down and explains each step in the code sample.

Set up your training code

Define a training function that takes in hyperparameter values from wandb.config and uses them to train a model and return metrics.

Optionally provide the name of the project where you want the output of the W&B Run to be stored (project parameter in wandb.init). If the project is not specified, the run is put in an “Uncategorized” project.

# 1: Define objective/training function
def objective(config):
    score = config.x**3 + config.y
    return score


def main():
    wandb.init(project="my-first-sweep")
    score = objective(wandb.config)
    wandb.log({"score": score})

Define the search space with a sweep configuration

Within a dictionary, specify what hyperparameters you want to sweep over and. For more information about configuration options, see Define sweep configuration.

The proceeding example demonstrates a sweep configuration that uses a random search ('method':'random'). The sweep will randomly select a random set of values listed in the configuration for the batch size, epoch, and the learning rate.

Throughout the sweeps, W&B will maximize the metric specified in the metric key (metric). In the following example, W&B will maximize ('goal':'maximize') the validation accuracy ('val_acc').

# 2: Define the search space
sweep_configuration = {
    "method": "random",
    "metric": {"goal": "minimize", "name": "score"},
    "parameters": {
        "x": {"max": 0.1, "min": 0.01},
        "y": {"values": [1, 3, 7]},
    },
}

Initialize the Sweep

W&B uses a Sweep Controller to manage sweeps on the cloud (standard), locally (local) across one or more machines. For more information about Sweep Controllers, see Search and stop algorithms locally.

A sweep identification number is returned when you initialize a sweep:

sweep_id = wandb.sweep(sweep=sweep_configuration, project="my-first-sweep")

For more information about initializing sweeps, see Initialize sweeps.

Start the Sweep

Use the wandb.agent API call to start a sweep.

wandb.agent(sweep_id, function=main, count=10)

Visualize results (optional)

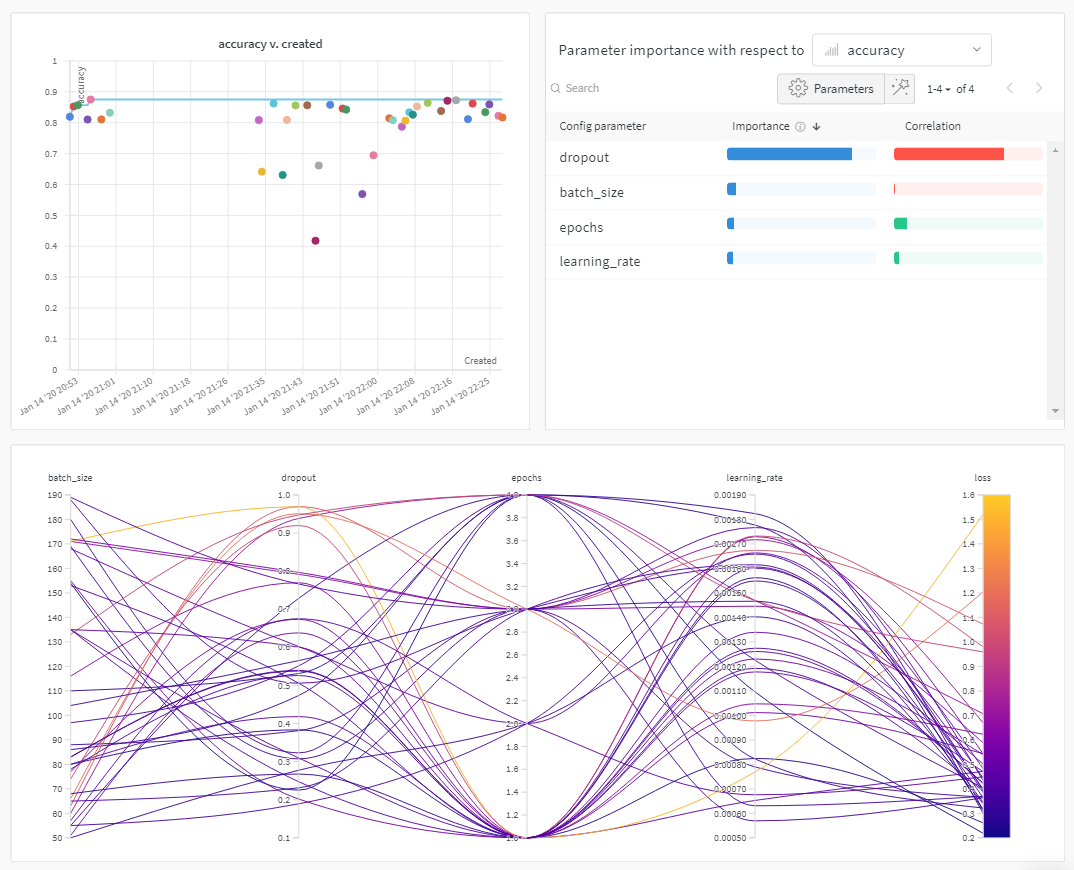
Open your project to see your live results in the W&B App dashboard. With just a few clicks, construct rich, interactive charts like parallel coordinates plots, parameter importance analyzes, and more.

Sweeps Dashboard example

For more information about how to visualize results, see Visualize sweep results. For an example dashboard, see this sample Sweeps Project.

Stop the agent (optional)

From the terminal, hit Ctrl+c to stop the run that the Sweep agent is currently running. To kill the agent, hit Ctrl+c again after the run is stopped.

2 - Add W&B (wandb) to your code

Add W&B to your Python code script or Jupyter Notebook.

There are numerous ways to add the W&B Python SDK to your script or Jupyter Notebook. Outlined below is a “best practice” example of how to integrate the W&B Python SDK into your own code.

Original training script

Suppose you have the following code in a Jupyter Notebook cell or Python script. We define a function called main that mimics a typical training loop. For each epoch, the accuracy and loss is computed on the training and validation data sets. The values are randomly generated for the purpose of this example.

We defined a dictionary called config where we store hyperparameters values (line 15). At the end of the cell, we call the main function to execute the mock training code.

# train.py
import random
import numpy as np


def train_one_epoch(epoch, lr, bs):
    acc = 0.25 + ((epoch / 30) + (random.random() / 10))
    loss = 0.2 + (1 - ((epoch - 1) / 10 + random.random() / 5))
    return acc, loss


def evaluate_one_epoch(epoch):
    acc = 0.1 + ((epoch / 20) + (random.random() / 10))
    loss = 0.25 + (1 - ((epoch - 1) / 10 + random.random() / 6))
    return acc, loss


config = {"lr": 0.0001, "bs": 16, "epochs": 5}


def main():
    # Note that we define values from `wandb.config`
    # instead of defining hard values
    lr = config["lr"]
    bs = config["bs"]
    epochs = config["epochs"]

    for epoch in np.arange(1, epochs):
        train_acc, train_loss = train_one_epoch(epoch, lr, bs)
        val_acc, val_loss = evaluate_one_epoch(epoch)

        print("epoch: ", epoch)
        print("training accuracy:", train_acc, "training loss:", train_loss)
        print("validation accuracy:", val_acc, "training loss:", val_loss)


# Call the main function.
main()

Training script with W&B Python SDK

The following code examples demonstrate how to add the W&B Python SDK into your code. If you start W&B Sweep jobs in the CLI, you will want to explore the CLI tab. If you start W&B Sweep jobs within a Jupyter notebook or Python script, explore the Python SDK tab.

To create a W&B Sweep, we added the following to the code example:

  1. Line 1: Import the Weights & Biases Python SDK.
  2. Line 6: Create a dictionary object where the key-value pairs define the sweep configuration. In the proceeding example, the batch size (batch_size), epochs (epochs), and the learning rate (lr) hyperparameters are varied during each sweep. For more information on how to create a sweep configuration, see Define sweep configuration.
  3. Line 19: Pass the sweep configuration dictionary to wandb.sweep. This initializes the sweep. This returns a sweep ID (sweep_id). For more information on how to initialize sweeps, see Initialize sweeps.
  4. Line 33: Use the wandb.init() API to generate a background process to sync and log data as a W&B Run.
  5. Line 37-39: (Optional) define values from wandb.config instead of defining hard coded values.
  6. Line 45: Log the metric we want to optimize with wandb.log. You must log the metric defined in your configuration. Within the configuration dictionary (sweep_configuration in this example) we defined the sweep to maximize the val_acc value).
  7. Line 54: Start the sweep with the wandb.agent API call. Provide the sweep ID (line 19), the name of the function the sweep will execute (function=main), and set the maximum number of runs to try to four (count=4). For more information on how to start W&B Sweep, see Start sweep agents.
import wandb
import numpy as np
import random

# Define sweep config
sweep_configuration = {
    "method": "random",
    "name": "sweep",
    "metric": {"goal": "maximize", "name": "val_acc"},
    "parameters": {
        "batch_size": {"values": [16, 32, 64]},
        "epochs": {"values": [5, 10, 15]},
        "lr": {"max": 0.1, "min": 0.0001},
    },
}

# Initialize sweep by passing in config.
# (Optional) Provide a name of the project.
sweep_id = wandb.sweep(sweep=sweep_configuration, project="my-first-sweep")


# Define training function that takes in hyperparameter
# values from `wandb.config` and uses them to train a
# model and return metric
def train_one_epoch(epoch, lr, bs):
    acc = 0.25 + ((epoch / 30) + (random.random() / 10))
    loss = 0.2 + (1 - ((epoch - 1) / 10 + random.random() / 5))
    return acc, loss


def evaluate_one_epoch(epoch):
    acc = 0.1 + ((epoch / 20) + (random.random() / 10))
    loss = 0.25 + (1 - ((epoch - 1) / 10 + random.random() / 6))
    return acc, loss


def main():
    run = wandb.init()

    # note that we define values from `wandb.config`
    # instead of defining hard values
    lr = wandb.config.lr
    bs = wandb.config.batch_size
    epochs = wandb.config.epochs

    for epoch in np.arange(1, epochs):
        train_acc, train_loss = train_one_epoch(epoch, lr, bs)
        val_acc, val_loss = evaluate_one_epoch(epoch)

        wandb.log(
            {
                "epoch": epoch,
                "train_acc": train_acc,
                "train_loss": train_loss,
                "val_acc": val_acc,
                "val_loss": val_loss,
            }
        )


# Start sweep job.
wandb.agent(sweep_id, function=main, count=4)

To create a W&B Sweep, we first create a YAML configuration file. The configuration file contains he hyperparameters we want the sweep to explore. In the proceeding example, the batch size (batch_size), epochs (epochs), and the learning rate (lr) hyperparameters are varied during each sweep.

# config.yaml
program: train.py
method: random
name: sweep
metric:
  goal: maximize
  name: val_acc
parameters:
  batch_size: 
    values: [16,32,64]
  lr:
    min: 0.0001
    max: 0.1
  epochs:
    values: [5, 10, 15]

For more information on how to create a W&B Sweep configuration, see Define sweep configuration.

Note that you must provide the name of your Python script for the program key in your YAML file.

Next, we add the following to the code example:

  1. Line 1-2: Import the Wieghts & Biases Python SDK (wandb) and PyYAML (yaml). PyYAML is used to read in our YAML configuration file.
  2. Line 18: Read in the configuration file.
  3. Line 21: Use the wandb.init() API to generate a background process to sync and log data as a W&B Run. We pass the config object to the config parameter.
  4. Line 25 - 27: Define hyperparameter values from wandb.config instead of using hard coded values.
  5. Line 33-39: Log the metric we want to optimize with wandb.log. You must log the metric defined in your configuration. Within the configuration dictionary (sweep_configuration in this example) we defined the sweep to maximize the val_acc value.
import wandb
import yaml
import random
import numpy as np


def train_one_epoch(epoch, lr, bs):
    acc = 0.25 + ((epoch / 30) + (random.random() / 10))
    loss = 0.2 + (1 - ((epoch - 1) / 10 + random.random() / 5))
    return acc, loss


def evaluate_one_epoch(epoch):
    acc = 0.1 + ((epoch / 20) + (random.random() / 10))
    loss = 0.25 + (1 - ((epoch - 1) / 10 + random.random() / 6))
    return acc, loss


def main():
    # Set up your default hyperparameters
    with open("./config.yaml") as file:
        config = yaml.load(file, Loader=yaml.FullLoader)

    run = wandb.init(config=config)

    # Note that we define values from `wandb.config`
    # instead of  defining hard values
    lr = wandb.config.lr
    bs = wandb.config.batch_size
    epochs = wandb.config.epochs

    for epoch in np.arange(1, epochs):
        train_acc, train_loss = train_one_epoch(epoch, lr, bs)
        val_acc, val_loss = evaluate_one_epoch(epoch)

        wandb.log(
            {
                "epoch": epoch,
                "train_acc": train_acc,
                "train_loss": train_loss,
                "val_acc": val_acc,
                "val_loss": val_loss,
            }
        )


# Call the main function.
main()

Navigate to your CLI. Within your CLI, set a maximum number of runs the sweep agent should try. This is step optional. In the following example we set the maximum number to five.

NUM=5

Next, initialize the sweep with the wandb sweep command. Provide the name of the YAML file. Optionally provide the name of the project for the project flag (--project):

wandb sweep --project sweep-demo-cli config.yaml

This returns a sweep ID. For more information on how to initialize sweeps, see Initialize sweeps.

Copy the sweep ID and replace sweepID in the proceeding code snippet to start the sweep job with the wandb agent command:

wandb agent --count $NUM your-entity/sweep-demo-cli/sweepID

For more information on how to start sweep jobs, see Start sweep jobs.

Consideration when logging metrics

Ensure to log the metric you specify in your sweep configuration explicitly to W&B. Do not log metrics for your sweep inside of a sub-directory.

For example, consider the proceeding psuedocode. A user wants to log the validation loss ("val_loss": loss). First they pass the values into a dictionary (line 16). However, the dictionary passed to wandb.log does not explicitly access the key-value pair in the dictionary:

# Import the W&B Python Library and log into W&B
import wandb
import random


def train():
    offset = random.random() / 5
    acc = 1 - 2**-epoch - random.random() / epoch - offset
    loss = 2**-epoch + random.random() / epoch + offset

    val_metrics = {"val_loss": loss, "val_acc": acc}
    return val_metrics


def main():
    wandb.init(entity="<entity>", project="my-first-sweep")
    val_metrics = train()
    # highlight-next-line
    wandb.log({"val_loss": val_metrics})


sweep_configuration = {
    "method": "random",
    "metric": {"goal": "minimize", "name": "val_loss"},
    "parameters": {
        "x": {"max": 0.1, "min": 0.01},
        "y": {"values": [1, 3, 7]},
    },
}

sweep_id = wandb.sweep(sweep=sweep_configuration, project="my-first-sweep")

wandb.agent(sweep_id, function=main, count=10)

Instead, explicitly access the key-value pair within the Python dictionary. For example, the proceeding code (line after you create a dictionary, specify the key-value pair when you pass the dictionary to the wandb.log method:

# Import the W&B Python Library and log into W&B
import wandb
import random


def train():
    offset = random.random() / 5
    acc = 1 - 2**-epoch - random.random() / epoch - offset
    loss = 2**-epoch + random.random() / epoch + offset

    val_metrics = {"val_loss": loss, "val_acc": acc}
    return val_metrics


def main():
    wandb.init(entity="<entity>", project="my-first-sweep")
    val_metrics = train()
    # highlight-next-line
    wandb.log({"val_loss", val_metrics["val_loss"]})


sweep_configuration = {
    "method": "random",
    "metric": {"goal": "minimize", "name": "val_loss"},
    "parameters": {
        "x": {"max": 0.1, "min": 0.01},
        "y": {"values": [1, 3, 7]},
    },
}

sweep_id = wandb.sweep(sweep=sweep_configuration, project="my-first-sweep")

wandb.agent(sweep_id, function=main, count=10)

3 - Define a sweep configuration

Learn how to create configuration files for sweeps.

A W&B Sweep combines a strategy for exploring hyperparameter values with the code that evaluates them. The strategy can be as simple as trying every option or as complex as Bayesian Optimization and Hyperband (BOHB).

Define a sweep configuration either in a Python dictionary or a YAML file. How you define your sweep configuration depends on how you want to manage your sweep.

The following guide describes how to format your sweep configuration. See Sweep configuration options for a comprehensive list of top-level sweep configuration keys.

Basic structure

Both sweep configuration format options (YAML and Python dictionary) utilize key-value pairs and nested structures.

Use top-level keys within your sweep configuration to define qualities of your sweep search such as the name of the sweep (name key), the parameters to search through (parameters key), the methodology to search the parameter space (method key), and more.

For example, the proceeding code snippets show the same sweep configuration defined within a YAML file and within a Python dictionary. Within the sweep configuration there are five top level keys specified: program, name, method, metric and parameters.

Define a sweep configuration in a YAML file if you want to manage sweeps interactively from the command line (CLI)

program: train.py
name: sweepdemo
method: bayes
metric:
  goal: minimize
  name: validation_loss
parameters:
  learning_rate:
    min: 0.0001
    max: 0.1
  batch_size:
    values: [16, 32, 64]
  epochs:
    values: [5, 10, 15]
  optimizer:
    values: ["adam", "sgd"]

Define a sweep in a Python dictionary data structure if you define training algorithm in a Python script or Jupyter notebook.

The proceeding code snippet stores a sweep configuration in a variable named sweep_configuration:

sweep_configuration = {
    "name": "sweepdemo",
    "method": "bayes",
    "metric": {"goal": "minimize", "name": "validation_loss"},
    "parameters": {
        "learning_rate": {"min": 0.0001, "max": 0.1},
        "batch_size": {"values": [16, 32, 64]},
        "epochs": {"values": [5, 10, 15]},
        "optimizer": {"values": ["adam", "sgd"]},
    },
}

Within the top level parameters key, the following keys are nested: learning_rate, batch_size, epoch, and optimizer. For each of the nested keys you specify, you can provide one or more values, a distribution, a probability, and more. For more information, see the parameters section in Sweep configuration options.

Double nested parameters

Sweep configurations support nested parameters. To delineate a nested parameter, use an additional parameters key under the top level parameter name. Sweep configs support multi-level nesting.

Specify a probability distribution for your random variables if you use a Bayesian or random hyperparameter search. For each hyperparameter:

  1. Create a top level parameters key in your sweep config.
  2. Within the parameterskey, nest the following:
    1. Specify the name of hyperparameter you want to optimize.
    2. Specify the distribution you want to use for the distribution key. Nest the distribution key-value pair underneath the hyperparameter name.
    3. Specify one or more values to explore. The value (or values) should be inline with the distribution key.
      1. (Optional) Use an additional parameters key under the top level parameter name to delineate a nested parameter.

Sweep configuration template

The following template shows how you can configure parameters and specify search constraints. Replace hyperparameter_name with the name of your hyperparameter and any values enclosed in <>.

program: <insert>
method: <insert>
parameter:
  hyperparameter_name0:
    value: 0  
  hyperparameter_name1: 
    values: [0, 0, 0]
  hyperparameter_name: 
    distribution: <insert>
    value: <insert>
  hyperparameter_name2:  
    distribution: <insert>
    min: <insert>
    max: <insert>
    q: <insert>
  hyperparameter_name3: 
    distribution: <insert>
    values:
      - <list_of_values>
      - <list_of_values>
      - <list_of_values>
early_terminate:
  type: hyperband
  s: 0
  eta: 0
  max_iter: 0
command:
- ${Command macro}
- ${Command macro}
- ${Command macro}
- ${Command macro}      

Sweep configuration examples

program: train.py
method: random
metric:
  goal: minimize
  name: loss
parameters:
  batch_size:
    distribution: q_log_uniform_values
    max: 256 
    min: 32
    q: 8
  dropout: 
    values: [0.3, 0.4, 0.5]
  epochs:
    value: 1
  fc_layer_size: 
    values: [128, 256, 512]
  learning_rate:
    distribution: uniform
    max: 0.1
    min: 0
  optimizer:
    values: ["adam", "sgd"]
sweep_config = {
    "method": "random",
    "metric": {"goal": "minimize", "name": "loss"},
    "parameters": {
        "batch_size": {
            "distribution": "q_log_uniform_values",
            "max": 256,
            "min": 32,
            "q": 8,
        },
        "dropout": {"values": [0.3, 0.4, 0.5]},
        "epochs": {"value": 1},
        "fc_layer_size": {"values": [128, 256, 512]},
        "learning_rate": {"distribution": "uniform", "max": 0.1, "min": 0},
        "optimizer": {"values": ["adam", "sgd"]},
    },
}

Bayes hyperband example

program: train.py
method: bayes
metric:
  goal: minimize
  name: val_loss
parameters:
  dropout:
    values: [0.15, 0.2, 0.25, 0.3, 0.4]
  hidden_layer_size:
    values: [96, 128, 148]
  layer_1_size:
    values: [10, 12, 14, 16, 18, 20]
  layer_2_size:
    values: [24, 28, 32, 36, 40, 44]
  learn_rate:
    values: [0.001, 0.01, 0.003]
  decay:
    values: [1e-5, 1e-6, 1e-7]
  momentum:
    values: [0.8, 0.9, 0.95]
  epochs:
    value: 27
early_terminate:
  type: hyperband
  s: 2
  eta: 3
  max_iter: 27

The proceeding tabs show how to specify either a minimum or maximum number of iterations for early_terminate:

early_terminate:
  type: hyperband
  min_iter: 3

The brackets for this example are: [3, 3*eta, 3*eta*eta, 3*eta*eta*eta], which equals [3, 9, 27, 81].

</div>
<div class="tab-body tab-pane fade"
    id="tabs-10-01" role="tabpanel" aria-labelled-by="tabs-10-01-tab" tabindex="10">
    <div class="highlight"><pre tabindex="0" style="color:#f8f8f2;background-color:#272822;-moz-tab-size:4;-o-tab-size:4;tab-size:4;"><code class="language-yaml" data-lang="yaml"><span style="display:flex;"><span><span style="color:#f92672">early_terminate</span>:

type: hyperband max_iter: 27 s: 2

The brackets for this example are [27/eta, 27/eta/eta], which equals [9, 3].

</div>

Command example

program: main.py
metric:
  name: val_loss
  goal: minimize

method: bayes
parameters:
  optimizer.config.learning_rate:
    min: !!float 1e-5
    max: 0.1
  experiment:
    values: [expt001, expt002]
  optimizer:
    values: [sgd, adagrad, adam]

command:
- ${env}
- ${interpreter}
- ${program}
- ${args_no_hyphens}
/usr/bin/env python train.py --param1=value1 --param2=value2
python train.py --param1=value1 --param2=value2

The proceeding tabs show how to specify common command macros:

Remove the {$interpreter} macro and provide a value explicitly to hardcode the python interpreter. For example, the following code snippet demonstrates how to do this:

command:
  - ${env}
  - python3
  - ${program}
  - ${args}

The following shows how to add extra command line arguments not specified by sweep configuration parameters:

command:
  - ${env}
  - ${interpreter}
  - ${program}
  - "--config"
  - "your-training-config.json"
  - ${args}

If your program does not use argument parsing you can avoid passing arguments all together and take advantage of wandb.init picking up sweep parameters into wandb.config automatically:

command:
  - ${env}
  - ${interpreter}
  - ${program}

You can change the command to pass arguments the way tools like Hydra expect. See Hydra with W&B for more information.

command:
  - ${env}
  - ${interpreter}
  - ${program}
  - ${args_no_hyphens}

3.1 - Sweep configuration options

A sweep configuration consists of nested key-value pairs. Use top-level keys within your sweep configuration to define qualities of your sweep search such as the parameters to search through (parameter key), the methodology to search the parameter space (method key), and more.

The proceeding table lists top-level sweep configuration keys and a brief description. See the respective sections for more information about each key.

Top-level keys Description
program (required) Training script to run
entity The entity for this sweep
project The project for this sweep
description Text description of the sweep
name The name of the sweep, displayed in the W&B UI.
method (required) The search strategy
metric The metric to optimize (only used by certain search strategies and stopping criteria)
parameters (required) Parameter bounds to search
early_terminate Any early stopping criteria
command Command structure for invoking and passing arguments to the training script
run_cap Maximum number of runs for this sweep

See the Sweep configuration structure for more information on how to structure your sweep configuration.

metric

Use the metric top-level sweep configuration key to specify the name, the goal, and the target metric to optimize.

Key Description
name Name of the metric to optimize.
goal Either minimize or maximize (Default is minimize).
target Goal value for the metric you are optimizing. The sweep does not create new runs when if or when a run reaches a target value that you specify. Active agents that have a run executing (when the run reaches the target) wait until the run completes before the agent stops creating new runs.

parameters

In your YAML file or Python script, specify parameters as a top level key. Within the parameters key, provide the name of a hyperparameter you want to optimize. Common hyperparameters include: learning rate, batch size, epochs, optimizers, and more. For each hyperparameter you define in your sweep configuration, specify one or more search constraints.

The proceeding table shows supported hyperparameter search constraints. Based on your hyperparameter and use case, use one of the search constraints below to tell your sweep agent where (in the case of a distribution) or what (value, values, and so forth) to search or use.

Search constraint Description
values Specifies all valid values for this hyperparameter. Compatible with grid.
value Specifies the single valid value for this hyperparameter. Compatible with grid.
distribution Specify a probability distribution. See the note following this table for information on default values.
probabilities Specify the probability of selecting each element of values when using random.
min, max (intor float) Maximum and minimum values. If int, for int_uniform -distributed hyperparameters. If float, for uniform -distributed hyperparameters.
mu (float) Mean parameter for normal - or lognormal -distributed hyperparameters.
sigma (float) Standard deviation parameter for normal - or lognormal -distributed hyperparameters.
q (float) Quantization step size for quantized hyperparameters.
parameters Nest other parameters inside a root level parameter.

method

Specify the hyperparameter search strategy with the method key. There are three hyperparameter search strategies to choose from: grid, random, and Bayesian search.

Iterate over every combination of hyperparameter values. Grid search makes uninformed decisions on the set of hyperparameter values to use on each iteration. Grid search can be computationally costly.

Grid search executes forever if it is searching within in a continuous search space.

Choose a random, uninformed, set of hyperparameter values on each iteration based on a distribution. Random search runs forever unless you stop the process from the command line, within your python script, or the W&B App UI.

Specify the distribution space with the metric key if you choose random (method: random) search.

In contrast to random and grid search, Bayesian models make informed decisions. Bayesian optimization uses a probabilistic model to decide which values to use through an iterative process of testing values on a surrogate function before evaluating the objective function. Bayesian search works well for small numbers of continuous parameters but scales poorly. For more information about Bayesian search, see the Bayesian Optimization Primer paper.

Bayesian search runs forever unless you stop the process from the command line, within your python script, or the W&B App UI.

Within the parameter key, nest the name of the hyperparameter. Next, specify the distribution key and specify a distribution for the value.

The proceeding tables lists distributions W&B supports.

Value for distribution key Description
constant Constant distribution. Must specify the constant value (value) to use.
categorical Categorical distribution. Must specify all valid values (values) for this hyperparameter.
int_uniform Discrete uniform distribution on integers. Must specify max and min as integers.
uniform Continuous uniform distribution. Must specify max and min as floats.
q_uniform Quantized uniform distribution. Returns round(X / q) * q where X is uniform. q defaults to 1.
log_uniform Log-uniform distribution. Returns a value X between exp(min) and exp(max)such that the natural logarithm is uniformly distributed between min and max.
log_uniform_values Log-uniform distribution. Returns a value X between min and max such that log(X) is uniformly distributed between log(min) and log(max).
q_log_uniform Quantized log uniform. Returns round(X / q) * q where X is log_uniform. q defaults to 1.
q_log_uniform_values Quantized log uniform. Returns round(X / q) * q where X is log_uniform_values. q defaults to 1.
inv_log_uniform Inverse log uniform distribution. Returns X, where log(1/X) is uniformly distributed between min and max.
inv_log_uniform_values Inverse log uniform distribution. Returns X, where log(1/X) is uniformly distributed between log(1/max) and log(1/min).
normal Normal distribution. Return value is normally distributed with mean mu (default 0) and standard deviation sigma (default 1).
q_normal Quantized normal distribution. Returns round(X / q) * q where X is normal. Q defaults to 1.
log_normal Log normal distribution. Returns a value X such that the natural logarithm log(X) is normally distributed with mean mu (default 0) and standard deviation sigma (default 1).
q_log_normal Quantized log normal distribution. Returns round(X / q) * q where X is log_normal. q defaults to 1.

early_terminate

Use early termination (early_terminate) to stop poorly performing runs. If early termination occurs, W&B stops the current run before it creates a new run with a new set of hyperparameter values.

Stopping algorithm

Hyperband hyperparameter optimization evaluates if a program should stop or if it should to continue at one or more pre-set iteration counts, called brackets.

When a W&B run reaches a bracket, the sweep compares that run’s metric to all previously reported metric values. The sweep terminates the run if the run’s metric value is too high (when the goal is minimization) or if the run’s metric is too low (when the goal is maximization).

Brackets are based on the number of logged iterations. The number of brackets corresponds to the number of times you log the metric you are optimizing. The iterations can correspond to steps, epochs, or something in between. The numerical value of the step counter is not used in bracket calculations.

Key Description
min_iter Specify the iteration for the first bracket
max_iter Specify the maximum number of iterations.
s Specify the total number of brackets (required for max_iter)
eta Specify the bracket multiplier schedule (default: 3).
strict Enable ‘strict’ mode that prunes runs aggressively, more closely following the original Hyperband paper. Defaults to false.

command

Modify the format and contents with nested values within the command key. You can directly include fixed components such as filenames.

W&B supports the following macros for variable components of the command:

Command macro Description
${env} /usr/bin/env on Unix systems, omitted on Windows.
${interpreter} Expands to python.
${program} Training script filename specified by the sweep configuration program key.
${args} Hyperparameters and their values in the form --param1=value1 --param2=value2.
${args_no_boolean_flags} Hyperparameters and their values in the form --param1=value1 except boolean parameters are in the form --boolean_flag_param when True and omitted when False.
${args_no_hyphens} Hyperparameters and their values in the form param1=value1 param2=value2.
${args_json} Hyperparameters and their values encoded as JSON.
${args_json_file} The path to a file containing the hyperparameters and their values encoded as JSON.
${envvar} A way to pass environment variables. ${envvar:MYENVVAR} __ expands to the value of MYENVVAR environment variable. __

4 - Initialize a sweep

Initialize a W&B Sweep

W&B uses a Sweep Controller to manage sweeps on the cloud (standard), locally (local) across one or more machines. After a run completes, the sweep controller will issue a new set of instructions describing a new run to execute. These instructions are picked up by agents who actually perform the runs. In a typical W&B Sweep, the controller lives on the W&B server. Agents live on your machines.

The following code snippets demonstrate how to initialize sweeps with the CLI and within a Jupyter Notebook or Python script.

Use the W&B SDK to initialize a sweep. Pass the sweep configuration dictionary to the sweep parameter. Optionally provide the name of the project for the project parameter (project) where you want the output of the W&B Run to be stored. If the project is not specified, the run is put in an “Uncategorized” project.

import wandb

# Example sweep configuration
sweep_configuration = {
    "method": "random",
    "name": "sweep",
    "metric": {"goal": "maximize", "name": "val_acc"},
    "parameters": {
        "batch_size": {"values": [16, 32, 64]},
        "epochs": {"values": [5, 10, 15]},
        "lr": {"max": 0.1, "min": 0.0001},
    },
}

sweep_id = wandb.sweep(sweep=sweep_configuration, project="project-name")

The wandb.sweep function returns the sweep ID. The sweep ID includes the entity name and the project name. Make a note of the sweep ID.

Use the W&B CLI to initialize a sweep. Provide the name of your configuration file. Optionally provide the name of the project for the project flag. If the project is not specified, the W&B Run is put in an “Uncategorized” project.

Use the wandb sweep command to initialize a sweep. The proceeding code example initializes a sweep for a sweeps_demo project and uses a config.yaml file for the configuration.

wandb sweep --project sweeps_demo config.yaml

This command will print out a sweep ID. The sweep ID includes the entity name and the project name. Make a note of the sweep ID.

5 - Start or stop a sweep agent

Start or stop a W&B Sweep Agent on one or more machines.

Start a W&B Sweep on one or more agents on one or more machines. W&B Sweep agents query the W&B server you launched when you initialized a W&B Sweep (wandb sweep) for hyperparameters and use them to run model training.

To start a W&B Sweep agent, provide the W&B Sweep ID that was returned when you initialized a W&B Sweep. The W&B Sweep ID has the form:

entity/project/sweep_ID

Where:

  • entity: Your W&B username or team name.
  • project: The name of the project where you want the output of the W&B Run to be stored. If the project is not specified, the run is put in an “Uncategorized” project.
  • sweep_ID: The pseudo random, unique ID generated by W&B.

Provide the name of the function the W&B Sweep will execute if you start a W&B Sweep agent within a Jupyter Notebook or Python script.

The proceeding code snippets demonstrate how to start an agent with W&B. We assume you already have a configuration file and you have already initialized a W&B Sweep. For more information about how to define a configuration file, see Define sweep configuration.

Use the wandb agent command to start a sweep. Provide the sweep ID that was returned when you initialized the sweep. Copy and paste the code snippet below and replace sweep_id with your sweep ID:

wandb agent sweep_id

Use the W&B Python SDK library to start a sweep. Provide the sweep ID that was returned when you initialized the sweep. In addition, provide the name of the function the sweep will execute.

wandb.agent(sweep_id=sweep_id, function=function_name)

Stop W&B agent

Optionally specify the number of W&B Runs a Sweep agent should try. The following code snippets demonstrate how to set a maximum number of W&B Runs with the CLI and within a Jupyter Notebook, Python script.

First, initialize your sweep. For more information, see Initialize sweeps.

sweep_id = wandb.sweep(sweep_config)

Next, start the sweep job. Provide the sweep ID generated from sweep initiation. Pass an integer value to the count parameter to set the maximum number of runs to try.

sweep_id, count = "dtzl1o7u", 10
wandb.agent(sweep_id, count=count)

First, initialize your sweep with the wandb sweep command. For more information, see Initialize sweeps.

wandb sweep config.yaml

Pass an integer value to the count flag to set the maximum number of runs to try.

NUM=10
SWEEPID="dtzl1o7u"
wandb agent --count $NUM $SWEEPID

6 - Parallelize agents

Parallelize W&B Sweep agents on multi-core or multi-GPU machine.

Parallelize your W&B Sweep agents on a multi-core or multi-GPU machine. Before you get started, ensure you have initialized your W&B Sweep. For more information on how to initialize a W&B Sweep, see Initialize sweeps.

Parallelize on a multi-CPU machine

Depending on your use case, explore the proceeding tabs to learn how to parallelize W&B Sweep agents using the CLI or within a Jupyter Notebook.

Use the wandb agent command to parallelize your W&B Sweep agent across multiple CPUs with the terminal. Provide the sweep ID that was returned when you initialized the sweep.

  1. Open more than one terminal window on your local machine.
  2. Copy and paste the code snippet below and replace sweep_id with your sweep ID:
wandb agent sweep_id

Use the W&B Python SDK library to parallelize your W&B Sweep agent across multiple CPUs within Jupyter Notebooks. Ensure you have the sweep ID that was returned when you initialized the sweep. In addition, provide the name of the function the sweep will execute for the function parameter:

  1. Open more than one Jupyter Notebook.
  2. Copy and past the W&B Sweep ID on multiple Jupyter Notebooks to parallelize a W&B Sweep. For example, you can paste the following code snippet on multiple jupyter notebooks to paralleliz your sweep if you have the sweep ID stored in a variable called sweep_id and the name of the function is function_name:
wandb.agent(sweep_id=sweep_id, function=function_name)

Parallelize on a multi-GPU machine

Follow the procedure outlined to parallelize your W&B Sweep agent across multiple GPUs with a terminal using CUDA Toolkit:

  1. Open more than one terminal window on your local machine.
  2. Specify the GPU instance to use with CUDA_VISIBLE_DEVICES when you start a W&B Sweep job (wandb agent). Assign CUDA_VISIBLE_DEVICES an integer value corresponding to the GPU instance to use.

For example, suppose you have two NVIDIA GPUs on your local machine. Open a terminal window and set CUDA_VISIBLE_DEVICES to 0 (CUDA_VISIBLE_DEVICES=0). Replace sweep_ID in the proceeding example with the W&B Sweep ID that is returned when you initialized a W&B Sweep:

Terminal 1

CUDA_VISIBLE_DEVICES=0 wandb agent sweep_ID

Open a second terminal window. Set CUDA_VISIBLE_DEVICES to 1 (CUDA_VISIBLE_DEVICES=1). Paste the same W&B Sweep ID for the sweep_ID mentioned in the proceeding code snippet:

Terminal 2

CUDA_VISIBLE_DEVICES=1 wandb agent sweep_ID

7 - Visualize sweep results

Visualize the results of your W&B Sweeps with the W&B App UI.

Visualize the results of your W&B Sweeps with the W&B App UI. Navigate to the W&B App UI at https://wandb.ai/home. Choose the project that you specified when you initialized a W&B Sweep. You will be redirected to your project workspace. Select the Sweep icon on the left panel (broom icon). From the Sweep UI, select the name of your Sweep from the list.

By default, W&B will automatically create a parallel coordinates plot, a parameter importance plot, and a scatter plot when you start a W&B Sweep job.

Animation that shows how to navigate to the Sweep UI interface and view autogenerated plots.

Parallel coordinates charts summarize the relationship between large numbers of hyperparameters and model metrics at a glance. For more information on parallel coordinates plots, see Parallel coordinates.

Example parallel coordinates plot.

The scatter plot(left) compares the W&B Runs that were generated during the Sweep. For more information about scatter plots, see Scatter Plots.

The parameter importance plot(right) lists the hyperparameters that were the best predictors of, and highly correlated to desirable values of your metrics. For more information parameter importance plots, see Parameter Importance.

Example scatter plot (left) and parameter importance plot (right).

You can alter the dependent and independent values (x and y axis) that are automatically used. Within each panel there is a pencil icon called Edit panel. Choose Edit panel. A model will appear. Within the modal, you can alter the behavior of the graph.

For more information on all default W&B visualization options, see Panels. See the Data Visualization docs for information on how to create plots from W&B Runs that are not part of a W&B Sweep.

8 - Manage sweeps with the CLI

Pause, resume, and cancel a W&B Sweep with the CLI.

Pause, resume, and cancel a W&B Sweep with the CLI. Pausing a W&B Sweep tells the W&B agent that new W&B Runs should not be executed until the Sweep is resumed. Resuming a Sweep tells the agent to continue executing new W&B Runs. Stopping a W&B Sweep tells the W&B Sweep agent to stop creating or executing new W&B Runs. Cancelling a W&B Sweep tells the Sweep agent to kill currently executing W&B Runs and stop executing new Runs.

In each case, provide the W&B Sweep ID that was generated when you initialized a W&B Sweep. Optionally open a new terminal window to execute the proceeding commands. A new terminal window makes it easier to execute a command if a W&B Sweep is printing output statements to your current terminal window.

Use the following guidance to pause, resume, and cancel sweeps.

Pause sweeps

Pause a W&B Sweep so it temporarily stops executing new W&B Runs. Use the wandb sweep --pause command to pause a W&B Sweep. Provide the W&B Sweep ID that you want to pause.

wandb sweep --pause entity/project/sweep_ID

Resume sweeps

Resume a paused W&B Sweep with the wandb sweep --resume command. Provide the W&B Sweep ID that you want to resume:

wandb sweep --resume entity/project/sweep_ID

Stop sweeps

Finish a W&B sweep to stop executing newW&B Runs and let currently executing Runs finish.

wandb sweep --stop entity/project/sweep_ID

Cancel sweeps

Cancel a sweep to kill all running runs and stop running new runs. Use the wandb sweep --cancel command to cancel a W&B Sweep. Provide the W&B Sweep ID that you want to cancel.

wandb sweep --cancel entity/project/sweep_ID

For a full list of CLI command options, see the wandb sweep CLI Reference Guide.

Pause, resume, stop, and cancel a sweep across multiple agents

Pause, resume, stop, or cancel a W&B Sweep across multiple agents from a single terminal. For example, suppose you have a multi-core machine. After you initialize a W&B Sweep, you open new terminal windows and copy the Sweep ID to each new terminal.

Within any terminal, use the wandb sweep CLI command to pause, resume, stop, or cancel a W&B Sweep. For example, the proceeding code snippet demonstrates how to pause a W&B Sweep across multiple agents with the CLI:

wandb sweep --pause entity/project/sweep_ID

Specify the --resume flag along with the Sweep ID to resume the Sweep across your agents:

wandb sweep --resume entity/project/sweep_ID

For more information on how to parallelize W&B agents, see Parallelize agents.

9 - Learn more about sweeps

Collection of useful sources for Sweeps.

Academic papers

Li, Lisha, et al. “Hyperband: A novel bandit-based approach to hyperparameter optimization.The Journal of Machine Learning Research 18.1 (2017): 6765-6816.

Sweep Experiments

The following W&B Reports demonstrate examples of projects that explore hyperparameter optimization with W&B Sweeps.

selfm-anaged

The following how-to-guide demonstrates how to solve real-world problems with W&B:

Sweep GitHub repository

W&B advocates open source and welcome contributions from the community. Find the GitHub repository at https://github.com/wandb/sweeps. For information on how to contribute to the W&B open source repo, see the W&B GitHub Contribution guidelines.

10 - Manage algorithms locally

Search and stop algorithms locally instead of using the W&B cloud-hosted service.

The hyper-parameter controller is hosted by Weights & Biased as a cloud service by default. W&B agents communicate with the controller to determine the next set of parameters to use for training. The controller is also responsible for running early stopping algorithms to determine which runs can be stopped.

The local controller feature allows the user to commence search and stop algorithms locally. The local controller gives the user the ability to inspect and instrument the code in order to debug issues as well as develop new features which can be incorporated into the cloud service.

Before you get start, you must install the W&B SDK(wandb). Type the following code snippet into your command line:

pip install wandb sweeps 

The following examples assume you already have a configuration file and a training loop defined in a python script or Jupyter Notebook. For more information about how to define a configuration file, see Define sweep configuration.

Run the local controller from the command line

Initialize a sweep similarly to how you normally would when you use hyper-parameter controllers hosted by W&B as a cloud service. Specify the controller flag (controller) to indicate you want to use the local controller for W&B sweep jobs:

wandb sweep --controller config.yaml

Alternatively, you can separate initializing a sweep and specifying that you want to use a local controller into two steps.

To separate the steps, first add the following key-value to your sweep’s YAML configuration file:

controller:
  type: local

Next, initialize the sweep:

wandb sweep config.yaml

After you initialized the sweep, start a controller with wandb controller:

# wandb sweep command will print a sweep_id
wandb controller {user}/{entity}/{sweep_id}

Once you have specified you want to use a local controller, start one or more Sweep agents to execute the sweep. Start a W&B Sweep similar to how you normally would. See Start sweep agents, for more information.

wandb sweep sweep_ID

Run a local controller with W&B Python SDK

The following code snippets demonstrate how to specify and use a local controller with the W&B Python SDK.

The simplest way to use a controller with the Python SDK is to pass the sweep ID to the wandb.controller method. Next, use the return objects run method to start the sweep job:

sweep = wandb.controller(sweep_id)
sweep.run()

If you want more control of the controller loop:

import wandb

sweep = wandb.controller(sweep_id)
while not sweep.done():
    sweep.print_status()
    sweep.step()
    time.sleep(5)

Or even more control over the parameters served:

import wandb

sweep = wandb.controller(sweep_id)
while not sweep.done():
    params = sweep.search()
    sweep.schedule(params)
    sweep.print_status()

If you want to specify your sweep entirely with code you can do something like this:

import wandb

sweep = wandb.controller()
sweep.configure_search("grid")
sweep.configure_program("train-dummy.py")
sweep.configure_controller(type="local")
sweep.configure_parameter("param1", value=3)
sweep.create()
sweep.run()

11 - Sweeps troubleshooting

Troubleshoot common W&B Sweep issues.

Troubleshoot common error messages with the guidance suggested.

CommError, Run does not exist and ERROR Error uploading

Your W&B Run ID might be defined if these two error messages are both returned. As an example, you might have a similar code snippet defined somewhere in your Jupyter Notebooks or Python script:

wandb.init(id="some-string")

You can not set a Run ID for W&B Sweeps because W&B automatically generates random, unique IDs for Runs created by W&B Sweeps.

W&B Run IDs need to be unique within a project.

We recommend you pass a name to the name parameter when you initialized W&B, if you want to set a custom name that will appear on tables and graphs. For example:

wandb.init(name="a helpful readable run name")

Cuda out of memory

Refactor your code to use process-based executions if you see this error message. More specifically, rewrite your code to a Python script. In addition, call the W&B Sweep Agent from the CLI, instead of the W&B Python SDK.

As an example, suppose you rewrite your code to a Python script called train.py. Add the name of the training script (train.py) to your YAML Sweep configuration file (config.yaml in this example):

program: train.py
method: bayes
metric:
  name: validation_loss
  goal: maximize
parameters:
  learning_rate:
    min: 0.0001
    max: 0.1
  optimizer:
    values: ["adam", "sgd"]

Next, add the following to your train.py Python script:

if _name_ == "_main_":
    train()

Navigate to your CLI and initialize a W&B Sweep with wandb sweep:

wandb sweep config.yaml

Make a note of the W&B Sweep ID that is returned. Next, start the Sweep job with wandb agent with the CLI instead of the Python SDK (wandb.agent). Replace sweep_ID in the code snippet below with the Sweep ID that was returned in the previous step:

wandb agent sweep_ID

anaconda 400 error

The following error usually occurs when you do not log the metric that you are optimizing:

wandb: ERROR Error while calling W&B API: anaconda 400 error: 
{"code": 400, "message": "TypeError: bad operand type for unary -: 'NoneType'"}

Within your YAML file or nested dictionary you specify a key named “metric” to optimize. Ensure that you log (wandb.log) this metric. In addition, ensure you use the exact metric name that you defined the sweep to optimize within your Python script or Jupyter Notebook. For more information about configuration files, see Define sweep configuration.

12 - Sweeps UI

Describes the different components of the Sweeps UI.

The state (State), creation time (Created), the entity that started the sweep (Creator), the number of runs completed (Run count), and the time it took to compute the sweep (Compute time) are displayed in the Sweeps UI. The expected number of runs a sweep will create (Est. Runs) is provided when you do a grid search over a discrete search space. You can also click on a sweep to pause, resume, stop, or kill the sweep from the interface.

13 - Tutorial: Create sweep job from project

Tutorial on how to create sweep jobs from a pre-existing W&B project.

This tutorial explains how to create sweep jobs from a pre-existing W&B project. We will use the Fashion MNIST dataset to train a PyTorch convolutional neural network how to classify images. The required code an dataset is located in the W&B repo: https://github.com/wandb/examples/tree/master/examples/pytorch/pytorch-cnn-fashion

Explore the results in this W&B Dashboard.

1. Create a project

First, create a baseline. Download the PyTorch MNIST dataset example model from W&B examples GitHub repository. Next, train the model. The training script is within the examples/pytorch/pytorch-cnn-fashion directory.

  1. Clone this repo git clone https://github.com/wandb/examples.git
  2. Open this example cd examples/pytorch/pytorch-cnn-fashion
  3. Run a run manually python train.py

Optionally explore the example appear in the W&B App UI dashboard.

View an example project page →

2. Create a sweep

From your project page, open the Sweep tab in the sidebar and select Create Sweep.

The auto-generated configuration guesses values to sweep over based on the runs you have completed. Edit the configuration to specify what ranges of hyperparameters you want to try. When you launch the sweep, it starts a new process on the hosted W&B sweep server. This centralized service coordinates the agents— the machines that are running the training jobs.

3. Launch agents

Next, launch an agent locally. You can launch up to 20 agents on different machines in parallel if you want to distribute the work and finish the sweep job more quickly. The agent will print out the set of parameters it’s trying next.

Now you’re running a sweep. The following image demonstrates what the dashboard looks like as the example sweep job is running. View an example project page →

Seed a new sweep with existing runs

Launch a new sweep using existing runs that you’ve previously logged.

  1. Open your project table.
  2. Select the runs you want to use with checkboxes on the left side of the table.
  3. Click the dropdown to create a new sweep.

Your sweep will now be set up on our server. All you need to do is launch one or more agents to start running runs.