- Quick access: Open the Playground from the Weave sidebar menu for a fresh session or from the Call page to test an existing project.
- Message controls: Edit, retry, or delete messages directly within the chat.
- Flexible messaging: Add new messages as either user or system inputs, and send them to the LLM.
- Customizable settings: Configure your preferred LLM provider and adjust model settings.
- Multi-LLM support: Switch between models, with team-level API key management.
- Compare models: Compare how different models respond to prompts.
- Custom providers: Test OpenAI-compatible API endpoints for custom models.
- Saved models: Create and configure a reusable model preset for your workflow.
- Add provider credentials and information
- Access the Playground
- Select an LLM
- Customize Playground settings
- Message controls
- Compare LLMs
- Custom providers
- Saved models
Add provider credentials and information
Before you can use Playground, you must add provider credentials so that Playground can authenticate requests to each model provider on your behalf. Playground supports models from many providers. To use one of the available models, you must add the appropriate information to your team secrets in W&B settings.- Amazon Bedrock:
AWS_ACCESS_KEY_IDAWS_SECRET_ACCESS_KEYAWS_REGION_NAME
- Anthropic:
ANTHROPIC_API_KEY - Azure:
AZURE_API_KEYAZURE_API_BASEAZURE_API_VERSION
- Deepseek:
DEEPSEEK_API_KEY - Google:
GEMINI_API_KEY - Groq:
GROQ_API_KEY - Mistral:
MISTRAL_API_KEY - OpenAI:
OPENAI_API_KEY - X.AI:
XAI_API_KEY
Access the Playground
You can access the Playground in two ways:- Open a fresh Playground page with a default system prompt: In the sidebar of a Weave project, select Playground. Playground opens in the same tab.
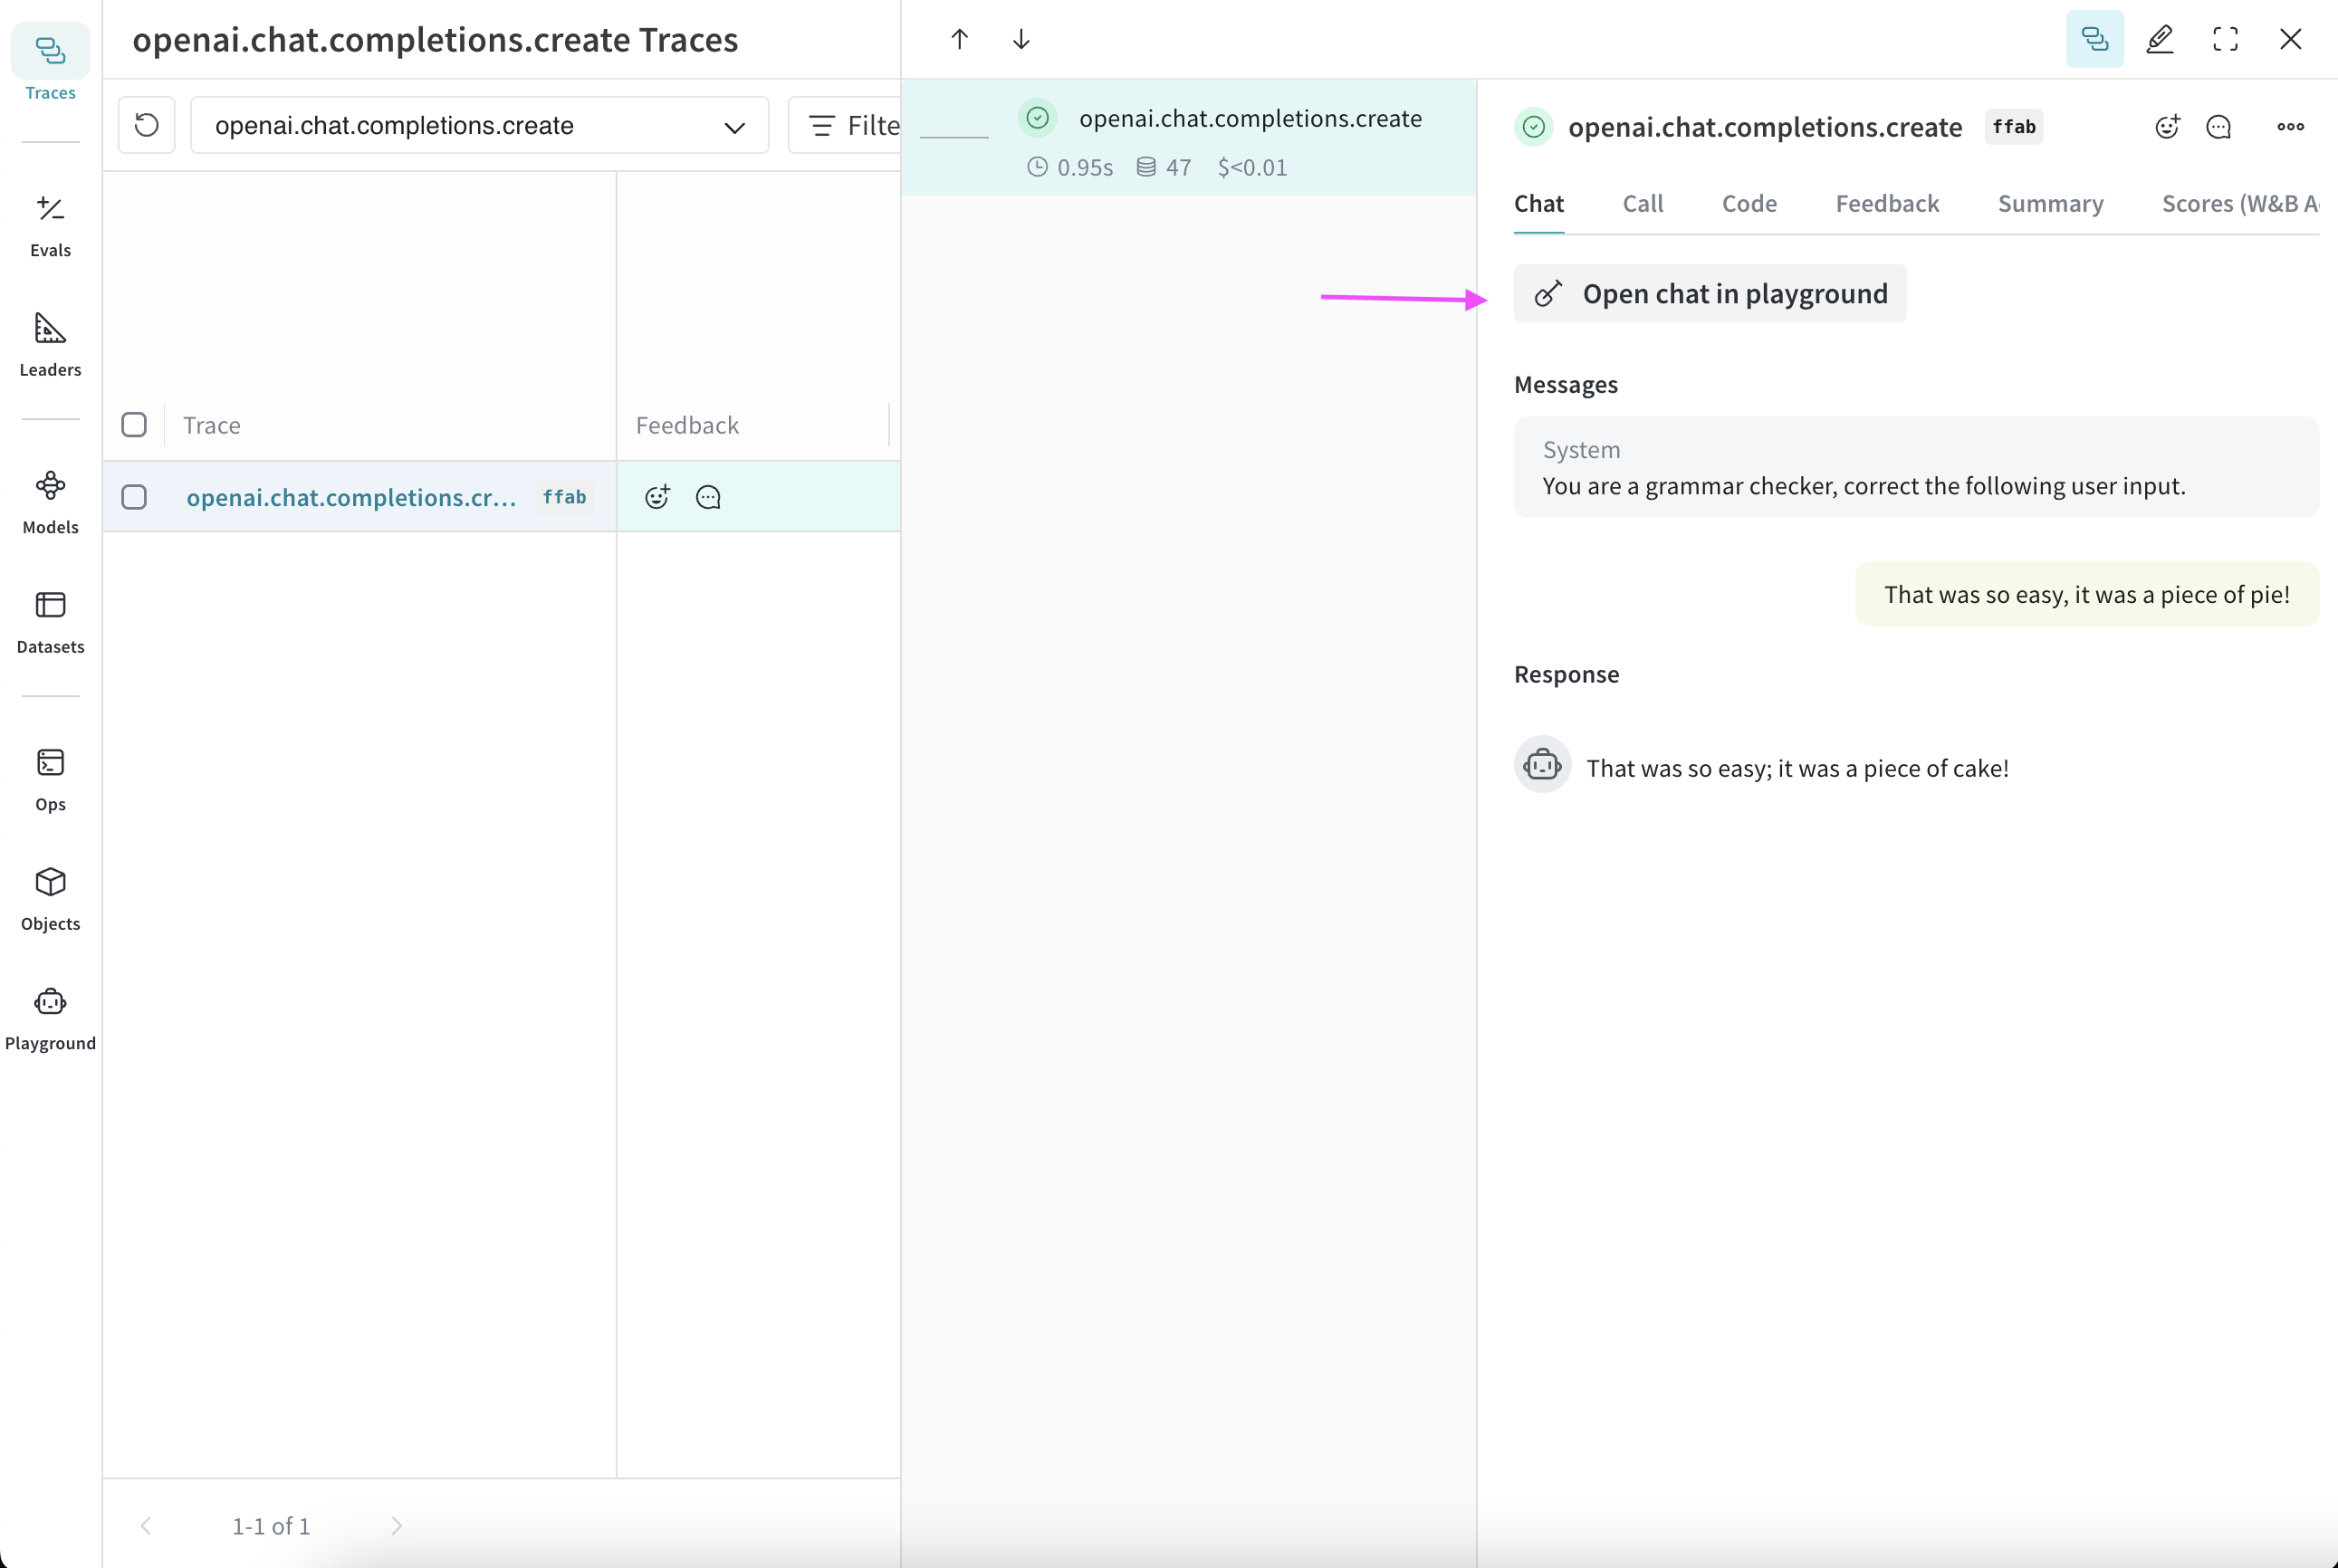
- Open Playground for a specific call:
- In the sidebar, select the Traces tab. A list of traces displays.
- In the list of traces, click the name of the call that you want to view. The call’s details page opens.
- Click Open chat in Playground. Playground opens in a new tab.
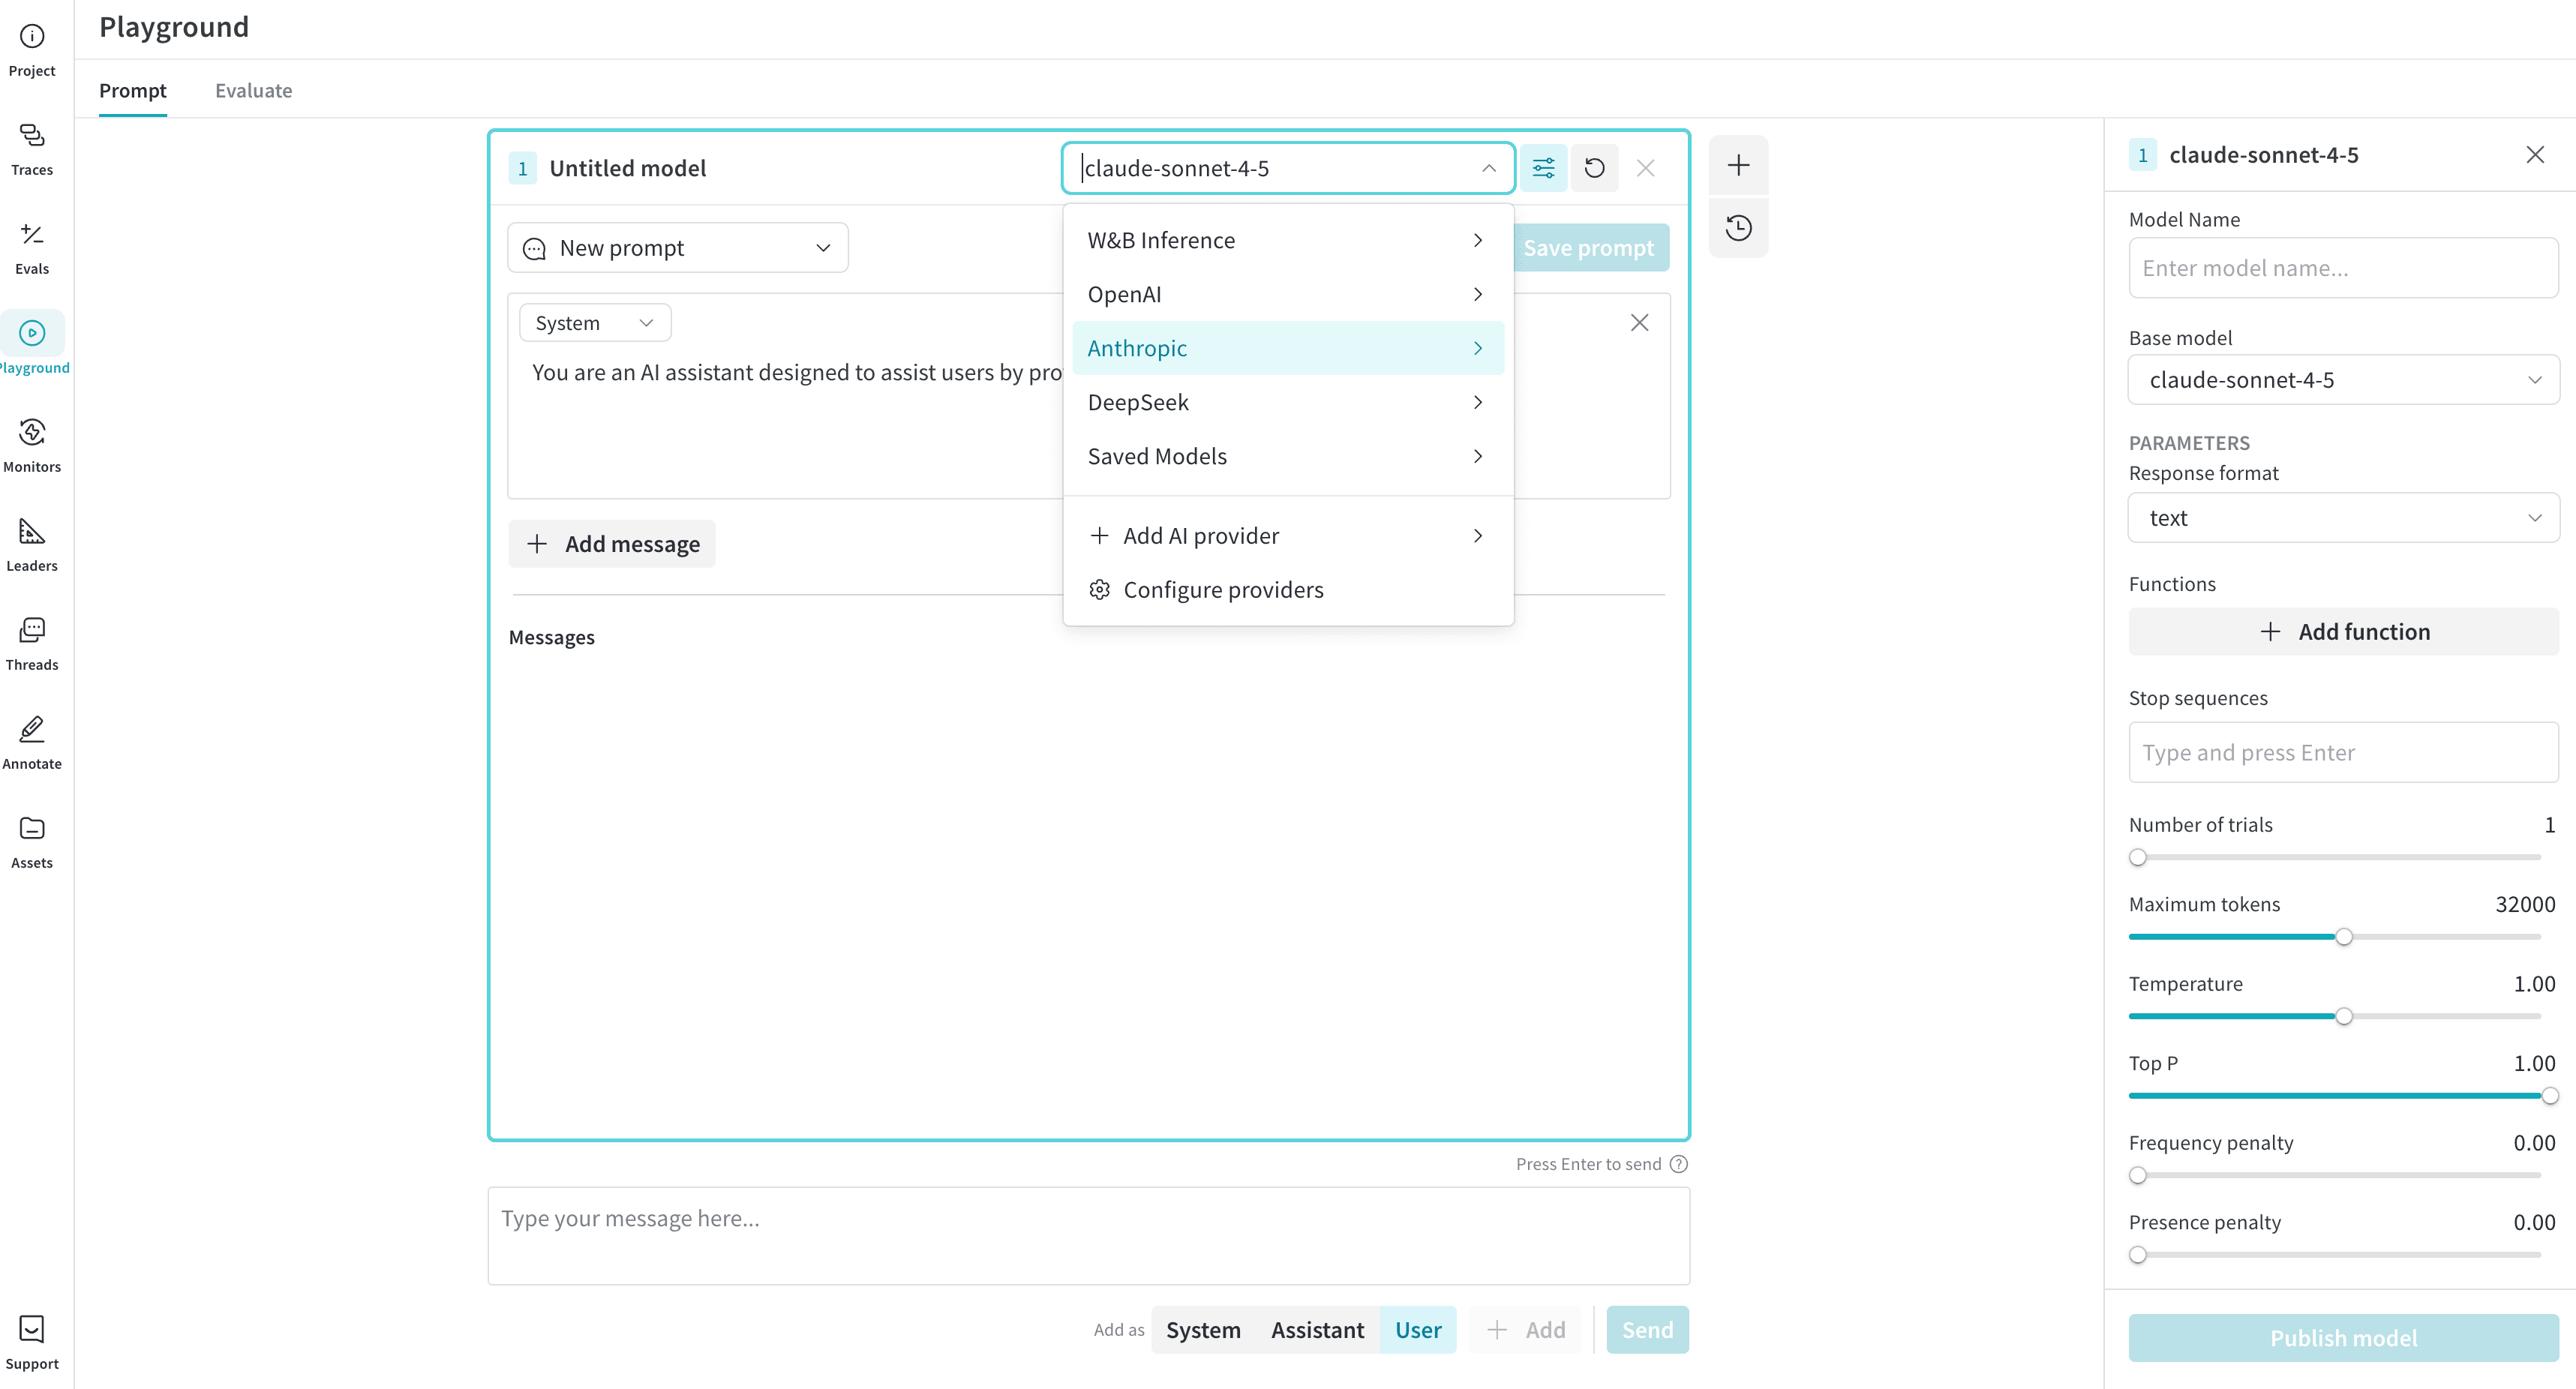
Select an LLM
You can switch the LLM using the Select a model dropdown in the prompt header (top of the main Playground panel). The following providers are available:- Amazon Bedrock
- Anthropic
- Azure
- Deepseek
- Groq
- Mistral
- OpenAI
- X.AI
Customize Playground settings
You can adjust the parameters of your selected model and add functions for the model to call. The following sections describe how to customize Playground settings.Adjust LLM parameters
You can experiment with different parameter values for your selected model. To adjust parameters in the Playground, do the following:- In the prompt header (top of main panel), click the Chat settings () button to open the Chat settings panel.
- In the Chat settings panel, adjust parameters as desired. You can also toggle Weave call tracking on or off, and add a function.
- Changes apply automatically. Click Chat settings again, or the x in the upper-right corner, to close the panel. The hover text for the Chat settings button shows the settings you’ve changed.
If you leave the page, your settings are lost. To save your settings, save your model. If you want to discard your changed settings and start over, refresh the page.
1. To adjust the number of trials, open the Chat settings panel and adjust the Number of trials setting.
Add a function
You can test how different models use functions based on input they receive from the user. To add a function for testing in Playground, in the Chat settings panel, click + Add function. Follow the on-screen guidance to define the function and save your changes.Message controls
The Playground chat interface is organized into three areas: the prompt definition area, the messages panel, and the message composer. The following sections describe each area.Prompt definition area
The Prompt definition area lets you define the instructions that shape the model’s behavior throughout an interaction. Use this area to provide context that applies consistently before any messages are exchanged. This includes role definition, tone and style guidance, behavioral constraints, and output requirements. Changes made here affect all subsequent interactions unless modified. It includes:- Prompt selector: Select an existing saved prompt or create a new one.
- Message role selector: Specify the role of the message being defined (System, Assistant, or User role).
- Prompt text: Enter the instruction text that establishes how the model responds.
- Add message button: Lets you include additional messages in the prompt context before execution.
- Add supplemental system-level instructions.
- Provide example assistant messages to guide responses (such as few-shot prompting).
- Predefine user messages for testing specific scenarios.
Messages panel
The Messages panel displays the conversation generated during execution. It includes:- Any predefined messages included in the prompt setup.
- Messages sent from the message composer.
- Responses returned by the model.
Message composer (input field)
Use the Message composer to send new messages to the model. It supports selecting the message role and submitting messages for execution. Most interactions are authored as User messages. You can add System or Assistant messages when testing instruction changes.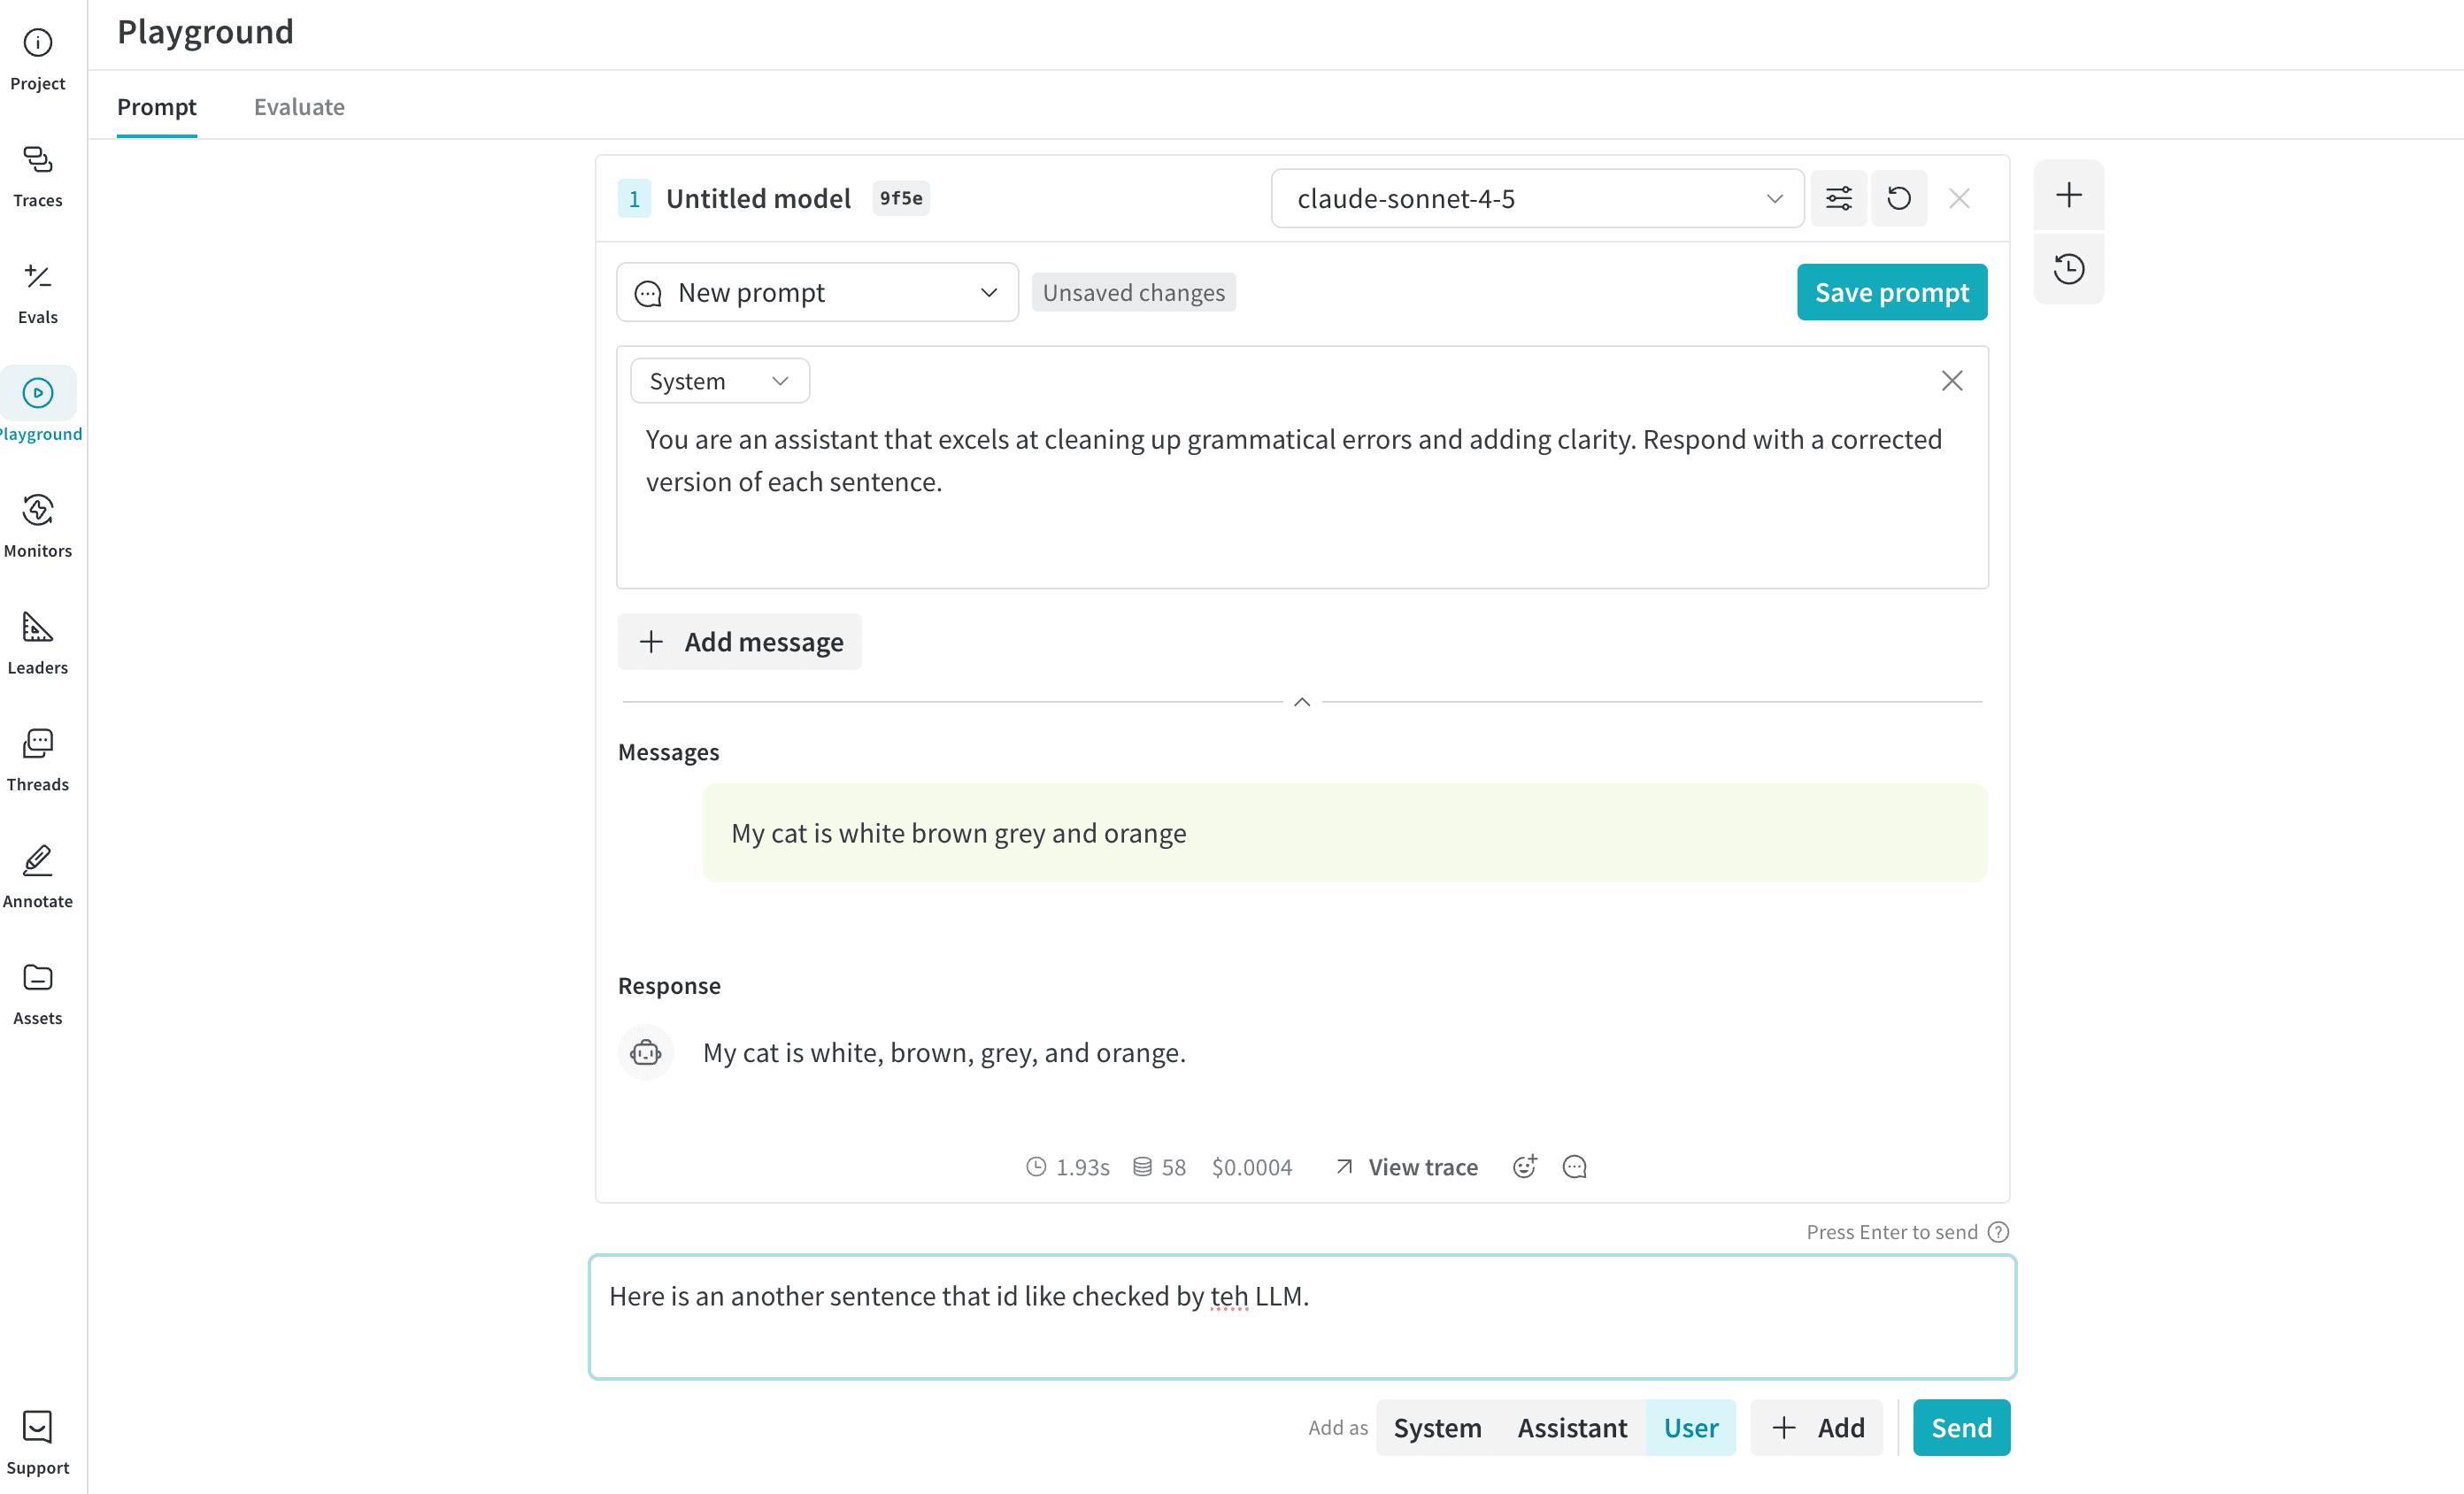
View message history
To view message history, click the History () button in the right-side Playground toolbar. This opens a History panel showing all messages sent for the current project. Selecting an item from the history loads it into an additional chat panel for comparison.Compare LLMs
Playground lets you compare LLMs side by side so you can evaluate how different models respond to the same prompts. To perform a comparison, click the Add Chat () button in the right-side Playground toolbar. A second chat opens next to the original chat. The second chat has the same functionality as the original chat, such as choosing the model, adjusting the settings, and adding functions.Custom providers
In addition to the built-in providers, the Playground supports custom providers that expose OpenAI-compatible API endpoints. The following sections describe how to add, edit, remove, and use custom providers.Add a custom provider
In addition to the built-in providers, you can use the Playground to test OpenAI-compatible API endpoints for custom models. Examples include:- Older versions of supported model providers
- Local models
- In the prompt header (top of main panel), click the Select a model dropdown.
- Select + Add AI provider.
- Select Custom Provider.
- In the pop-up modal, enter the provider information:
- Provider name: A name for the provider, such as
openaiorollama. - API key: The API key for the provider, such as an OpenAI API key.
- Base URL: The base endpoint for the provider, such as
https://api.openai.com/v1/or an ngrok URL likehttps://e452-2600-1700-45f0-3e10-2d3f-796b-d6f2-8ba7.ngrok-free.app. - Headers (Optional): One or more custom HTTP header key-value pairs.
- Models: One or more models for the provider, such as
deepseek-r1orqwq. - Max tokens (Optional): For each model, the maximum number of tokens the model can generate in a response.
- Provider name: A name for the provider, such as
- After you’ve entered your provider information, click Add provider.
- Select your new provider and available models from the Select a model dropdown.
Edit a custom provider
To edit information for a previously created custom provider, do the following:- In the prompt header, click the Select a model dropdown. Then select +Configure providers.
- Alternatively, in the sidebar menu, you can select Project, and then select the AI Providers tab.
- In the Custom providers table, find the custom provider you want to update.
- In the Last Updated column of the entry for your custom provider, click the edit button (the pencil icon).
- In the pop-up modal, edit the provider information.
- Click Save.
Remove a custom provider
To remove a previously created custom provider, do the following:- In the prompt header, click the Select a model dropdown. Then select +Configure providers.
- Alternatively, in the sidebar menu, you can select Project, and then select the AI Providers tab.
- In the Custom providers table, find the custom provider you want to update.
- In the Last Updated column of the entry for your custom provider, click the delete button (the trashcan icon).
- In the pop-up modal, confirm that you want to delete the provider. You can’t undo this action.
- Click Delete.
Use a local model as a custom provider
To test a locally running model in the Playground, use ngrok and Ollama to create a temporary public URL that avoids CORS restrictions. This lets the Playground reach a model that is running on your own machine without violating browser security policies. To set it up, do the following:- Install ngrok for your operating system.
-
Start your Ollama model. Replace
[MODEL]with the name of the Ollama model you want to run. -
In a separate terminal, create an ngrok tunnel with the required CORS headers:
-
After ngrok starts, it displays a public URL, such as
https://xxxx-xxxx.ngrok-free.app. Use this URL as the Base URL when you add a custom provider in the Playground.
Saved models
Saved models let you preserve a provider, model, parameters, and function hooks as a reusable preset. The following sections describe how to save, use, and update a model.Save a model
You can create and configure a reusable model preset for your workflow. Saving a model lets you quickly load it with your preferred settings, parameters, and function hooks.- In the prompt header (top of main panel), in the Select a model dropdown, select a provider and model.
- In the prompt header, click the Chat settings () button to open the Chat settings panel.
- In the Chat settings panel:
- Model Name (required): Enter a name for your saved model.
- Adjust parameters as desired. You can also toggle Weave call tracking on or off, and add a function.
- Click Publish model. The model is saved and accessible from Saved Models in the Select a model dropdown. You can then use and update the saved model.
Use a saved model
Switch to a previously saved model to maintain consistency across experiments or sessions. This way you can pick up where you left off.- In the prompt header, in the Select a model dropdown, select Saved Models.
- From the list of saved models, select the saved model you want to load. The model loads and is ready to use in the Playground.
Update a saved model
Edit an existing saved model to fine-tune parameters or refresh its configuration. This way, your saved models evolve alongside your use cases.- In the prompt header, in the Select a model dropdown, select Saved Models.
- From the list of saved models, select the saved model you want to update.
- In the prompt header, click the Chat settings () button to open the Chat settings panel.
- In the Chat settings panel, adjust parameters as desired. You can also toggle Weave call tracking on or off, and add a function.
- Click Update model. This updates the model and makes it accessible from Saved Models in the Select a model dropdown. The version of your saved model increments automatically.