LLM 평가 작업은 W&B Multi-tenant Cloud에서 프리뷰 기능으로 제공됩니다. 프리뷰 기간에는 컴퓨팅이 무료입니다. 자세한 내용은 LLM Evaluation Jobs 가격을 참조하세요.
사전 요구 사항
- LLM Evaluation Jobs의 요구 사항 및 제한 사항을 검토하세요.
- 일부 벤치마크를 실행하려면 팀 관리자가 필요한 API 키를 팀 범위 시크릿으로 추가해야 합니다. 평가 작업을 구성할 때는 모든 팀원이 이 시크릿을 지정할 수 있습니다. 요구 사항은 Evaluation model catalog를 참조하세요.
- OpenAPI API 키: 점수 산정에 OpenAI 모델을 사용하는 벤치마크에서 사용됩니다. 벤치마크를 선택한 뒤 Scorer API key 필드가 나타나면 필요합니다. 시크릿 이름은
OPENAI_API_KEY여야 합니다. - Hugging Face 사용자 액세스 토큰: 하나 이상의 제한된 Hugging Face 데이터셋에 대한 액세스가 필요한
lingoly,lingoly2같은 일부 벤치마크에 필요합니다. 벤치마크를 선택한 뒤 Hugging Face token 필드가 나타나면 필요합니다. 이 API 키에는 해당 데이터셋에 대한 액세스 권한이 있어야 합니다. 자세한 내용은 Hugging Face 문서의 User access tokens 및 accessing gated datasets를 참조하세요.
- OpenAPI API 키: 점수 산정에 OpenAI 모델을 사용하는 벤치마크에서 사용됩니다. 벤치마크를 선택한 뒤 Scorer API key 필드가 나타나면 필요합니다. 시크릿 이름은
- 평가 결과를 저장할 새 W&B 프로젝트를 만드세요. 프로젝트 사이드바에서 Create new project를 클릭합니다.
- 모델을 VLLM 호환 형식으로 패키징한 뒤 W&B Models에 아티팩트로 저장하세요. 다른 유형의 아티팩트를 벤치마크하려고 하면 실패합니다. 한 가지 방법은 다음 예시: Prepare a model 섹션을 참조하세요.
- 사용할 벤치마크의 문서를 검토해 작동 방식을 이해하고 구체적인 요구 사항을 확인하세요. 편의를 위해 Available evaluation benchmarks 레퍼런스에 관련 링크가 포함되어 있습니다.
모델 평가
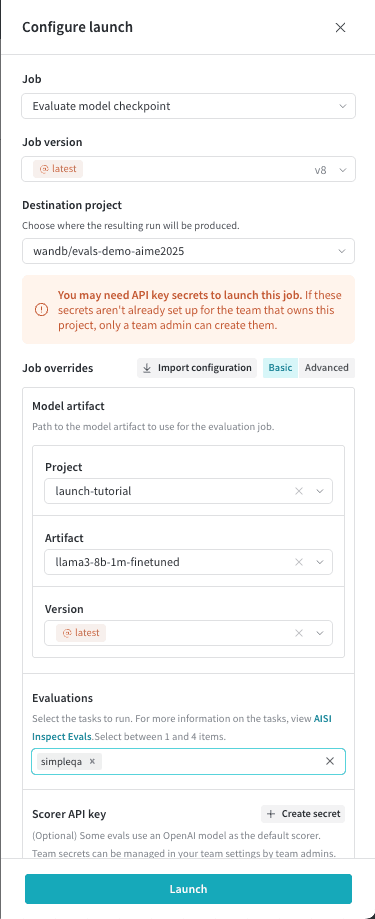
- W&B에 로그인한 다음 프로젝트 사이드바에서 Launch를 클릭합니다. LLM Evaluation Jobs 페이지가 표시됩니다.
- 모델 체크포인트 평가하기를 클릭하여 평가 작업을 설정합니다.
- 평가 결과를 저장할 대상 프로젝트를 선택합니다.
- Model artifact 섹션에서 평가할 준비된 모델의 프로젝트, 아티팩트, 버전을 지정합니다.
- Evaluations를 클릭한 다음 벤치마크를 최대 4개까지 선택합니다.
- 점수 산정에 OpenAI 모델을 사용하는 벤치마크를 선택하면 Scorer API key 필드가 표시됩니다. 이 필드를 클릭한 다음
OPENAI_API_KEY시크릿을 선택합니다. 편의를 위해 팀 관리자는 Create secret를 클릭해 이 drawer에서 시크릿을 생성할 수 있습니다. - Hugging Face의 제한된 데이터셋에 대한 액세스가 필요한 벤치마크를 선택하면 Hugging Face token 필드가 표시됩니다. 관련 데이터셋에 대한 액세스를 요청한 다음, Hugging Face 사용자 액세스 token이 포함된 시크릿을 선택합니다.
- 선택 사항: Sample limit를 양의 정수로 설정해 평가할 벤치마크 샘플의 최대 개수를 제한합니다. 그렇지 않으면 작업에 있는 모든 샘플이 포함됩니다.
- 리더보드를 자동으로 만들려면 Publish results to leaderboard를 클릭합니다. 리더보드에는 모든 평가가 워크스페이스 패널에 함께 표시되며, 리포트에서 공유할 수도 있습니다.
- Launch를 클릭하여 평가 작업을 Launch합니다.
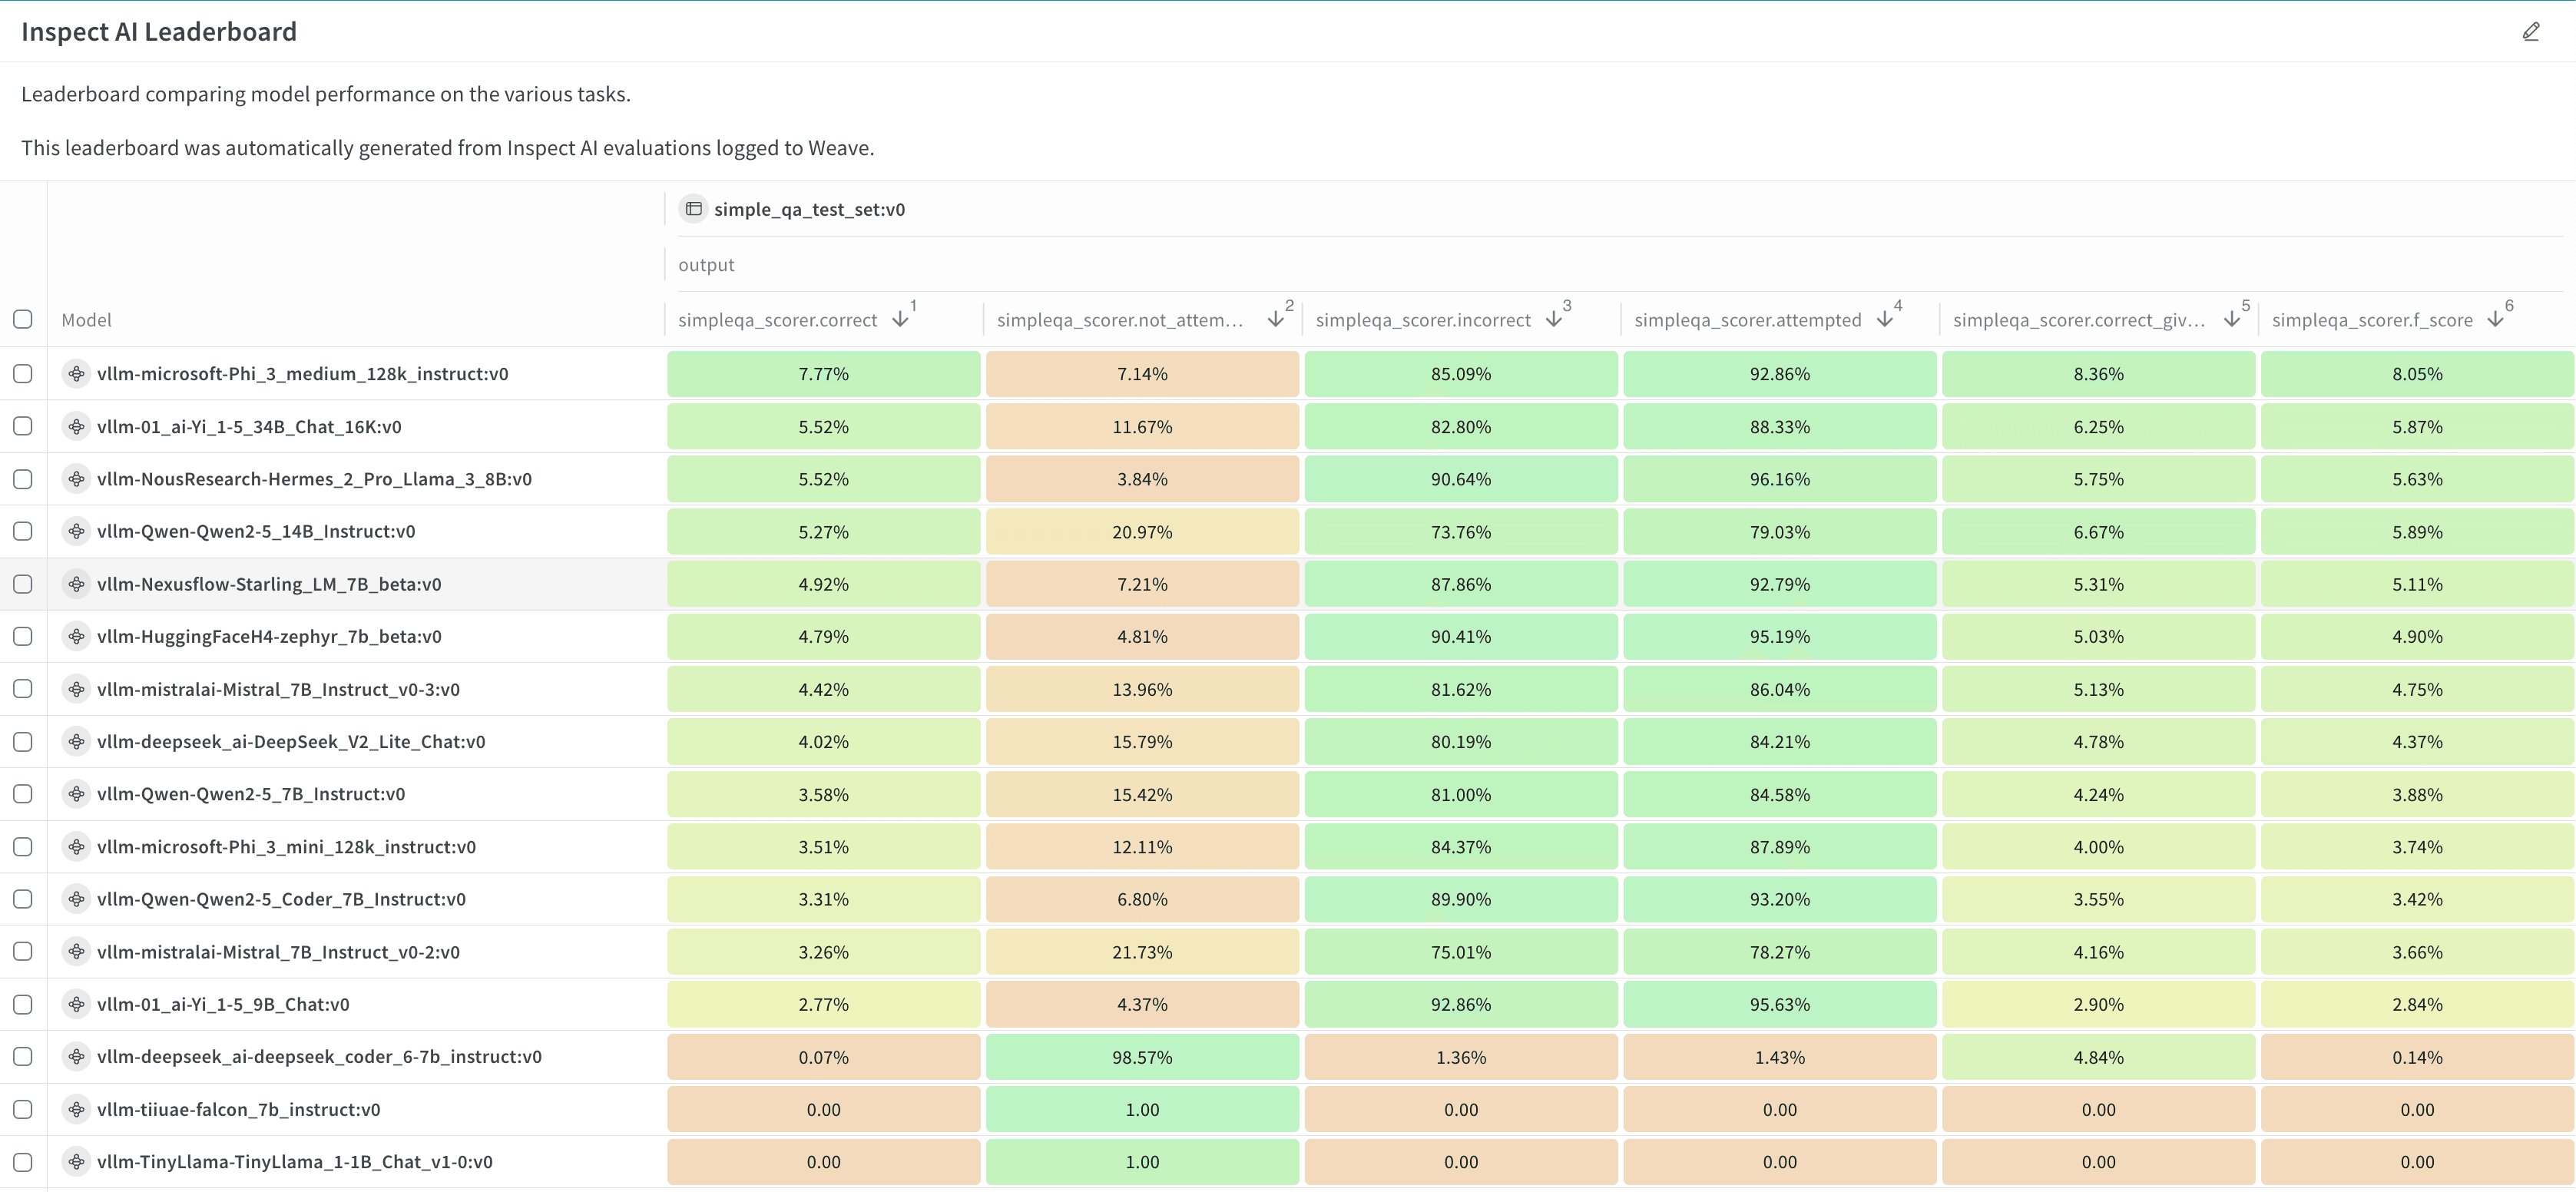
- 페이지 상단의 원형 화살표 아이콘을 클릭하여 최근 run 모달을 엽니다. 평가 작업은 다른 최근 run과 함께 표시됩니다. 완료된 run의 이름을 클릭하면 단일 run 뷰로 열리고, Leaderboard 링크를 클릭하면 리더보드가 바로 열립니다. 자세한 내용은 결과 보기를 참조하세요.
평가 결과 검토
- 페이지 상단의 원형 화살표 아이콘을 클릭하여 최근 run 모달을 엽니다. 이 모달에는 평가 작업이 프로젝트의 다른 run과 함께 표시됩니다. 평가 작업에 리더보드가 있으면 Leaderboard를 클릭해 리더보드를 전체 화면으로 열거나, run 이름을 클릭해 프로젝트의 단일 run 뷰에서 엽니다.
- 워크스페이스의 Evaluations 섹션 또는 Weave 사이드바 패널의 Traces 탭에서 평가 작업의 트레이스를 확인합니다.
- Overview 탭을 클릭하여 평가 작업의 설정과 요약 메트릭을 포함한 자세한 정보를 확인합니다.
- Logs 탭을 클릭하여 평가 작업의 디버그 로그를 확인, 검색 또는 다운로드합니다.
- Files 탭을 클릭하여 코드, 로그, 설정 및 기타 출력 파일을 포함한 평가 작업의 파일을 찾아보거나 확인하거나 다운로드합니다.
리더보드 사용자 지정하기
- 기본적으로 모든 평가 작업이 표시됩니다. 왼쪽의 run 선택기를 사용해 평가 작업을 필터링하거나 검색하세요.
- 기본적으로 평가 작업은 그룹화되지 않습니다. 하나 이상의 열을 기준으로 그룹화하려면 Group 아이콘을 클릭하세요. 그룹을 표시하거나 숨길 수 있으며, 그룹을 펼쳐 해당 run을 볼 수 있습니다.
- 기본적으로 모든 오퍼레이션이 표시됩니다. 하나의 오퍼레이션만 표시하려면 All ops를 클릭하고 오퍼레이션을 선택하세요.
- 열을 기준으로 정렬하려면 열 헤더를 클릭하세요. 열 표시를 사용자 지정하려면 Columns를 클릭하세요.
- 기본적으로 헤더는 단일 수준으로 구성됩니다. 관련 헤더를 함께 묶으려면 헤더 깊이를 늘릴 수 있습니다.
- 개별 열을 선택하거나 선택 해제해 표시하거나 숨길 수 있으며, 한 번의 클릭으로 모든 열을 표시하거나 숨길 수도 있습니다.
- 고정된 열이 고정되지 않은 열보다 먼저 표시되도록 열을 고정할 수 있습니다.
리더보드 내보내기
- Columns 버튼 근처에 있는 다운로드 아이콘을 클릭합니다.
- 내보내기 크기를 줄이기 위해 W&B는 기본적으로 트레이스 루트만 내보냅니다. 전체 트레이스를 내보내려면 Trace roots only를 끄세요.
- 내보내기 크기를 줄이기 위해 W&B는 기본적으로 피드백과 비용은 내보내지 않습니다. 내보내기에 포함하려면 Feedback 또는 Costs를 켜세요.
- 기본적으로 JSONL 형식으로 내보냅니다. 형식을 사용자 지정하려면 Export to file을 클릭한 다음 형식을 선택하세요.
- 브라우저에서 리더보드를 내보내려면 Export를 클릭하세요.
- 리더보드를 프로그래밍 방식으로 내보내려면 Python 또는 cURL을 선택한 다음 Copy를 클릭하고 스크립트나 명령어를 실행하세요.
평가 작업 다시 실행
- 마지막으로 실행한 평가 작업을 다시 실행하려면 모델 평가하기의 단계를 따르세요. 대상 프로젝트를 선택하면 이전에 선택한 모델 artifact 세부 정보와 벤치마크가 자동으로 채워집니다. 필요에 따라 조정한 다음 평가 작업을 Launch하세요.
- 프로젝트의 Runs 탭 또는 run selector에서 평가 작업을 다시 실행하려면 run 이름 위에 마우스를 올리고 play 아이콘을 클릭하세요. 설정이 미리 채워진 작업 설정 drawer가 표시됩니다. 필요에 따라 설정을 조정한 다음 Launch를 클릭하세요.
- 다른 프로젝트의 평가 작업을 다시 실행하려면 해당 설정을 임포트하세요:
- 모델 평가하기의 단계를 따르세요. 대상 프로젝트를 선택한 후 설정 임포트를 클릭하세요.
- 임포트할 평가 작업이 있는 프로젝트를 선택한 다음 해당 평가 작업 run을 선택하세요. 설정이 미리 채워진 작업 설정 drawer가 표시됩니다.
- 필요에 따라 설정을 조정하세요.
- Launch를 클릭하세요.
평가 작업 설정 내보내기
config.yaml 로컬 복사본을 저장하려면 run의 Files 탭에서 설정을 내보내세요.
- 단일 run 뷰에서 run을 엽니다.
- run에서 Files를 선택합니다.
config.yaml옆의 다운로드 버튼을 선택합니다.