Deploy W&B Platform on AWS
11 minute read
W&B recommends using the W&B Server AWS Terraform Module to deploy the platform on AWS.
Before you start, W&B recommends that you choose one of the remote backends available for Terraform to store the State File.
The State File is the necessary resource to roll out upgrades or make changes in your deployment without recreating all components.
The Terraform Module deploys the following mandatory components:
- Load Balancer
- AWS Identity & Access Management (IAM)
- AWS Key Management System (KMS)
- Amazon Aurora MySQL
- Amazon VPC
- Amazon S3
- Amazon Route53
- Amazon Certificate Manager (ACM)
- Amazon Elastic Load Balancing (ALB)
- Amazon Secrets Manager
Other deployment options can also include the following optional components:
- Elastic Cache for Redis
- SQS
Pre-requisite permissions
The account that runs Terraform needs to be able to create all components described in the Introduction and permission to create IAM Policies and IAM Roles and assign roles to resources.
General steps
The steps on this topic are common for any deployment option covered by this documentation.
-
Prepare the development environment.
- Install Terraform
- W&B recommend creating a Git repository for version control.
-
Create the
terraform.tfvarsfile.The
tvfarsfile content can be customized according to the installation type, but the minimum recommended will look like the example below.namespace = "wandb" license = "xxxxxxxxxxyyyyyyyyyyyzzzzzzz" subdomain = "wandb-aws" domain_name = "wandb.ml" zone_id = "xxxxxxxxxxxxxxxx" allowed_inbound_cidr = ["0.0.0.0/0"] allowed_inbound_ipv6_cidr = ["::/0"] eks_cluster_version = "1.29"Ensure to define variables in your
tvfarsfile before you deploy because thenamespacevariable is a string that prefixes all resources created by Terraform.The combination of
subdomainanddomainwill form the FQDN that W&B will be configured. In the example above, the W&B FQDN will bewandb-aws.wandb.mland the DNSzone_idwhere the FQDN record will be created.Both
allowed_inbound_cidrandallowed_inbound_ipv6_cidralso require setting. In the module, this is a mandatory input. The proceeding example permits access from any source to the W&B installation. -
Create the file
versions.tfThis file will contain the Terraform and Terraform provider versions required to deploy W&B in AWS
provider "aws" {
  region = "eu-central-1"

  default_tags {
    tags = {
      GithubRepo = "terraform-aws-wandb"
      GithubOrg  = "wandb"
      Enviroment = "Example"
      Example    = "PublicDnsExternal"
    }
  }
}
Refer to the Terraform Official Documentation to configure the AWS provider.
Optionally, but highly recommended, add the remote backend configuration mentioned at the beginning of this documentation.
-
Create the file
variables.tfFor every option configured in the
terraform.tfvarsTerraform requires a correspondent variable declaration.variable "namespace" { type = string description = "Name prefix used for resources" } variable "domain_name" { type = string description = "Domain name used to access instance." } variable "subdomain" { type = string default = null description = "Subdomain for accessing the Weights & Biases UI." } variable "license" { type = string } variable "zone_id" { type = string description = "Domain for creating the Weights & Biases subdomain on." } variable "allowed_inbound_cidr" { description = "CIDRs allowed to access wandb-server." nullable = false type = list(string) } variable "allowed_inbound_ipv6_cidr" { description = "CIDRs allowed to access wandb-server." nullable = false type = list(string) } variable "eks_cluster_version" { description = "EKS cluster kubernetes version" nullable = false type = string }
Recommended deployment option
This is the most straightforward deployment option configuration that creates all Mandatory components and installs in the Kubernetes Cluster the latest version of W&B.
-
Create the
main.tfIn the same directory where you created the files in the
General Steps, create a filemain.tfwith the following content:module "wandb_infra" { source = "wandb/wandb/aws" version = "~>7.0" namespace = var.namespace domain_name = var.domain_name subdomain = var.subdomain zone_id = var.zone_id allowed_inbound_cidr = var.allowed_inbound_cidr allowed_inbound_ipv6_cidr = var.allowed_inbound_ipv6_cidr public_access = true external_dns = true kubernetes_public_access = true kubernetes_public_access_cidrs = ["0.0.0.0/0"] eks_cluster_version = var.eks_cluster_version } data "aws_eks_cluster" "eks_cluster_id" { name = module.wandb_infra.cluster_name } data "aws_eks_cluster_auth" "eks_cluster_auth" { name = module.wandb_infra.cluster_name } provider "kubernetes" { host = data.aws_eks_cluster.eks_cluster_id.endpoint cluster_ca_certificate = base64decode(data.aws_eks_cluster.eks_cluster_id.certificate_authority.0.data) token = data.aws_eks_cluster_auth.eks_cluster_auth.token } provider "helm" { kubernetes { host = data.aws_eks_cluster.eks_cluster_id.endpoint cluster_ca_certificate = base64decode(data.aws_eks_cluster.eks_cluster_id.certificate_authority.0.data) token = data.aws_eks_cluster_auth.eks_cluster_auth.token } } output "url" { value = module.wandb_infra.url } output "bucket" { value = module.wandb_infra.bucket_name } -
Deploy W&B
To deploy W&B, execute the following commands:
terraform init
terraform apply -var-file=terraform.tfvars
Enable REDIS
Another deployment option uses Redis to cache the SQL queries and speed up the application response when loading the metrics for the experiments.
You need to add the option create_elasticache_subnet = true to the same main.tf file described in the Recommended deployment section to enable the cache.
module "wandb_infra" {
  source  = "wandb/wandb/aws"
  version = "~>7.0"

  namespace   = var.namespace
  domain_name = var.domain_name
  subdomain   = var.subdomain
  zone_id     = var.zone_id
	**create_elasticache_subnet = true**
}
[...]
Enable message broker (queue)
Deployment option 3 consists of enabling the external message broker. This is optional because the W&B brings embedded a broker. This option doesn’t bring a performance improvement.
The AWS resource that provides the message broker is the SQS, and to enable it, you will need to add the option use_internal_queue = false to the same main.tf described in the Recommended deployment section.
module "wandb_infra" {
  source  = "wandb/wandb/aws"
  version = "~>7.0"

  namespace   = var.namespace
  domain_name = var.domain_name
  subdomain   = var.subdomain
  zone_id     = var.zone_id
  **use_internal_queue = false**

[...]
}
Other deployment options
You can combine all three deployment options adding all configurations to the same file.
The Terraform Module provides several options that can be combined along with the standard options and the minimal configuration found in Deployment - Recommended
Manual configuration
To use an Amazon S3 bucket as a file storage backend for W&B, you will need to:
- Create an Amazon S3 Bucket and Bucket Notifications
- Create SQS Queue
- Grant Permissions to Node Running W&B
you’ll need to create a bucket, along with an SQS queue configured to receive object creation notifications from that bucket. Your instance will need permissions to read from this queue.
Create an S3 Bucket and Bucket Notifications
Follow the procedure bellow to create an Amazon S3 bucket and enable bucket notifications.
- Navigate to Amazon S3 in the AWS Console.
- Select Create bucket.
- Within the Advanced settings, select Add notification within the Events section.
- Configure all object creation events to be sent to the SQS Queue you configured earlier.

Enable CORS access. Your CORS configuration should look like the following:
<?xml version="1.0" encoding="UTF-8"?>
<CORSConfiguration xmlns="http://s3.amazonaws.com/doc/2006-03-01/">
<CORSRule>
    <AllowedOrigin>http://YOUR-W&B-SERVER-IP</AllowedOrigin>
    <AllowedMethod>GET</AllowedMethod>
    <AllowedMethod>PUT</AllowedMethod>
    <AllowedHeader>*</AllowedHeader>
</CORSRule>
</CORSConfiguration>
Create an SQS Queue
Follow the procedure below to create an SQS Queue:
- Navigate to Amazon SQS in the AWS Console.
- Select Create queue.
- From the Details section, select a Standard queue type.
- Within the Access policy section, add permission to the following principals:
SendMessageReceiveMessageChangeMessageVisibilityDeleteMessageGetQueueUrl
Optionally add an advanced access policy in the Access Policy section. For example, the policy for accessing Amazon SQS with a statement is as follows:
{
    "Version" : "2012-10-17",
    "Statement" : [
      {
        "Effect" : "Allow",
        "Principal" : "*",
        "Action" : ["sqs:SendMessage"],
        "Resource" : "<sqs-queue-arn>",
        "Condition" : {
          "ArnEquals" : { "aws:SourceArn" : "<s3-bucket-arn>" }
        }
      }
    ]
}
Grant permissions to node that runs W&B
The node where W&B server is running must be configured to permit access to Amazon S3 and Amazon SQS. Depending on the type of server deployment you have opted for, you may need to add the following policy statements to your node role:
{
   "Statement":[
      {
         "Sid":"",
         "Effect":"Allow",
         "Action":"s3:*",
         "Resource":"arn:aws:s3:::<WANDB_BUCKET>"
      },
      {
         "Sid":"",
         "Effect":"Allow",
         "Action":[
            "sqs:*"
         ],
         "Resource":"arn:aws:sqs:<REGION>:<ACCOUNT>:<WANDB_QUEUE>"
      }
   ]
}
Configure W&B server
Finally, configure your W&B Server.
- Navigate to the W&B settings page at
http(s)://YOUR-W&B-SERVER-HOST/system-admin. - Enable the **Use an external file storage backend option
- Provide information about your Amazon S3 bucket, region, and Amazon SQS queue in the following format:
- File Storage Bucket:
s3://<bucket-name> - File Storage Region (AWS only):
<region> - Notification Subscription:
sqs://<queue-name>
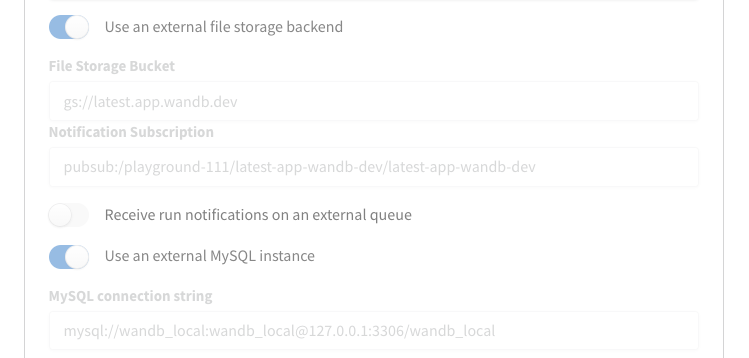
- Select Update settings to apply the new settings.
Upgrade your W&B version
Follow the steps outlined here to update W&B:
- Add
wandb_versionto your configuration in yourwandb_appmodule. Provide the version of W&B you want to upgrade to. For example, the following line specifies W&B version0.48.1:
module "wandb_app" {
    source  = "wandb/wandb/kubernetes"
    version = "~>1.0"

    license       = var.license
    wandb_version = "0.48.1"
wandb_version to the terraform.tfvars and create a variable with the same name and instead of using the literal value, use the var.wandb_version- After you update your configuration, complete the steps described in the Recommended deployment section.
Migrate to operator-based AWS Terraform modules
This section details the steps required to upgrade from pre-operator to post-operator environments using the terraform-aws-wandb module.
Before and after architecture
Previously, the W&B architecture used:
module "wandb_infra" {
  source  = "wandb/wandb/aws"
  version = "1.16.10"
  ...
}
to control the infrastructure:

and this module to deploy the W&B Server:
module "wandb_app" {
  source  = "wandb/wandb/kubernetes"
  version = "1.12.0"
}

Post-transition, the architecture uses:
module "wandb_infra" {
  source  = "wandb/wandb/aws"
  version = "4.7.2"
  ...
}
to manage both the installation of infrastructure and the W&B Server to the Kubernetes cluster, thus eliminating the need for the module "wandb_app" in post-operator.tf.

This architectural shift enables additional features (like OpenTelemetry, Prometheus, HPAs, Kafka, and image updates) without requiring manual Terraform operations by SRE/Infrastructure teams.
To commence with a base installation of the W&B Pre-Operator, ensure that post-operator.tf has a .disabled file extension and pre-operator.tf is active (that does not have a .disabled extension). Those files can be found here.
Prerequisites
Before initiating the migration process, ensure the following prerequisites are met:
- Egress: The deployment can’t be airgapped. It needs access to deploy.wandb.ai to get the latest spec for the Release Channel.
- AWS Credentials: Proper AWS credentials configured to interact with your AWS resources.
- Terraform Installed: The latest version of Terraform should be installed on your system.
- Route53 Hosted Zone: An existing Route53 hosted zone corresponding to the domain under which the application will be served.
- Pre-Operator Terraform Files: Ensure
pre-operator.tfand associated variable files likepre-operator.tfvarsare correctly set up.
Pre-Operator set up
Execute the following Terraform commands to initialize and apply the configuration for the Pre-Operator setup:
terraform init -upgrade
terraform apply -var-file=./pre-operator.tfvars
pre-operator.tf should look something like this:
namespace     = "operator-upgrade"
domain_name   = "sandbox-aws.wandb.ml"
zone_id       = "Z032246913CW32RVRY0WU"
subdomain     = "operator-upgrade"
wandb_license = "ey..."
wandb_version = "0.51.2"
The pre-operator.tf configuration calls two modules:
module "wandb_infra" {
  source  = "wandb/wandb/aws"
  version = "1.16.10"
  ...
}
This module spins up the infrastructure.
module "wandb_app" {
  source  = "wandb/wandb/kubernetes"
  version = "1.12.0"
}
This module deploys the application.
Post-Operator Setup
Make sure that pre-operator.tf has a .disabled extension, and post-operator.tf is active.
The post-operator.tfvars includes additional variables:
...
# wandb_version = "0.51.2" is now managed via the Release Channel or set in the User Spec.

# Required Operator Variables for Upgrade:
size                 = "small"
enable_dummy_dns     = true
enable_operator_alb  = true
custom_domain_filter = "sandbox-aws.wandb.ml"
Run the following commands to initialize and apply the Post-Operator configuration:
terraform init -upgrade
terraform apply -var-file=./post-operator.tfvars
The plan and apply steps will update the following resources:
actions:
  create:
    - aws_efs_backup_policy.storage_class
    - aws_efs_file_system.storage_class
    - aws_efs_mount_target.storage_class["0"]
    - aws_efs_mount_target.storage_class["1"]
    - aws_eks_addon.efs
    - aws_iam_openid_connect_provider.eks
    - aws_iam_policy.secrets_manager
    - aws_iam_role_policy_attachment.ebs_csi
    - aws_iam_role_policy_attachment.eks_efs
    - aws_iam_role_policy_attachment.node_secrets_manager
    - aws_security_group.storage_class_nfs
    - aws_security_group_rule.nfs_ingress
    - random_pet.efs
    - aws_s3_bucket_acl.file_storage
    - aws_s3_bucket_cors_configuration.file_storage
    - aws_s3_bucket_ownership_controls.file_storage
    - aws_s3_bucket_server_side_encryption_configuration.file_storage
    - helm_release.operator
    - helm_release.wandb
    - aws_cloudwatch_log_group.this[0]
    - aws_iam_policy.default
    - aws_iam_role.default
    - aws_iam_role_policy_attachment.default
    - helm_release.external_dns
    - aws_default_network_acl.this[0]
    - aws_default_route_table.default[0]
    - aws_iam_policy.default
    - aws_iam_role.default
    - aws_iam_role_policy_attachment.default
    - helm_release.aws_load_balancer_controller

  update_in_place:
    - aws_iam_policy.node_IMDSv2
    - aws_iam_policy.node_cloudwatch
    - aws_iam_policy.node_kms
    - aws_iam_policy.node_s3
    - aws_iam_policy.node_sqs
    - aws_eks_cluster.this[0]
    - aws_elasticache_replication_group.default
    - aws_rds_cluster.this[0]
    - aws_rds_cluster_instance.this["1"]
    - aws_default_security_group.this[0]
    - aws_subnet.private[0]
    - aws_subnet.private[1]
    - aws_subnet.public[0]
    - aws_subnet.public[1]
    - aws_launch_template.workers["primary"]

  destroy:
    - kubernetes_config_map.config_map
    - kubernetes_deployment.wandb
    - kubernetes_priority_class.priority
    - kubernetes_secret.secret
    - kubernetes_service.prometheus
    - kubernetes_service.service
    - random_id.snapshot_identifier[0]

  replace:
    - aws_autoscaling_attachment.autoscaling_attachment["primary"]
    - aws_route53_record.alb
    - aws_eks_node_group.workers["primary"]
You should see something like this:

Note that in post-operator.tf, there is a single:
module "wandb_infra" {
  source  = "wandb/wandb/aws"
  version = "4.7.2"
  ...
}
Changes in the post-operator configuration:
- Update Required Providers: Change
required_providers.aws.versionfrom3.6to4.0for provider compatibility. - DNS and Load Balancer Configuration: Integrate
enable_dummy_dnsandenable_operator_albto manage DNS records and AWS Load Balancer setup through an Ingress. - License and Size Configuration: Transfer the
licenseandsizeparameters directly to thewandb_inframodule to match new operational requirements. - Custom Domain Handling: If necessary, use
custom_domain_filterto troubleshoot DNS issues by checking the External DNS pod logs within thekube-systemnamespace. - Helm Provider Configuration: Enable and configure the Helm provider to manage Kubernetes resources effectively:
provider "helm" {
  kubernetes {
    host                   = data.aws_eks_cluster.app_cluster.endpoint
    cluster_ca_certificate = base64decode(data.aws_eks_cluster.app_cluster.certificate_authority[0].data)
    token                  = data.aws_eks_cluster_auth.app_cluster.token
    exec {
      api_version = "client.authentication.k8s.io/v1beta1"
      args        = ["eks", "get-token", "--cluster-name", data.aws_eks_cluster.app_cluster.name]
      command     = "aws"
    }
  }
}
This comprehensive setup ensures a smooth transition from the Pre-Operator to the Post-Operator configuration, leveraging new efficiencies and capabilities enabled by the operator model.
Feedback
Was this page helpful?
Glad to hear it! If you have further feedback, please let us know.
Sorry to hear that. Please tell us how we can improve.